Function of the Base of a Microscope: Support, Stability and Light Explained
What Is the Function of the Base of a Microscope?
The base of a microscope supports the whole instrument, keeps it stable, and on most modern compound models houses the light source that illuminates the specimen. It is the heavy foundation that every other part depends on.
It is easy to overlook. The lenses get the attention, yet a wobbly or poorly lit microscope is frustrating to use, however good its optics are.
This guide explains what the base does, how it works with the arm, stage, condenser and diaphragm, which types exist, and how to handle and choose one. It suits students, teachers, parents and lab or procurement staff alike.
What Is the Base of a Microscope?
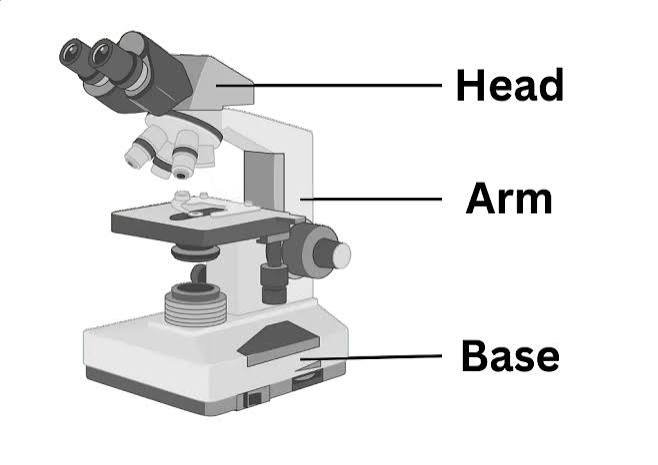
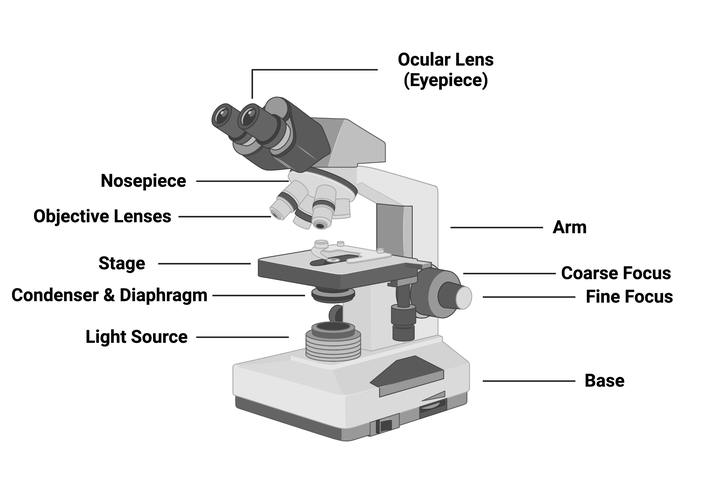
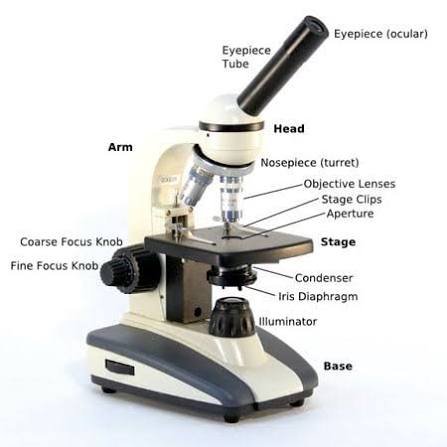
The base, also called the foot or stand, is the lowest and widest part of a microscope. It rests on the bench and carries the arm, which in turn holds the stage, nosepiece, objective lenses and eyepiece.
Most bases are deliberately heavy. Laboratory models are usually cast metal, while beginner and classroom models often use hard plastic or a metal-plastic mix. Rubber feet on the underside help the instrument grip the surface.
On a diagram, the base is the bottom block. If a question asks you to label the part that supports the microscope or contains the light, this is the answer.
The Main Functions of a Microscope Base
The base does more than hold things up. Its jobs fall into six groups.
1. Supports the whole instrument
Every other component is carried by the base, directly or through the arm. It takes the full weight of the optics, stage and focusing mechanism.
2. Keeps the microscope stable
A broad, heavy base lowers the center of gravity so the microscope does not tip. At high magnification, even a small shake looks like a large jump in the field of view, so stability directly affects what you can see.
3. Anchors the arm and keeps the optics aligned
The arm connects to the base, and some designs add a pillar for extra support. This fixed connection holds the eyepiece, objectives and stage in correct alignment with each other.
4. Houses the illuminator
On most compound light microscopes, the base contains the illuminator, usually an LED or a halogen lamp. Light travels upward from the base through the condenser and iris diaphragm, then through the specimen on the stage.
Older or very basic models use a mirror instead. The mirror reflects room light or a separate lamp up toward the specimen.
5. Holds the electronics and controls
Many bases contain the power switch, the brightness control (often a rheostat dial), wiring and the connection for the power cord or batteries. Some also carry a field diaphragm used for Köhler illumination.
Where lamps run hot, better designs separate the lighting components from the electronics and manage heat inside the base, so the instrument stays reliable over long sessions.
6. Dampens vibration
Weight and rubber feet absorb small vibrations from foot traffic, doors and nearby equipment. In busy classrooms and shared labs, this is often the difference between a steady image and a shimmering one.
How the Base Fits Into the Light Path
The base is where the light path begins. Understanding this makes the other parts easier to remember.
- The illuminator in the base produces light.
- The light rises to the condenser, which gathers and focuses it.
- The iris diaphragm adjusts how much light passes through, which changes brightness and contrast.
- Light passes through the specimen on the stage.
- The objective lens forms the first magnified image.
- The eyepiece magnifies it again for your eye.
If the light from the base is weak, uneven or flickering, every later step suffers. Good viewing starts at the bottom of the microscope.
Base vs. Arm vs. Stage
These three parts are often confused, especially in exams. This table separates them.
| Part | Where it is | Main job | Carrying role |
| Base | Bottom | Supports the instrument, gives stability, usually holds the light | Hold from underneath |
| Arm | Rises from the base | Connects the base to the head and optics | Hold with one hand |
| Stage | Mid-level platform | Holds the slide | Never carry by the stage |
A simple memory trick: the base is the bottom support, the arm is the handle, and the stage is the shelf for the slide.
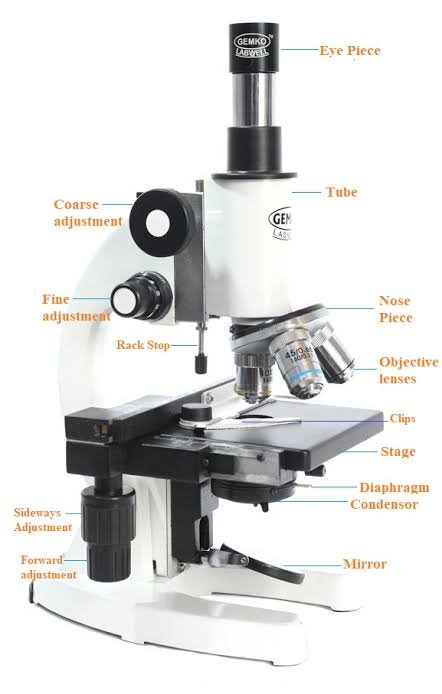
Types of Microscope Bases
Base shape changes how stable, portable and serviceable a microscope is.
| Base type | Shape | Typical use | Notes |
| Horseshoe (U-shaped) | Open curved foot | Older student and lab models | Stable; often paired with a mirror |
| Y-shaped or tripod | Three-point foot | Classic compound and some stereo models | Steady on slightly uneven benches |
| Rectangular block | Solid box | Modern LED compound microscopes | Houses illuminator and electronics |
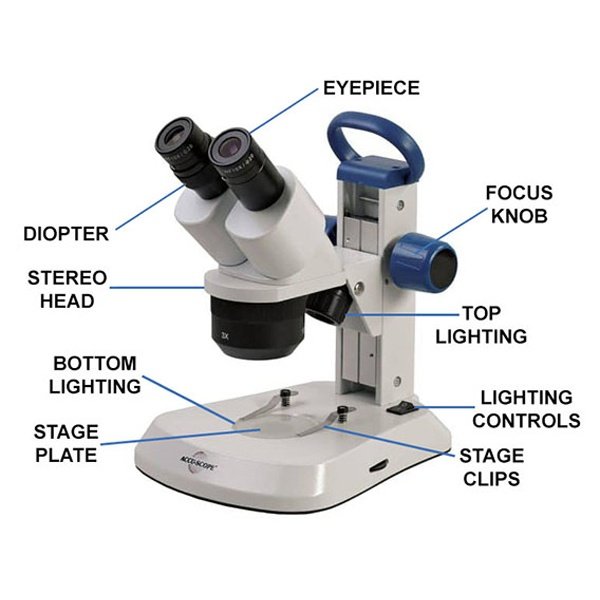
| Pillar stand with plate | Wide plate with vertical post | Stereo (dissecting) microscopes | Often supports a stage plate and lighting options |
| Compact portable base | Small and light | Pocket and handheld models | Favors portability over stability |
Some designs add practical features, such as a rotating base for easier positioning or a folding base for portability.
How the Base Differs by Microscope Type
Compound light microscopes
The base nearly always holds the transmitted light source and brightness control. It also carries most of the weight, which is why these bases are the heaviest part.
Stereo (dissecting) microscopes
The base often works as a stand with a stage plate. Lighting may come from below, from above through a separate lamp, or both.
Inverted microscopes
The layout is reversed. The light source sits above the specimen and the objectives sit below it, so the base carries the optics instead of the lamp. This is common in cell culture work.
Digital and portable microscopes
The base can be a simple weighted stand, with a camera and screen handling the viewing. Handheld models trade a heavy base for portability, so expect more movement at high magnification.
Mirror vs. Built-In Illuminator
The light source in or on the base is one of the biggest differences between older and newer instruments.
| Feature | Mirror | Built-in LED or halogen |
| Needs electricity | No | Yes (mains or battery) |
| Light consistency | Depends on room light | Steady and adjustable |
| Brightness control | Limited | Dial or switch |
| Heat | None | Halogen runs hot; LED stays cooler |
| Best for | Basic or field use | Classrooms, labs, regular use |
If you use a mirror, never aim it at direct sunlight. Concentrated sunlight through a microscope can damage your eyes.
Practical User Experience
In everyday bench use, the base is the part you notice only when something is wrong. A solid base feels planted: turning the focus knobs does not shift the whole instrument, and tapping the bench does not make the image shimmer at higher magnification.
A lighter plastic base behaves differently. It is easier to move between desks, but at the highest magnification the image can drift slightly when the focus knob is turned or the table is bumped.
The light inside the base also shapes the session. A dial that starts low and rises smoothly makes it easier to find the right brightness. A lamp that flickers or a loose switch makes viewing tiring quickly.
A few habits make handling easier. Check that all feet sit flat before you begin. Switch on at the lowest brightness. Carry the microscope with one hand on the arm and one hand under the base, and let a halogen lamp cool before you pack it away.
Overall, the base rarely gets praised when it works. A heavy, well-footed base with a reliable light makes everything else easier, while a light or loose one is the first thing to cause frustration.
How to Choose a Microscope With a Good Base
Use these questions to match the base to the job.
- Who will use it? Classrooms and children benefit from a heavy, rubber-footed base that survives bumps.
- What magnification will you use? Higher magnification demands a steadier base.
- Do you need a built-in light? If so, look for an LED illuminator with a brightness dial.
- Will you move it often? A compact base is easier to carry, but it will be less stable.
- Is it for professional or clinical work? Look for a metal base, a proven light source and available service and spare parts.
Metal base: better stability, vibration control and longevity, but heavier and usually more expensive.
Plastic base: lighter and cheaper, and fine for basic learning at low magnification, but more prone to wobble and cracking under heavy daily use.
Prices vary widely by brand, region and specification, so compare current listings from reputable suppliers rather than relying on a fixed figure.
How to Carry and Care for the Base
Carrying a microscope safely
- Grip the arm firmly with one hand.
- Support the base from underneath with the other hand.
- Keep the microscope upright.
- Set it down gently on a flat, dry surface.
Care checklist
- Unplug before cleaning.
- Wipe the base with a soft, slightly damp cloth and dry it.
- Keep liquids, stains and water away from the base, since electronics sit inside.
- Check the cord for fraying and the plug for damage.
- Replace the lamp or LED module only with the type the manufacturer recommends.
- Cover the microscope when it is not in use.
Safety warnings
- Never open the base while it is plugged in.
- Halogen lamps get hot. Let them cool before touching or storing.
- Do not aim a mirror at direct sunlight.
- Follow your institution’s lab rules and the manufacturer’s manual for servicing and electrical safety.
Common Problems and Fixes
| Problem | Likely cause | What to try |
| No light | Power off, loose cord, blown lamp or fuse | Check the switch and cord, then replace the lamp or LED module |
| Dim or flickering light | Low brightness setting, aging lamp, loose contact | Raise brightness, inspect the connection, replace the lamp |
| Microscope wobbles | Uneven bench or worn feet | Move to a flat surface, replace rubber feet |
| Image drifts while focusing | Loose arm-to-base joint | Do not force it; seek servicing |
| Uneven lighting | Misaligned lamp or dirty optics | Clean the optics, check lamp position, adjust the condenser |
Regional Notes for Buyers and Labs
Electrical standards differ around the world. Many regions use mains power of roughly 110 to 120 V, while others use roughly 220 to 240 V, so check the rating label on the base before plugging in.
Suppliers include educational equipment dealers, scientific distributors and manufacturer-authorized resellers. Spare lamps, LED modules and feet are easier to find for well-known brands, and a model with local service support can save weeks of downtime.
Institutions often buy through approved supplier lists or tenders, so confirm requirements before ordering.
Frequently Asked Questions
1.What is the function of the base of a microscope?
The base supports the microscope, keeps it stable, anchors the arm and, on most compound models, contains the light source that illuminates the specimen.
2.Why is the base of a microscope heavy?
The weight lowers the center of gravity, prevents tipping and absorbs vibration. This keeps the image steady, especially at high magnification.
3.What is the difference between the base and the arm of a microscope?
The base is the bottom support and usually holds the light. The arm rises from it, connects to the optical head and acts as the carrying handle.
4.Where is the light on a microscope?
On most compound microscopes, the light is in the base, under the stage, shining upward through the condenser. Basic models use a mirror instead.
5.How do you hold a microscope properly?
Hold the arm with one hand and support the base from underneath with the other, and keep the microscope upright.
6.Can a microscope work without a base?
Not in practice. Without a base, the instrument would be unstable and the optical parts could not stay aligned.
7.Is the light source always in the base?
No. Many compound microscopes have it there, but stereo microscopes may use overhead or external lighting, and inverted microscopes place the light above the specimen.
8.Why do microscopes have rubber feet?
Rubber feet grip the bench, prevent sliding and absorb small vibrations so the image stays steady.
Conclusion
The base is the quiet foundation of every microscope. It supports the instrument, steadies the image and, on most compound models, supplies the light that makes viewing possible.
When you handle a microscope, hold the arm and base together, check the feet and light before you begin, and keep the base clean and dry. When you buy one, match the base to the user and the magnification, favoring weight and a reliable illuminator for regular use.
Get the base right, and everything built on top of it works better.
Unfulfilled Points: A named expert reviewer or byline and direct citations to specific manufacturer manuals could not be included, because no verified author or source documents were provided. Exact pricing was left general for the same reason.
These information are gathered from different surveys, medical tests and tech giants like Techradar and more. Our top priority is to provide you valuable information about Function of the Base of a Microscope
For More Details About Different Digital Microscopes Click Here