What Is a Microscope?
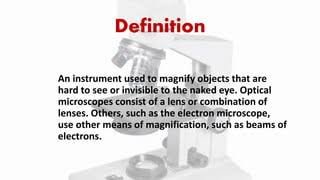
A microscope is an instrument that magnifies objects too small for the naked eye and reveals fine detail, such as cells, microbes and crystal structure. It does this by bending light, or by using beams of electrons, to produce an enlarged image.
That is the definition you can write in an exam answer or copy into a class worksheet. For a younger learner, it can be shortened further: a microscope is a tool that makes very small things look big enough to see clearly.
The word comes from the Greek mikros (small) and skopein (to look at). The image a microscope produces, especially when photographed, is called a micrograph.
Magnification and resolution: the two ideas inside the definition
Every good definition of a microscope rests on two ideas. Magnification is how many times larger the object appears. Resolution is how clearly two nearby points are seen as separate.
The difference matters. A microscope that magnifies a lot but resolves little gives you a bigger blur, not more information. This is the most common confusion among students and first-time buyers, and it explains why “2000x” claims on cheap models are so misleading.
Why the Microscope Matters
The unaided human eye can only separate details down to roughly a tenth of a millimetre. Anything finer needs help. A microscope extends that limit by orders of magnitude, which is why so much of modern science depends on it.
Here is where it makes the biggest difference:
- Medicine: examining blood smears, identifying bacteria and studying tissue samples in pathology.
- Biology: cell theory itself grew out of microscope observation.
- Education: it is often a student’s first hands-on scientific instrument.
- Materials science and industry: inspecting metals, coatings and circuit boards.
- Forensics: comparing fibres, hair, paint and tool marks.
- Agriculture and environment: identifying plankton, pollen, soil microbes and plant diseases.
In short, a microscope has three core jobs: it magnifies, it resolves detail, and it creates contrast so that the specimen stands out from its background.
Who Uses a Microscope and When
You need a microscope whenever the detail you care about is smaller than about 0.2 mm. Different people need very different instruments.
| User | Typical need | Common choice |
| Primary and secondary students | Onion skin, pond water, basic cells | Entry compound or stereo microscope |
| Teachers and schools | Durable, multi-student use | Compound microscope with LED light |
| Hobbyists | Insects, coins, minerals, crafts | Stereo or digital microscope |
| Clinical and research labs | Cells, bacteria, tissue | Advanced compound, phase contrast, fluorescence |
| Electronics and repair technicians | Soldering and inspection | Stereo or digital inspection scope |
| Materials scientists | Surface and grain structure | Metallurgical, SEM, AFM |
How a Microscope Works
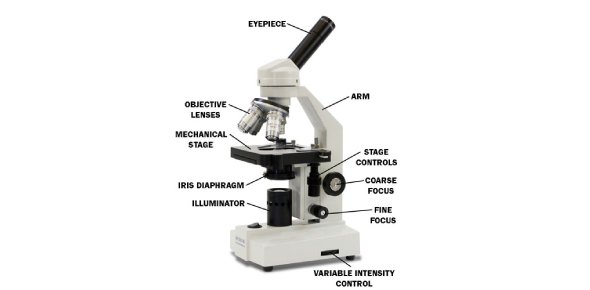
Most people picture the compound light microscope, so let’s start there. It uses two lens systems working together.
- Light source: an LED or halogen lamp (or a mirror) sends light up through the specimen.
- Condenser: gathers the light and focuses it onto the slide.
- Objective lens: collects light from the specimen and forms the first magnified image.
- Eyepiece (ocular): magnifies that image again for your eye or a camera.
- Focus knobs: move the stage or head until the image is sharp.
Total magnification is simple to calculate: multiply the objective power by the eyepiece power. A 40× objective with a 10× eyepiece gives 400×.
Why light microscopes have a limit
Light has a wavelength, and that sets a physical ceiling on detail. Ernst Abbe described this in the 1870s as the diffraction limit. For visible light, it works out to roughly 200 nanometres of resolution.
This is why magnifying a light microscope image far beyond about 1,000× to 1,500× adds size but no new information. That is called empty magnification.
How electron microscopes break the limit
Electron microscopes replace light with a beam of electrons and use magnetic lenses to focus it. Electrons have a far shorter wavelength than visible light, so they resolve much finer detail. This is why viruses and the inner structure of cells are studied with electron microscopes rather than ordinary classroom ones.
Main Parts of a Microscope
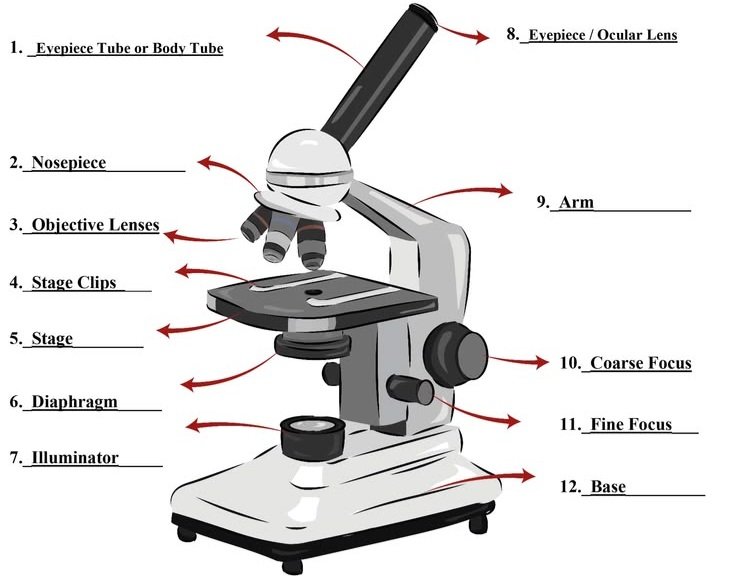
Knowing the parts helps with homework, with labeling diagrams and with buying decisions.
Optical parts
- Eyepiece (ocular lens): the lens you look through, commonly 10×.
- Objective lenses: usually 4×, 10×, 40× and 100× (oil immersion).
- Condenser: focuses light onto the specimen.
- Diaphragm (iris): controls light intensity and contrast.
- Light source or mirror: illuminates the slide.
Mechanical parts
- Head (body tube): houses the optics.
- Nosepiece (revolving turret): rotates objectives into position.
- Arm: supports the head and is the correct carrying handle.
- Stage and stage clips: hold the slide in place.
- Coarse focus knob: large, quick focusing, used only at low power.
- Fine focus knob: precise final focusing.
- Base: the stable foundation, often with the lamp inside.
A few terms worth knowing
- Numerical aperture (NA): a number showing how much light an objective gathers. Higher NA means better resolution.
- Parfocal: when you switch objectives, the image stays roughly in focus.
- Working distance: the space between the objective and the slide.
- Field of view: the area you can see at once; it shrinks as magnification rises.
- Depth of field: how much of the specimen’s thickness is in focus at the same time.
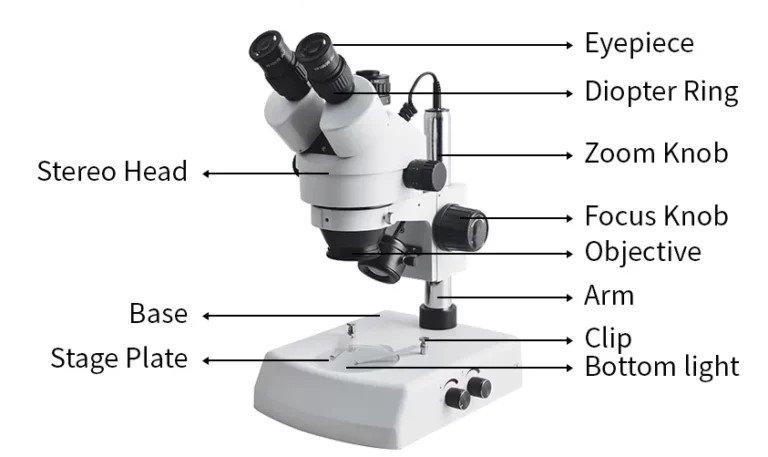
Types of Microscopes
The right type depends on what you want to see. Here is a clear comparison.
| Type | How it works | Best for |
| Simple microscope | One magnifying lens | Hand lens, jeweller’s loupe |
| Compound light microscope | Objective plus eyepiece | Cells, bacteria, school labs |
| Stereo (dissecting) microscope | Two optical paths, 3D view | Insects, circuit boards, dissection |
| Phase contrast microscope | Turns phase shifts into contrast | Living, unstained cells |
| Darkfield microscope | Scattered light on a dark background | Fine, unstained microorganisms |
| Fluorescence microscope | Fluorescent dyes or proteins | Immunology, cell biology |
| Confocal microscope | Pinhole blocks out-of-focus light | Sharp 3D cell imaging |
| Digital microscope | Camera sensor and screen | Inspection, sharing images |
| Transmission electron microscope (TEM) | Electrons pass through a thin sample | Viruses, organelle structure |
| Scanning electron microscope (SEM) | Electrons scan a surface | Materials, insects, fracture surfaces |
| Scanning probe (AFM, STM) | A sharp tip senses the surface | Atomic-scale surface detail |
Simple vs compound microscope
A simple microscope uses a single lens, like a magnifying glass, and offers modest magnification. A compound microscope combines at least two lens systems and reaches far higher power. When most people say “microscope,” they mean the compound type.
Compound vs stereo microscope
Choose a compound microscope for thin, transparent samples on slides, such as cells and bacteria. Choose a stereo microscope for solid, whole objects like coins, insects or circuit boards, where a 3D view and long working distance help.
Light vs electron microscope
Light microscopes are affordable, work with living samples and fit on a desk. Electron microscopes deliver vastly better resolution but need vacuum conditions, specialist training and an institutional budget.
A Short History of the Microscope
The story begins in the Netherlands in the late 1500s and early 1600s, where spectacle makers built early compound microscopes. Credit is often given to Zacharias Janssen or Hans Lippershey, but historians still debate who came first, so it is safest to say the invention was not clearly one person’s.
The instrument became a scientific tool in the 17th century:
- 1665: Robert Hooke published Micrographia, with detailed drawings from his observations. He used the word “cell” after looking at cork.
- 1670s: Antonie van Leeuwenhoek used single-lens microscopes to observe bacteria and protozoa, and his findings were shared with the Royal Society.
- 1873: Ernst Abbe published his theory of resolution, guiding modern lens design.
- 1893: August Köhler introduced Köhler illumination, still the standard for even, high-contrast lighting.
- 1930s: Frits Zernike developed phase contrast, work recognised with the 1953 Nobel Prize in Physics.
- 1931: Ernst Ruska and Max Knoll built the first electron microscope.
- 1980s: Gerd Binnig and Heinrich Rohrer developed the scanning tunnelling microscope, which opened up atomic-scale imaging.
How to Use a Compound Microscope
Good technique protects both the slide and the lens. Follow these steps:
- Carry the microscope with one hand on the arm and the other under the base.
- Plug it in, switch on the light and turn the nosepiece to the lowest power objective (usually 4×).
- Place the slide on the stage and secure it with the clips.
- Look from the side and use the coarse knob to bring the stage close without touching the slide.
- Look through the eyepiece and focus slowly with the coarse knob.
- Sharpen the image with the fine focus knob.
- Adjust the diaphragm for the best contrast.
- Centre what you want to see, then move to 10× and 40×, using only the fine knob.
- Use the 100× oil immersion objective only with immersion oil and a suitable objective.
- When finished, return to the lowest power, lower the stage, remove the slide and cover the microscope.
If your image is blurry, the usual causes are a dirty lens, too little light, a slide placed upside down or starting at too high a power.
How to Choose a Microscope
If you are buying, start with the task, not the magnification number.
Step 1: Define the job
- Cells, microbes, blood or pond water: compound microscope.
- Whole objects, insects, coins, circuits: stereo microscope.
- Sharing images or documenting work: a model with a camera, or a digital microscope.
- Viruses or nanometre detail: an electron microscope, available through universities and research facilities rather than as a personal purchase.
Step 2: Match the specifications
| Factor | Beginner or child | Student or school | Lab or professional |
| Magnification | 40×–400× | 40×–1000× | 40×–1000× or more |
| Optics | Glass lenses | Glass, achromatic | Plan achromat or apochromat, high NA |
| Light | LED | Adjustable LED | Köhler-capable LED |
| Build | Metal frame preferred | Metal frame | Modular and upgradeable |
| Camera | Optional | Optional | Often trinocular |
Step 3: Watch for warning signs
- Plastic lenses and “2000×” claims on a very cheap model usually mean empty magnification.
- A wobbly base or plastic stage will frustrate you quickly.
- No warranty or spare parts makes repairs difficult.
Established optics makers such as Zeiss, Leica, Olympus (now Evident) and Nikon are known for research-grade instruments, and many other manufacturers supply good school-level models. Compare reviews and warranty terms rather than relying on a brand name alone.
Approximate price ranges
Prices vary widely by country, brand and year, so treat these as broad tiers, not quotes.
| Tier | Typical buyer | Approximate range (USD) |
| Toy or entry | Young children | Roughly 20 to 60 |
| Student compound | Schools, teens | Roughly 100 to 400 |
| Advanced compound or stereo | Labs, serious hobbyists | Roughly 400 to 2,000 |
| Research grade (phase, fluorescence) | Research labs | Several thousand and up |
| Electron microscope | Institutions | Hundreds of thousands to millions |
Buying tips for different regions
The definition is universal, but availability is not. Searching for “microscope shops near me” or “lab equipment suppliers” will usually turn up scientific distributors in larger cities. Before buying, check the voltage and plug type for your country, whether spare bulbs and objectives are available, and what after-sales service the seller offers.
Common Mistakes and Safety Warnings
- Chasing magnification: a sharp 400× image beats a blurry 1,500× one.
- Using the coarse knob at high power: this can crack slides and damage the objective.
- Touching lenses with fingers or tissue: use lens paper and an approved cleaner.
- Getting oil on dry objectives: immersion oil belongs only on the oil objective.
- Skipping staining: transparent cells can look empty without contrast. Methylene blue, iodine and Gram stain are common choices.
- Aiming a mirror at the sun: never do this; it can cause serious eye damage.
- Ignoring basic safety: handle glass slides carefully, use stains and oils as directed, and keep lamps and cords in good condition.
Alternatives to a Microscope
You do not always need a full microscope.
- Magnifying glass or loupe: a low-cost choice for roughly 5× to 20× viewing.
- Smartphone clip-on lens: portable and convenient for quick macro images.
- Digital inspection camera: useful for repair work and screen-based viewing.
- Virtual microscopy: online slide libraries are helpful when equipment is limited.
- University or lab access: the practical route to confocal or electron imaging.
Caring for Your Microscope
A well-kept microscope lasts for decades. Keep these habits:
- Carry it with two hands, one on the arm and one on the base.
- Always begin and end at the lowest power.
- Clean lenses only with lens paper.
- Wipe oil from the 100× objective after each use.
- Switch off the lamp and cover the microscope after use.
- Store it somewhere dry and dust-free, and add silica gel in humid climates, where fungus can grow on lenses.
- Have it serviced if focus drifts or the optics fog.
Practical User Experience
For a first-time user, the first thing that stands out is how much the objective lenses control the whole experience. Starting at 4× makes finding the specimen easy, and the nosepiece lets you step up to 10× and 40× without losing the image completely. Since the objectives are parfocal, only a small fine-focus adjustment is usually needed after switching.
The LED light and the diaphragm make a noticeable difference. Adjusting the diaphragm gave clearer contrast on transparent samples, so the image felt less washed out. The mechanical stage also helps, because moving a slide by hand at higher power is fiddly.
The learning curve shows up with focus. The coarse and fine knobs look similar at first, and the field of view shrinks quickly as magnification rises, so it is easy to lose the sample. Patience helps: centre the specimen before increasing power and make small, slow adjustments.
For longer sessions, a stable base and a metal frame feel more comfortable than lighter builds, and a comfortable eyepiece position matters more than I expected. Oil immersion at 100× is the most demanding step and takes extra care.
The limits are real. A light microscope does not show everything, and pushing past roughly 1,000× adds size rather than detail. Viruses are out of reach without an electron microscope.
Overall, it feels approachable once the basic parts make sense. It rewards slow, careful use, and its detail has a clear ceiling
Frequently Asked Questions
1.What is the simple definition of a microscope?
A microscope is a tool that makes very small things look bigger so you can see them clearly. It is an optical or electronic instrument used to study objects too small for the naked eye.
2.Who invented the microscope?
No single inventor is certain. Dutch spectacle makers of the late 1500s and early 1600s are credited, often with Zacharias Janssen or Hans Lippershey. Robert Hooke and Antonie van Leeuwenhoek later turned it into a serious scientific instrument.
3.What are the three main functions of a microscope?
It magnifies the specimen, resolves fine detail so close points look separate, and improves contrast so the specimen stands out from its background.
4.What is the difference between a microscope and a telescope?
A microscope magnifies very small objects that are close by. A telescope magnifies large objects that are far away.
5.Can a microscope see viruses or atoms?
Most viruses are too small for a standard light microscope, so electron microscopes are used. Scanning probe instruments such as STM and AFM can map surfaces at atomic scale, though they do not produce a photograph-like view.
6.How do you calculate total magnification?
Multiply the objective lens power by the eyepiece power. A 10× eyepiece with a 40× objective gives 400×.
7.Is a microscope an optical instrument?
Light microscopes are optical instruments because they use lenses and visible light. Electron and probe microscopes work on different principles, so “optical” does not cover every type.
8.What is a micrograph?
A micrograph is an image or photograph taken through a microscope. Light micrographs, electron micrographs and digital captures are all common.
9.What is the best microscope for beginners?
A compound microscope with glass optics, LED lighting and a metal frame is a sound starting point. A range of 40× to 400×, or up to 1000× for older students, is plenty for most beginners.
Conclusion
A microscope is an instrument that magnifies and resolves what the naked eye cannot see, opening up the world of cells, microbes and materials. The definition is short, but the details behind it, from resolution and numerical aperture to the difference between light and electron types, are what make the instrument genuinely useful.
If you are studying, memorise the one-sentence definition, the magnification formula and the main parts. If you are buying, match the type to your task, favour optical quality and build over big magnification claims, and check warranty and local service before you pay. And whichever route you take, start at low power, focus slowly and keep your lenses clean.
Unfulfilled Points: The author byline and reviewer credit, a last-reviewed date and an original labeled diagram need to be added by the publisher, as they cannot be created within plain article text.
These information are gathered from different surveys, medical tests and tech giants like Techradar and more. Our top priority is to provide you valuable information about Definition of the Microscope .
For More Details About Different Digital Microscopes Click Here