Compound Light Microscope Parts and Functions: Complete Guide with Table
What Is a Compound Light Microscope?
A compound light microscope uses visible light and two sets of lenses, the objective and the eyepiece, to magnify thin, translucent specimens. It typically reaches up to about 1000x, enough to see cells, protozoa and, with oil immersion, bacteria.
It is the workhorse of school science rooms, clinical labs and university biology courses. It is also a popular choice for hobbyists and homeschool families.
Knowing the parts is not just exam material. It tells you how to focus without damaging a slide, how to fix a dim image and what to look for if you are buying one.
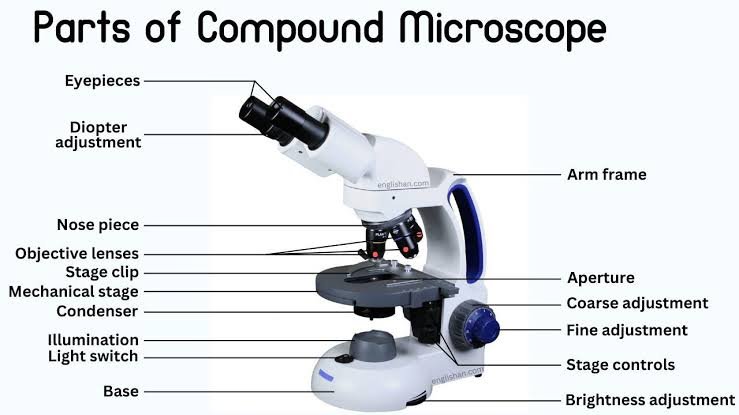
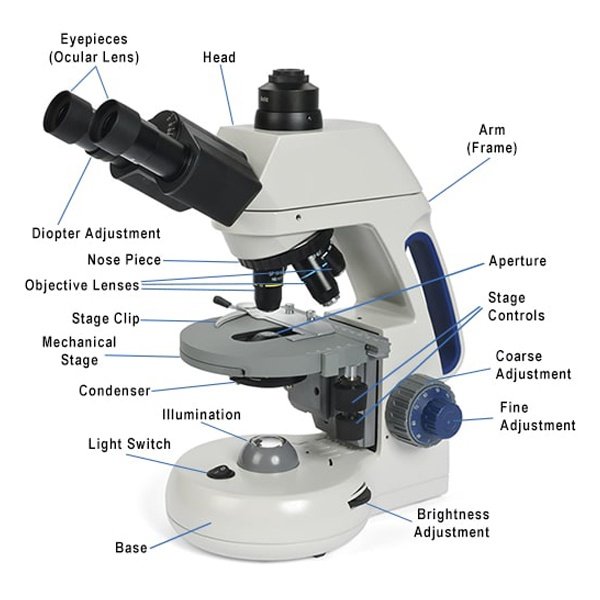
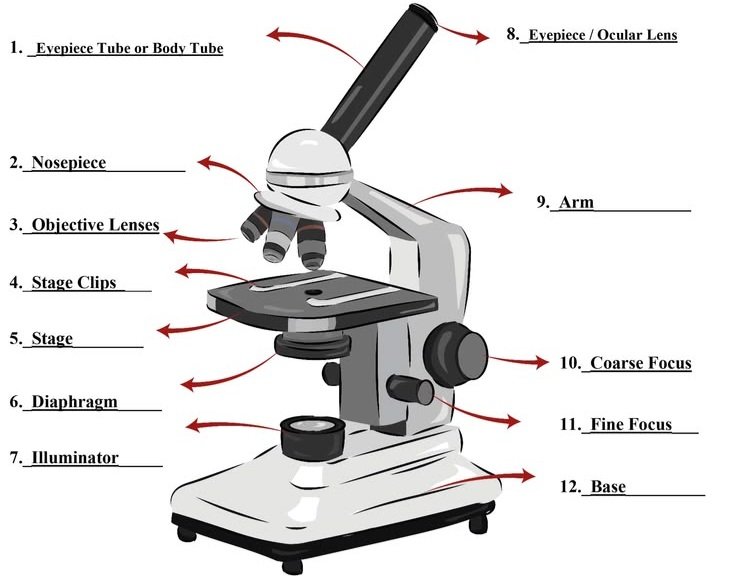
The 14 Main Parts at a Glance
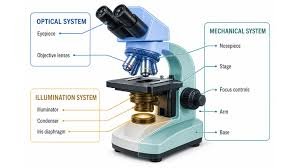
Different sources count 12, 13 or 15 parts, mostly because they combine or split items like the head and body tube. This guide uses 14 and groups them into three systems: optical, mechanical and illumination.
| # | Part | System | What it does |
| 1 | Eyepiece (ocular lens) | Optical | Magnifies the image a second time, usually 10x |
| 2 | Objective lenses | Optical | Provide the main magnification (4x, 10x, 40x, 100x) |
| 3 | Condenser | Optical | Gathers and focuses light onto the specimen |
| 4 | Head (body tube) | Mechanical | Holds the eyepiece and aligns it with the objective |
| 5 | Revolving nosepiece (turret) | Mechanical | Holds the objectives and rotates them into place |
| 6 | Arm | Mechanical | Connects head to base; the carrying handle |
| 7 | Base | Mechanical | Stabilizes the microscope and often houses the light |
| 8 | Stage | Mechanical | Supports the slide |
| 9 | Stage clips or mechanical stage | Mechanical | Hold the slide; a mechanical stage moves it precisely |
| 10 | Coarse focus knob | Mechanical | Large, fast focus adjustment at low power |
| 11 | Fine focus knob | Mechanical | Small adjustments for sharp detail |
| 12 | Iris diaphragm | Illumination | Controls light amount, contrast and depth of field |
| 13 | Illuminator (light source) | Illumination | LED or halogen lamp, or a mirror on older scopes |
| 14 | Light intensity control | Illumination | Adjusts brightness without changing contrast |
The Optical Parts
These parts shape the image itself.
Eyepiece (Ocular Lens)
The eyepiece is the lens you look through. Most student and lab scopes use 10x, though 5x, 15x and 20x versions exist.
Monocular models have one eyepiece. Binocular heads have two, which reduces eye strain during long sessions. Trinocular heads add a port for a camera.
Wide-field eyepieces show a larger area. High-eyepoint versions are friendlier if you wear glasses.
Objective Lenses
Objectives sit on the nosepiece, close to the slide, and do the heavy optical work. A standard set looks like this:
- 4x scanning objective: finds the specimen and gives an overview
- 10x low-power objective: good for tissue layout and larger organisms
- 40x high-power objective: shows individual cells and internal structures
- 100x oil immersion objective: resolves bacteria and fine detail, and requires immersion oil
Most objectives are parfocal, meaning the image stays roughly in focus when you switch lenses. Many are also parcentric, meaning the specimen stays roughly centered.
How to Read the Markings on an Objective
The numbers engraved on the barrel tell you a lot. A typical label might read 40x/0.65 160/0.17.
- 40x is the magnification.
- 0.65 is the numerical aperture (NA), a measure of how much light the lens gathers. Higher NA means better resolution and a brighter image.
- 160 is the mechanical tube length in millimeters for older finite-tube designs. Some modern objectives show an infinity symbol instead.
- 0.17 is the cover glass thickness, in millimeters, the lens is designed for.
An “oil” marking means the lens must be used with immersion oil. Never use oil on a dry objective.
Objective Types: Achromatic, Plan and Beyond
Achromatic objectives, common on student scopes, correct color for two wavelengths. Plan achromatic objectives also flatten the field so the whole view stays sharp.
Apochromatic objectives, found on research instruments, correct color even more precisely. For most learners, a good achromatic set is plenty.
Condenser
The condenser sits below the stage and focuses light into a cone that fills the objective. Many basic scopes use an Abbe condenser, named after Ernst Abbe, who contributed heavily to modern microscope optics.
Without a properly set condenser, high-power images look dim and flat.
The Mechanical Parts
These parts support, position and focus everything else.
Head, Arm and Base
The head holds the eyepiece tube or tubes. Some rotate 360 degrees, which helps when several people share one scope.
The arm joins the head to the base. When you move the microscope, hold the arm with one hand and support the base with the other.
The base provides weight and stability. It often contains the LED or halogen lamp and the power circuitry.
Revolving Nosepiece
The nosepiece, also called the turret, holds three to five objectives. Rotate it by gripping the ring, not by pushing on a lens.
Stage and Stage Clips
The stage is the flat platform that holds the slide. Simple stages use two spring clips.
A mechanical stage adds two knobs that move the slide smoothly left-right and forward-back. At 400x and above, where tiny movements shift the view dramatically, it makes a real difference.
Coarse and Fine Focus
The coarse knob moves the stage or head in large steps. Use it only with the 4x or 10x objective.
The fine knob makes small corrections. At 40x and 100x, it should be the only focus knob you touch.
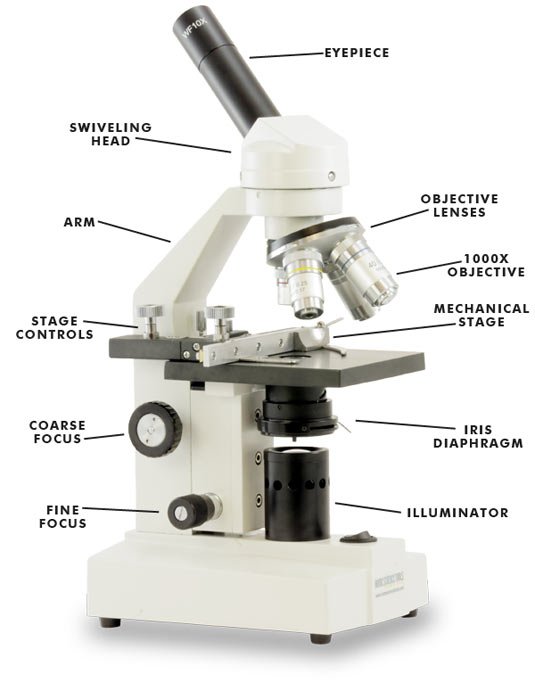
The Illumination Parts
These parts control the light that makes the specimen visible.
Illuminator
Most modern compound microscopes use LED illumination. LEDs run cool, last a long time and use little power. Halogen lamps give a warm, bright light and are still found on some lab models. Older or very basic scopes use a mirror that reflects room light upward.
Iris Diaphragm
The iris diaphragm works like the pupil of an eye. Opening it admits more light. Closing it increases contrast and depth of field.
A common beginner mistake is adjusting brightness alone when the diaphragm would have improved the image more.
Condenser vs Diaphragm: What Is the Difference?
The condenser focuses light. The diaphragm controls how much of that light, and at what angle, reaches the specimen. They work together, but they are separate adjustments.
Light Intensity Control
This dial changes lamp brightness without changing contrast. Use it alongside the diaphragm, not instead of it.
How the Parts Work Together: The Light Path
Light follows a predictable path through the microscope:
- The illuminator produces light.
- The condenser gathers and focuses it.
- The iris diaphragm shapes the amount and angle of light.
- Light passes through the specimen on the stage.
- The objective lens collects it and forms a magnified primary image.
- The eyepiece magnifies that image again for your eye or camera.
If any link in this chain is off, the image suffers. A dirty objective, a misadjusted condenser or a nearly closed diaphragm each cause a different problem.
Total Magnification and Its Limits
Total magnification = eyepiece magnification × objective magnification.
| Objective | With 10x eyepiece | Typical use |
| 4x | 40x | Locating the specimen |
| 10x | 100x | Tissue and larger organisms |
| 40x | 400x | Individual cells |
| 100x (oil) | 1000x | Bacteria and fine structure |
Useful magnification is limited by resolution, which depends on numerical aperture and the wavelength of light. For visible light microscopy, the practical limit is roughly 0.2 micrometers.
Past that limit you get empty magnification: a bigger but blurrier picture. This is why a listing that promises 2000x on a basic scope deserves suspicion.
How to Set Up and Focus Correctly
- Carry the microscope with one hand on the arm and one under the base.
- Place it on a flat, stable surface and switch on the light.
- Rotate the nosepiece to the 4x objective.
- Place the slide on the stage and secure it with the clips.
- Raise the condenser close to the stage and open the diaphragm partway.
- Use the coarse knob to find the specimen, then sharpen it with the fine knob.
- Center the specimen and switch to 10x. Refocus with the fine knob only.
- Move to 40x only after the image is sharp at 10x.
- Adjust the diaphragm for contrast.
- When finished, return to 4x, lower the stage, remove the slide and cover the instrument.
Starting at the lowest power is not just a habit. It gives you the widest field and the longest working distance, which protects both the slide and the lens.
Using the 100x Oil Immersion Objective
Oil immersion is used for bacteria and very fine detail. Oil has a refractive index close to glass, so it reduces light loss between the slide and the lens.
- Focus on the specimen at 40x and center it.
- Rotate the nosepiece partway so no objective is in position.
- Place a small drop of immersion oil on the slide.
- Rotate the 100x objective into the oil.
- Focus with the fine knob only.
- Clean the lens and slide with lens paper when finished.
Dried oil can damage an objective, so never skip the cleanup.
Troubleshooting Common Problems
| Problem | Likely cause | Fix |
| Image too dark | Diaphragm nearly closed, light low, condenser too low | Open the diaphragm, raise the light, raise the condenser |
| Blurry at 40x | Dirty lens, wrong slide orientation, thick cover glass | Clean with lens paper, flip the slide, use a standard cover slip |
| Specimen vanishes when switching objectives | Not centered or not focused at lower power | Return to 10x, center, refocus |
| Uneven or patchy lighting | Condenser misaligned or dust on optics | Re-center the condenser and clean exposed surfaces |
| Cannot find the specimen | Starting at high power | Go back to 4x and search methodically |
| Image shifts or drifts | Loose stage or unstable surface | Check the stage and move to a flat, solid table |
Common Mistakes to Avoid
- Using the coarse knob at high power, which risks cracking a slide or damaging an objective.
- Wiping lenses with tissue or clothing. Use lens paper and approved cleaner.
- Carrying the scope by the stage or head.
- Closing the diaphragm too far, which causes dark, diffracted images.
- Using oil with an objective that is not oil-rated.
- Leaving the microscope uncovered and exposed to dust.
Compound vs Stereo vs Digital Microscopes
| Feature | Compound microscope | Stereo (dissecting) microscope | Digital microscope |
| Best for | Thin, transparent specimens | Larger, opaque 3D objects | Sharing and recording images |
| Typical magnification | 40x to 1000x | Roughly 5x to 50x | Varies by model |
| View | Through one optical path | Two paths for a 3D view | On a screen |
| Example use | Cells, blood smears, pond water | Insects, rocks, circuit boards | Classroom display, documentation |
A compound microscope also differs from an electron microscope. Light microscopes use visible light and resolve down to about 0.2 micrometers. Electron microscopes use electron beams and resolve far finer detail, but they are large, costly and specialized.
Choosing a Microscope: Which Parts Matter Most
If you are buying, spend your attention on the parts that affect the image, not on the headline magnification.
- Objectives. Glass lenses with a stated numerical aperture beat plastic lenses with big claims.
- Mechanical stage. Strongly recommended if you will use 400x regularly.
- Condenser with an iris diaphragm. Needed for contrast control.
- LED illumination with a dimmer. Cool, reliable and easy to live with.
- Metal frame and smooth focus. Plastic frames and gritty knobs wear out quickly.
- Binocular head. Worth it if sessions last more than a few minutes.
- 100x oil objective. Only if you will actually study bacteria or need lab-level detail.
Price Tiers (Approximate)
| Tier | Typical buyer | What to expect |
| Entry level | Students, beginners | Basic achromatic objectives, clip stage, LED; generally the lowest price range |
| Mid-range | College, serious hobbyists | Better objectives, mechanical stage, binocular option; a noticeable step up in cost |
| Professional lab | Clinics, research | Superior optics, Köhler-capable illumination, camera ports; the highest price range |
Prices vary widely by brand, region and retailer, so check current listings before you budget. Established makers include Zeiss, Olympus (Evident), Nikon, Leica and Motic, while AmScope, Swift and Omax are common in the student and hobby market.
Buying Considerations by Region
Local conditions matter more than most people expect.
- Check voltage and plug type (110V vs 220–240V) before you order.
- Confirm warranty terms and whether service is available where you live.
- Ask about replacement bulbs or LED modules.
- Schools and clinics may need an authorized dealer who can handle calibration, installation and servicing.
Searches like “microscope shop near me” or “lab equipment supplier in your country” can help you find stock and repair support.
Caring for Your Microscope
Good habits keep optics sharp for years.
- Keep the dust cover on when the scope is not in use.
- Clean lenses only when needed, with lens paper and approved cleaner.
- Store the microscope somewhere dry to discourage fungus on the glass.
- Turn the light down before switching it off.
- In shared settings, disinfect eyepieces between users as your lab or school requires.
- Handle glass slides carefully and dispose of broken ones safely.
- If the scope is mains-powered, keep cables tidy and avoid liquids near the base.
If focus becomes gritty or the optics seem cloudy inside, have a technician service it rather than taking it apart yourself.
A Short History Behind the Parts
Robert Hooke and Antonie van Leeuwenhoek were among the early pioneers of microscopy in the seventeenth century. Hooke’s published observations helped popularize the instrument, while Leeuwenhoek’s lenses revealed microorganisms.
Later, Ernst Abbe and Carl Zeiss transformed lens design, and August Köhler introduced a method for aligning the light path to give even illumination. Many of the parts described above, especially the condenser and the objective, trace back to these advances.
Practical User Experience
This section reflects common patterns in classroom, home and lab use rather than a single product review.
The most frequent stumbling block is not the optics but the order of operations. New users often go straight to 40x, lose the specimen and then reach for the coarse knob. Starting at 4x and refocusing with the fine knob after each switch avoids most of the frustration.
The second surprise is how much the diaphragm and condenser matter. A scope that looks dim or flat is often just set up poorly. Opening the diaphragm slightly, raising the condenser and then trimming the light usually improves the image more than turning the lamp up.
Mechanical stages are also noticeable in practice. Moving a slide by hand with clips works at low power, but at 400x it becomes fiddly, and the two-knob stage makes scanning a smear far less tiring.
On the other hand, binocular heads feel clearly better during longer sessions, while a monocular scope is perfectly workable for short lessons.
Overall impression: a basic compound microscope with clean glass objectives, a working iris diaphragm and steady focus is enough for most learners. Good technique contributes more than extra magnification.
Frequently Asked Questions
1.What are the main parts of a compound light microscope?
The main parts are the eyepiece, objective lenses, nosepiece, head, arm, base, stage, stage clips, coarse and fine focus knobs, condenser, iris diaphragm, illuminator and light intensity control. They fall into optical, mechanical and illumination groups.
2.What does the iris diaphragm do on a microscope?
It controls how much light reaches the specimen and how wide the light cone is. Closing it increases contrast and depth of field, while opening it gives a brighter, lower-contrast image.
3.What is the difference between coarse and fine focus?
The coarse knob makes large, quick adjustments and is meant for low-power objectives. The fine knob makes small adjustments for sharp detail and is the only one you should use at 40x and 100x.
4.How do you calculate total magnification?
Multiply the eyepiece magnification by the objective magnification. A 10x eyepiece with a 40x objective gives 400x.
5.Why is oil used with the 100x objective?
Immersion oil has a refractive index close to glass, so it reduces light loss between the slide and the lens. That raises resolution and brightness at very high magnification.
6.What is the difference between a compound and a stereo microscope?
A compound microscope views thin, transparent specimens at high magnification through one optical path. A stereo microscope uses two paths for a three-dimensional view of larger, often opaque objects at lower magnification.
7.Which part should you hold when carrying a microscope?
Hold the arm with one hand and support the base with the other. Never carry it by the stage or the head.
8.Why should you start with the lowest power objective?
The 4x objective gives the widest field of view and the longest working distance. That makes the specimen easier to find and reduces the risk of hitting the slide.
9.What limits useful magnification on a light microscope?
Resolution, which depends on numerical aperture and the wavelength of light. Beyond roughly 1000x to 1500x, extra magnification enlarges blur rather than revealing new detail.
Conclusion
A compound light microscope works as a system. The optical parts form the image, the mechanical parts position and focus it, and the illumination parts make it visible.
Once you can name each part and say what it does, setup gets faster, mistakes get rarer and buying decisions get easier.
To put this into practice:
- Learn the 14 parts using the table, then test yourself without it.
- Follow the setup steps on your next session, starting at 4x every time.
- If you are buying, prioritize objectives, a mechanical stage, an iris condenser and LED lighting.
- Check voltage, warranty and service options for your region before you purchase.
- Clean and store the instrument properly so it lasts.
Unfulfilled Points: A named author or reviewer, source links, an original labeled diagram, a light-path graphic and video could not be included because they require assets or credentials that cannot be produced in text.
These information are gathered from different surveys, medical tests and tech giants like Techradar and more. Our top priority is to provide you valuable information about Compound Light Microscope Parts and Functions .
For More Details About Different Digital Microscopes Click Here