Compound Microscope Labeled: Every Part and Its Function, Explained Simply
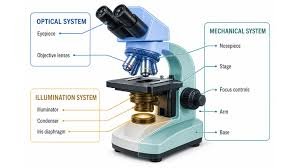
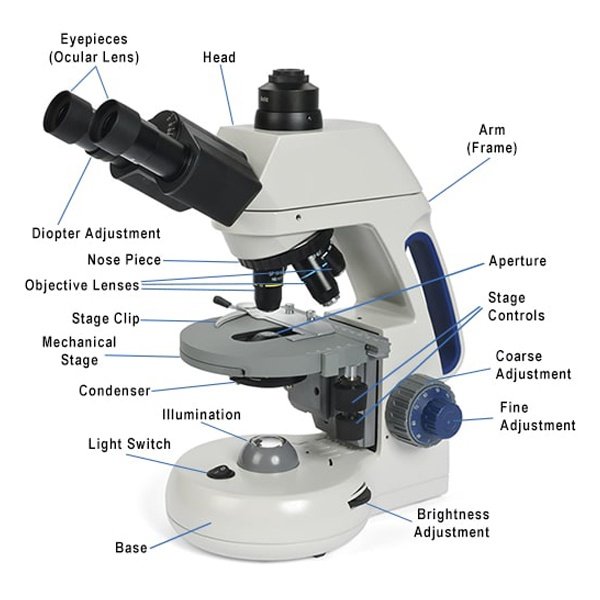
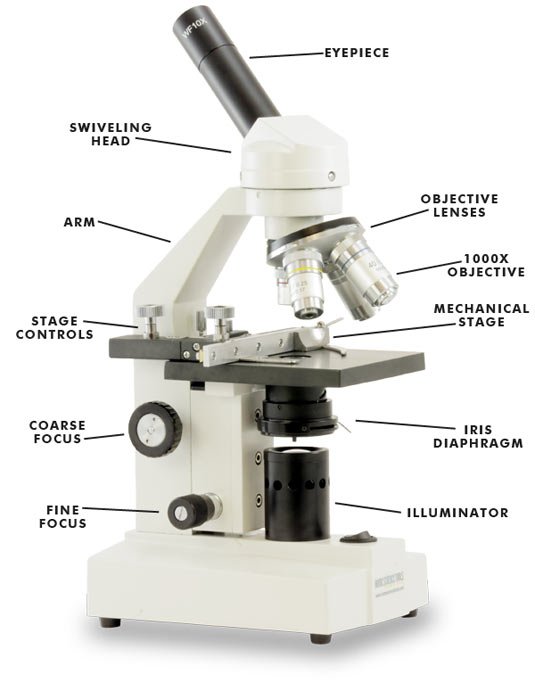
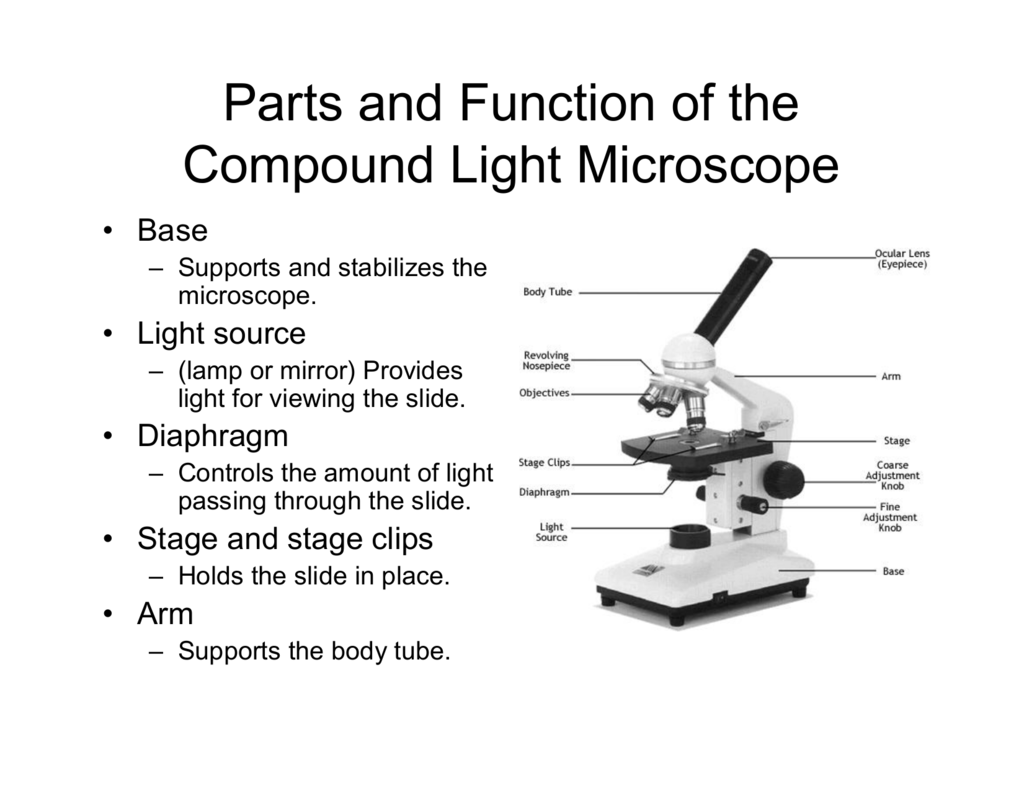
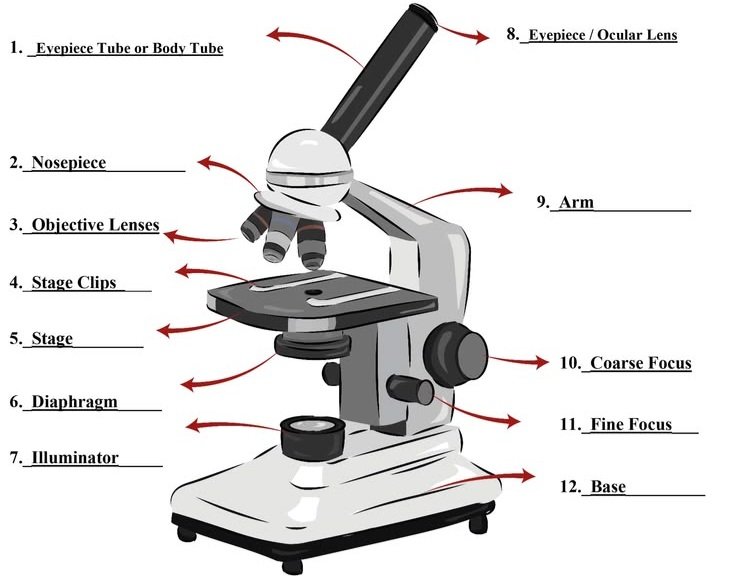
A compound microscope uses two lens systems, an objective and an eyepiece, to magnify thin specimens up to about 1000x. A labeled diagram shows the eyepiece, body tube, nosepiece, objectives, arm, stage, stage clips, diaphragm, condenser, light source, focus knobs and base.
That is the short version. The rest of this guide shows where each part sits, what it does, and how to remember all of it without rote memorizing.
What a Compound Microscope Actually Is
A compound microscope, also called a light microscope, optical microscope or brightfield microscope, passes light through a thin specimen on a glass slide. The objective lens forms a first magnified image. The eyepiece (ocular lens) magnifies that image again.
That two-stage design is the “compound” part of the name. It is why this instrument can reveal onion cells, pond protozoa, blood smears and, with the right lens and staining, bacteria.
It works best on thin or translucent samples. For a coin, an insect or a circuit board, a stereo (dissecting) microscope is the better tool.
The Compound Microscope Labeled: Quick-Reference Table
If you only need the answer for a worksheet or exam, start here.
| Part | Group | What it does |
| Eyepiece (ocular lens) | Optical | Final magnification, usually 10x |
| Body tube (head) | Mechanical | Holds the eyepiece and keeps the light path aligned |
| Revolving nosepiece (turret) | Mechanical | Rotates to switch objective lenses |
| Objective lenses | Optical | Main magnification: typically 4x, 10x, 40x, 100x |
| Arm | Mechanical | Connects the head to the base; the carrying handle |
| Stage | Mechanical | Platform that supports the slide |
| Stage clips or mechanical stage | Mechanical | Hold the slide; a mechanical stage moves it precisely |
| Condenser | Illumination | Gathers and focuses light onto the specimen |
| Iris diaphragm | Illumination | Controls how much light reaches the specimen |
| Light source (illuminator) | Illumination | LED, halogen lamp or mirror that supplies light |
| Coarse adjustment knob | Mechanical | Large focus movements at low power |
| Fine adjustment knob | Mechanical | Small focus movements for a sharp image |
| Base | Mechanical | Heavy foundation that keeps the instrument stable |
Why Textbooks List 10, 12 or 14 Parts
This confuses a lot of students. One book lists ten parts, another lists fourteen, and both are correct.
The difference is grouping. Some books treat the condenser and diaphragm as one “illumination” item. Others split them. Some count the stage clips and the stage separately, or include a power switch and a mechanical stage.
If your teacher gives a specific count, follow your course material. If not, the table above covers every part that appears on standard diagrams.
Three Systems: Optical, Mechanical and Illumination
Sorting the parts into three groups makes them far easier to recall.
Optical parts: the ones that bend light
The eyepiece, objective lenses and condenser shape the image. These are the parts you protect most carefully.
Mechanical parts: the ones that hold and move
The base, arm, stage, nosepiece, body tube and focus knobs provide support, alignment and movement.
Illumination parts: the ones that deliver light
The light source, condenser and diaphragm decide how bright and how contrasty your view will be.
Some school decks use slightly different names for the groups, such as illuminating, magnifying and mechanical. The idea is identical.
Part-by-Part: What Each Label Means
Eyepiece (ocular lens)
The eyepiece is the lens you look through. Most student microscopes use a 10x eyepiece. Binocular models have two, which reduces eye strain in long sessions.
Objective lenses
Objectives sit closest to the slide and do the heavy lifting.
- 4x scanning: finds the specimen quickly
- 10x low power: general viewing
- 40x high power: cell detail
- 100x oil immersion: bacteria and fine structure, used with a drop of immersion oil
A useful trait is parfocal design. Once you focus at low power, the image stays roughly in focus when you rotate to a higher objective, so you only need a touch of fine focus.
Revolving nosepiece (turret)
This rotating mount holds the objectives. Turn it by the knurled ring, not by grabbing a lens, and listen for the click that signals the lens is aligned.
Body tube and arm
The body tube keeps the eyepiece and objective at the correct distance and alignment. The arm supports it. When you move a microscope, one hand goes on the arm and the other under the base.
Stage, stage clips and mechanical stage
The stage holds the slide flat. Basic models use two spring clips. Better ones use a mechanical stage with X-Y knobs that move the slide in tiny, repeatable steps, which matters a lot at 400x.
Condenser and iris diaphragm
The condenser sits under the stage and concentrates light into a cone. The iris diaphragm narrows or widens that light.
More light is not always better. Closing the diaphragm slightly raises contrast, which helps with pale or unstained specimens. Opening it gives a brighter but flatter image.
Light source
Older microscopes use a mirror to reflect room light. Modern ones use LED illumination (cool and energy-efficient) or halogen lamps (warm and bright, but hot to the touch).
Coarse and fine focus knobs
The coarse knob makes big movements. The fine knob makes small ones. Use coarse focus only with the lowest-power objective, then switch to fine focus for everything else.
Base
The base carries the weight and usually houses the lamp and power switch. A heavy, stable base is one of the quickest signs of a well-built instrument.
How Light Travels Through the Microscope
The fastest way to learn the labels is to follow the light.
- The light source produces illumination.
- The condenser concentrates it into a cone.
- The iris diaphragm adjusts its intensity.
- Light passes through the specimen on the stage.
- The objective lens forms a magnified image.
- The image travels up the body tube.
- The eyepiece magnifies it again for your eye.
Learn the parts in that order and a blank diagram starts to feel like a story rather than a list.
Magnification, Resolution and Numerical Aperture
Total magnification is simple: multiply the eyepiece power by the objective power.
| Eyepiece | Objective | Total magnification |
| 10x | 4x | 40x |
| 10x | 10x | 100x |
| 10x | 40x | 400x |
| 10x | 100x | 1000x |
But bigger is not always clearer. Resolution is the ability to tell two close points apart, and it depends on the objective’s numerical aperture (NA) and the wavelength of light. Pushing magnification past what the optics can resolve only gives a larger blur.
This is also why a visible-light microscope tops out around the scale of bacteria. Seeing viruses or fine cell internals needs an electron microscope.
Working distance, the gap between the objective and the slide, shrinks as magnification rises. At 100x it is tiny, which is why careless focusing breaks slides.
Why the Image Looks Upside Down
The lenses invert and reverse the image. Move the slide to the left and the image appears to move right. It feels odd for the first ten minutes and then becomes automatic.
A handy trick: place a small printed letter “e” on a slide. Under the eyepiece it appears as an upside-down “ə”, and you can practice steering it.
Types of Compound Microscopes
| Type | Key feature | Best for |
| Monocular | One eyepiece, lowest cost | Students and beginners |
| Binocular | Two eyepieces, more comfortable | Labs and long sessions |
| Trinocular | Extra camera port | Teaching and documentation |
| Digital | Built-in camera and screen | Classrooms and hobbyists |
| Phase contrast | Shows unstained, transparent cells | Cell biology |
| Fluorescence | Special filters and dyes | Research labs |
| Inverted | Objectives below the stage | Cell culture |
The compound design has been central to biology since the seventeenth century. Robert Hooke and Anton van Leeuwenhoek are the famous early names, and the invention of the compound arrangement is often credited to Zacharias Janssen, though historians still debate the attribution.
How to Label a Compound Microscope Diagram (Exam-Ready Method)
Most lost marks come from messy labeling, not wrong answers. Use this routine.
- Draw the outline lightly in pencil first: base, arm, stage, tube, eyepiece.
- Start labels at the top with the eyepiece and work down.
- Use a ruler for label lines, and never let two lines cross.
- Write labels in a neat column beside the drawing, horizontally.
- Use standard names such as revolving nosepiece and iris diaphragm, not casual descriptions.
- Add magnification values to the objectives if your diagram shows them.
- Give the drawing a title.
If your course asks for functions as well, write one short phrase after each label, for example “Stage clips: hold the slide in place.”
How to Use a Compound Microscope Without Damaging It
- Place the microscope on a flat surface and switch on the light.
- Rotate the nosepiece to the lowest-power objective.
- Secure the slide with the clips and center the specimen over the light.
- Use the coarse knob to focus, then the fine knob to sharpen.
- Adjust the diaphragm for contrast.
- Move to 10x and then 40x, refocusing with the fine knob only.
- When finished, return to the lowest-power objective, lower the stage and clean the lenses with lens paper.
The three mistakes that crack slides
- Using the coarse knob at high power. The objective can strike the slide.
- Skipping low power. Starting at 40x makes the specimen very hard to find.
- Using oil on the wrong lens. Only the 100x oil immersion objective takes immersion oil.
Troubleshooting a Dark or Blurry Image
| Problem | Likely cause | Fix |
| Image too dark | Diaphragm nearly closed or lamp low | Open the diaphragm and raise lamp brightness |
| Washed out, low contrast | Diaphragm too open | Close it slightly |
| Can’t focus at 400x | Not focused at low power first | Return to 4x or 10x, refocus, then step up |
| Smudges or spots that rotate with the eyepiece | Dirty eyepiece | Clean with lens paper |
| Spots that stay when you move the slide | Dirty slide | Wipe or replace the slide |
| Uneven lighting | Condenser too low or misaligned | Raise or recenter the condenser |
If you want a stronger, more even image, look into Köhler illumination, a method of aligning the lamp and condenser that serious microscopists use for the best contrast and resolution.
Choosing a Compound Microscope
If you are comparing models, these questions narrow the field quickly.
- Who will use it? A child, a student or a lab technician?
- What will you look at? Prepared slides, pond water, blood smears or clinical samples?
- How long are the sessions? Long sessions favor a binocular head.
- Do you need photos or a screen? Look for a trinocular or digital model.
- What is the budget?
A buying checklist
- Glass lenses, not plastic
- Metal frame and a heavy base
- Smooth, slip-free focus knobs
- Adjustable condenser and iris diaphragm
- Mechanical stage if you plan to use 400x often
- Available spare parts and a clear warranty
Beginner versus laboratory-grade
| Feature | Beginner model | Laboratory-grade model |
| Objectives | Basic achromatic | Plan or plan achromat |
| Head | Monocular | Binocular or trinocular |
| Stage | Clips | Mechanical stage |
| Condenser | Simple or fixed | Abbe condenser, centerable |
| Illumination | Basic LED | Adjustable LED or Köhler-capable |
| Typical use | School, hobby | Clinical, research, QC |
Student models commonly sit in the tens to low hundreds of US dollars, while research-grade instruments cost considerably more (Source: supplier listings, check current prices as they vary by brand, optics and region).
Brands such as Olympus, Nikon, Zeiss, Leica, Motic and AmScope cover everything from classroom to lab. Compare specifications rather than names.
Buying notes for different regions
Power supply voltage differs by country, so check that the adapter matches your mains supply or choose a battery or USB-powered LED model. Look for brands with reliable spare parts nearby. School buyers should ask suppliers for quotations that include delivery and warranty. Curriculum terms vary too: you may see “labelled” in the UK and Australia, “ocular” in lab manuals, and the same parts appear in GCSE, A-level, grade 7 and class 9 syllabi.
Safety and Care
- Carry the microscope with one hand on the arm and one under the base.
- Handle slides carefully, since broken glass is the most common classroom injury.
- Halogen lamps get hot, so let them cool before covering or moving the microscope.
- Keep cords tidy in classrooms to avoid tripping and electrical hazards.
- Clinical or biological samples may require biohazard procedures. Follow your institution’s rules.
- Clean lenses only with lens paper and appropriate lens cleaner, then cover the microscope to keep out dust.
Alternatives to a Compound Microscope
| Alternative | Best for | Limitation |
| Stereo (dissecting) microscope | Larger 3D objects | Lower magnification |
| Digital USB microscope | Quick images, electronics | Lower resolution |
| Pocket or handheld microscope | Field use | Limited detail |
| Phase contrast microscope | Live, unstained cells | Higher cost |
| Electron microscope | Nanoscale structures | Costly and specialized |
Practical User Experience
This guide draws on the standard features of compound microscopes, not on hands-on testing of one specific model. What follows describes what learners commonly run into, and it is not a product review.
The first session usually goes the same way. Finding the specimen at 4x takes patience, because the field of view is small and the slide has to sit right over the light. Most beginners reach for the diaphragm last, even though it often decides whether cells look clear or washed out.
Switching to 40x tends to be the hardest moment. The image shrinks to a small window, focus feels touchy, and the fine knob becomes the only control that helps. Learners who stay at low power until the specimen is centered and sharp generally move up with less frustration.
Labeling a diagram is easier after even ten minutes with a real instrument. Turning the nosepiece and tracing the light from lamp to eyepiece fixes the parts in memory better than rereading a list.
Overall impression: a compound microscope rewards slow, low-power-first habits. Identifying the parts is a gentle learning curve, focusing at high power is a steeper one, and a stable, well-built instrument makes both easier.
Frequently Asked Questions
1.What are the main parts of a compound microscope?
The eyepiece, body tube, revolving nosepiece, objective lenses, arm, stage, stage clips, condenser, iris diaphragm, light source, coarse and fine focus knobs, and base.
2.What is the difference between coarse and fine focus?
The coarse knob makes large movements for finding focus at low power. The fine knob makes small adjustments to sharpen the image at any power.
3.How do you calculate total magnification?
Multiply the eyepiece power by the objective power. A 10x eyepiece with a 40x objective gives 400x.
4.What does the diaphragm do?
It controls the amount of light passing through the specimen, which changes brightness and contrast.
5.Why is the image upside down?
The lens system inverts and reverses the image, so the slide and the image appear to move in opposite directions.
6.What is the function of the nosepiece?
It holds the objective lenses and rotates to place the one you want into the light path.
7.What is the difference between a simple and a compound microscope?
A simple microscope uses a single lens, like a magnifying glass. A compound microscope uses an objective and an eyepiece working together for much higher magnification.
8.Can a compound microscope see bacteria?
Yes. Bacteria are usually visible at 400x to 1000x, especially with staining and oil immersion.
9.Why does the oil go only on the 100x objective?
Immersion oil improves resolution for that lens specifically. Other objectives are not designed for it, and oil can damage them.
Conclusion
A labeled compound microscope is really a map of how light becomes an image. Learn the three groups (optical, mechanical and illumination) and the seven-step light path, and the diagram stops being a list of names.
Practice by labeling a blank diagram from memory, then repeat it on a real microscope. Start every session at low power, focus gently, and keep the lenses clean. If you are buying, work through the checklist before comparing prices.
Unfulfilled Points: A downloadable blank diagram, an original image, a named author or reviewer and a last-updated date could not be included because they require assets and credentials that must come from you.
These information are gathered from different surveys, medical tests and tech giants like Techradar and more. Our top priority is to provide you valuable information about Compound Microscope Labeled .
For More Details About Different Digital Microscopes Click Here