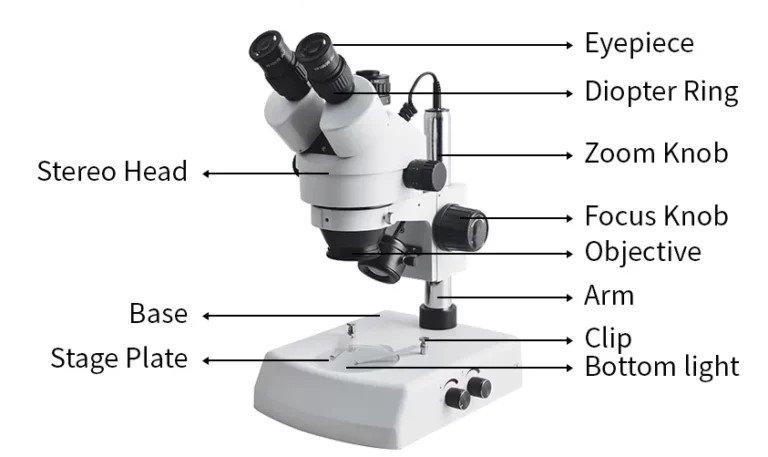
Parts of a Microscope With Labels: Functions, Diagram and Practical Tips
Article Body
A microscope looks intimidating the first time you sit in front of one. Knobs, lenses, dials and a metal arm all compete for attention, and nobody tells you which one to touch first.
The good news is that every microscope does three jobs: it magnifies, it lights the specimen, and it holds the slide steady. Once you sort the parts into those three groups, the whole instrument makes sense.
This guide walks through every part, shows where each one sits, explains what it does, and adds the practical lessons you only learn at the bench.
The Short Answer: What Are the Main Parts of a Microscope?
The main parts of a microscope are the eyepiece, objective lenses, revolving nosepiece, stage, diaphragm, condenser, light source, coarse and fine focus knobs, arm and base. Optical parts magnify the image, illumination parts control light, and mechanical parts support the slide.
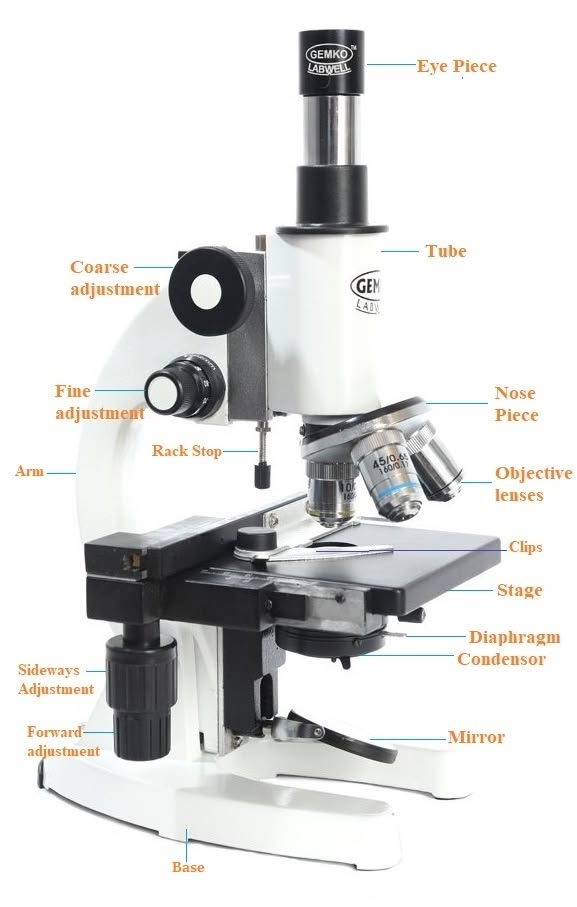
A Labeled Map of a Compound Microscope
Most school and lab microscopes are compound light microscopes. They use two lens systems, the eyepiece and the objective, to build the final image.
Here is a text-based labeled map, read from top to bottom. It works alongside any photo or diagram you have, and it helps if you use a screen reader.
[1] EYEPIECE (OCULAR)
|
[2] BODY TUBE / HEAD
| [3] ARM
[4] REVOLVING NOSEPIECE |
| |
[5] OBJECTIVE LENSES |
| |
[6] STAGE CLIPS + SLIDE |
[7] STAGE ———————-|
| |
[8] CONDENSER + DIAPHRAGM |
[9] LIGHT SOURCE |
[10] BASE ———————-
Side knobs: [11] COARSE FOCUS [12] FINE FOCUS
Textbooks differ on how many parts they list. You will see anything from 10 to 16. This guide uses 13 because it covers everything a student, teacher or buyer needs to name.
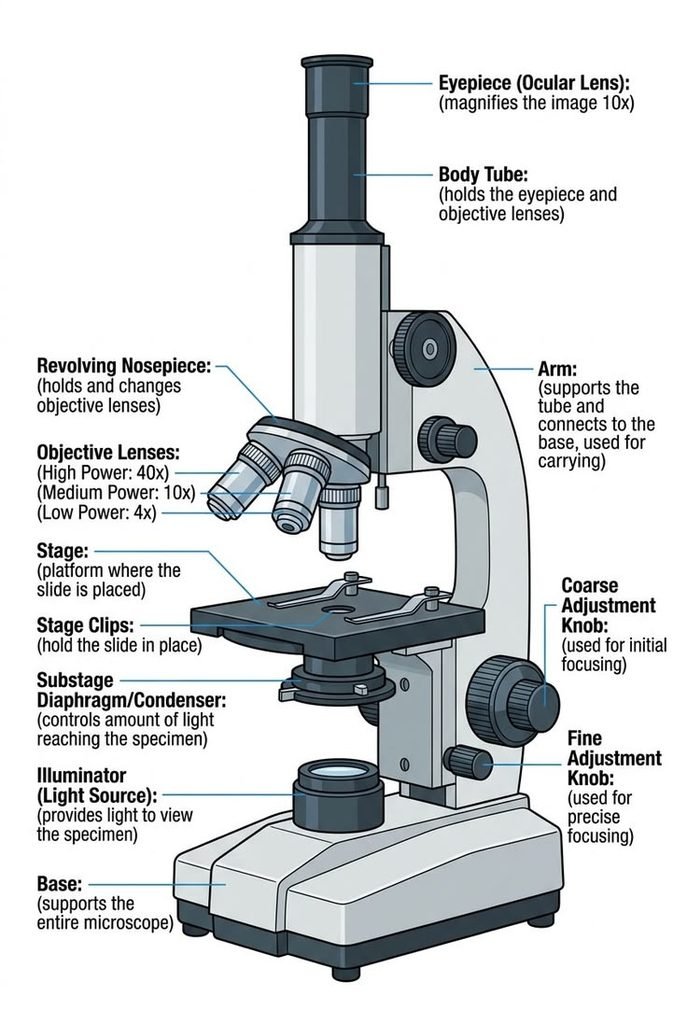
Quick Reference: All 13 Parts and Their Functions
| Part | Also called | Group | What it does |
| Eyepiece | Ocular lens | Optical | Final magnification stage, usually 10x |
| Body tube | Head | Optical | Carries light from objective to eyepiece |
| Objective lenses | Objectives | Optical | Main magnification: 4x, 10x, 40x, 100x |
| Revolving nosepiece | Turret | Mechanical | Rotates to switch objectives |
| Stage | Specimen platform | Mechanical | Supports the slide |
| Stage clips | Slide holders | Mechanical | Keep the slide from sliding |
| Mechanical stage | Slide mover | Mechanical | Moves the slide with precision knobs |
| Condenser | Substage condenser | Illumination | Focuses light onto the specimen |
| Diaphragm | Iris, aperture | Illumination | Controls light amount and contrast |
| Light source | Illuminator | Illumination | Provides light from below |
| Coarse focus | Coarse knob | Mechanical | Large, fast focusing |
| Fine focus | Fine knob | Mechanical | Small, precise focusing |
| Arm and base | Frame | Mechanical | Structure, handle and stability |
Regional wording varies. In some classrooms you will hear “aperture” for the diaphragm or “ocular” for the eyepiece. They are the same parts.
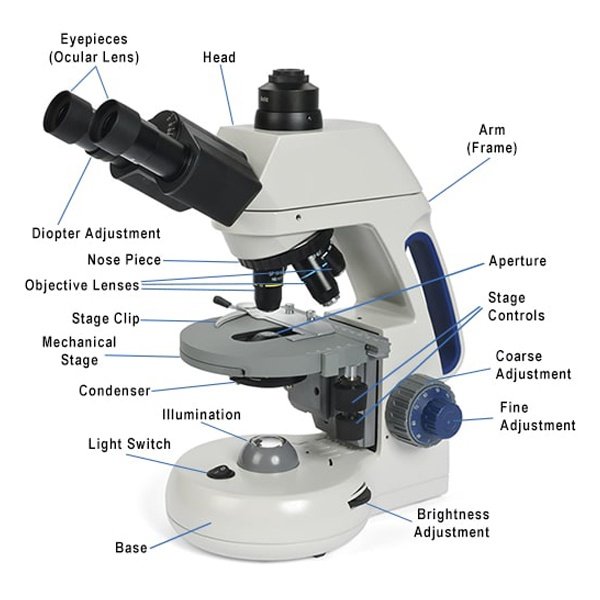
The Optical Parts: Where the Magnification Happens
Eyepiece (Ocular Lens)
The eyepiece is the lens you look through. Most are 10x, though 15x and 20x versions exist.
A monocular microscope has one eyepiece. Binocular models have two, which is far more comfortable for long sessions. Trinocular heads add a third port for a camera.
Objective Lenses
Objectives do most of the work. Each is engraved with its magnification and a numerical aperture (NA), a number describing how much light the lens gathers and how much detail it can resolve.
| Objective | Typical color band | Best for |
| 4x (scanning) | Red | Finding the specimen |
| 10x (low power) | Yellow | Tissue layout, general viewing |
| 40x (high power) | Blue | Individual cells and nuclei |
| 100x (oil immersion) | White | Bacteria and fine cell detail |
The color bands follow a common convention (DIN/ISO), but they are not universal. Always trust the engraving over the color.
Good objectives are parfocal, meaning the image stays roughly in focus when you switch lenses. They are also parcentric, so the specimen stays near the center.
The 100x lens needs immersion oil between the lens and the slide. The oil bends light the way glass does and sharpens the image. Never use it on the other objectives.
Body Tube and Head
The head holds the eyepieces and houses prisms that direct light toward your eyes. Many heads rotate, which is useful when two people share one microscope.
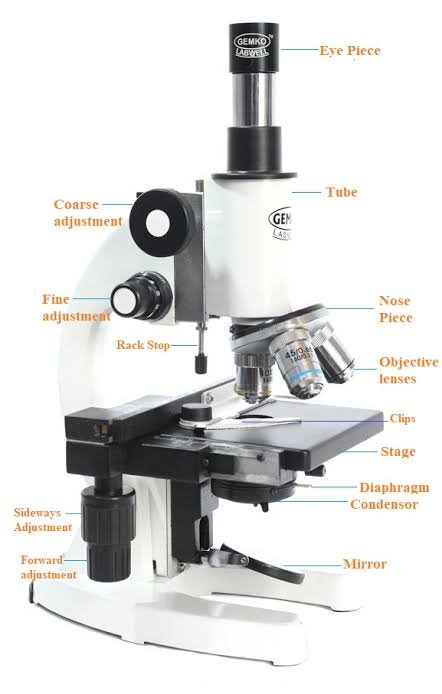
The Illumination Parts: Getting Light Right
Light Source
Modern microscopes use LED illumination. LEDs run cool, last a long time, and are available in cordless versions, which helps in schools without reliable power.
Older or basic models use a halogen or tungsten bulb, or a mirror that reflects room light. Corded models need the right voltage for your region, so check 110V versus 220-240V before buying.
Condenser
The condenser sits under the stage and gathers light into a cone that hits the specimen. Better microscopes let you raise or lower it with a small knob.
For basic school work you can leave it near the top. For sharper high-power images, it is worth adjusting.
Diaphragm
The iris diaphragm controls how much light passes through the slide. It also controls contrast, and this is where beginners get tripped up.
Most students open the diaphragm fully because brighter feels better. For clear or lightly stained specimens like onion skin or cheek cells, a partly closed diaphragm gives a crisper edge and more visible detail.
The Mechanical Parts: Holding and Moving Everything
Stage and Stage Clips
The stage is the platform that carries your slide, with a hole in the center for light to pass through. Stage clips hold the slide in place.
A mechanical stage adds two knobs that slide the specimen left and right, forward and back. It is the single most useful upgrade on a student microscope because moving a slide by hand at 400x is surprisingly difficult.
Revolving Nosepiece
The turret rotates to bring each objective into position. Turn it until you feel and hear a click.
Hold it by the ring, never by the lenses. Pushing on an objective can knock it out of alignment.
Coarse and Fine Focus Knobs
| Knob | Movement | Use it with |
| Coarse | Big and fast | 4x and 10x only |
| Fine | Small and slow | Every objective, and the only knob at 40x and 100x |
Arm and Base
The arm connects the head to the base and is your carrying handle. The base is heavy by design, because stability matters when you are viewing at 400x or more.
Carry the microscope with one hand on the arm and the other under the base.
How the Parts Work Together: The Light Path
Light follows a simple path through the instrument:
Light source → diaphragm → condenser → specimen → objective → body tube → eyepiece → your eye.
Understanding this explains most problems. A dark image usually points to the light source or diaphragm. A blurry image usually points to the objective, the focus or a dirty lens.
How to Use a Microscope: A Practical Walkthrough
- Set the microscope on a flat, stable surface and switch on the light.
- Rotate the nosepiece to the lowest power objective (4x) until it clicks.
- Place the slide on the stage, coverslip facing up, and secure it with the clips.
- Center the specimen over the opening in the stage.
- Watching from the side, raise the stage with the coarse knob until the slide is close to the objective but not touching.
- Look through the eyepiece and turn the coarse knob slowly until something appears.
- Sharpen with the fine knob.
- Adjust the diaphragm until the edges look crisp.
- Switch to 10x, then 40x, using only the fine knob.
- When you finish, return to 4x, lower the stage, remove the slide and cover the microscope.
What the First Session Actually Feels Like
Expect the first minute to feel awkward. You will probably see a bright empty circle, or nothing but a blur.
That is normal. At 4x, scan slowly and look for any edge, dark spot or color. Once you find something, center it before you change lenses. At each step up in power, the field of view shrinks, so anything off-center disappears.
Also expect the image to be reversed and upside down. Move the slide to the right and the image drifts left. It feels strange for about five minutes, then becomes second nature.
Common Problems and Quick Fixes
| What you see | Likely cause | Fix |
| Black or dim field | Light off, diaphragm too closed, objective not clicked | Check the light, open the diaphragm, rotate the turret until it clicks |
| Half the circle is dark | Nosepiece not fully aligned | Turn until it clicks |
| Blurry at 40x | Coarse knob used, dirty lens, thick slide | Use fine focus, clean with lens paper, check the slide |
| Nothing found at all | Started at high power, specimen off-center | Return to 4x and rescan |
| Dust specks that rotate | Dirty eyepiece | Wipe gently with lens paper |
| Washed-out, flat image | Diaphragm too open | Close it slightly |
How to Calculate Total Magnification
Multiply the eyepiece power by the objective power.
| Eyepiece | Objective | Total |
| 10x | 4x | 40x |
| 10x | 10x | 100x |
| 10x | 40x | 400x |
| 10x | 100x | 1000x |
Bigger is not always better. Resolution, the ability to tell two close points apart, depends on numerical aperture and the wavelength of light, a principle worked out by Ernst Abbe in the 1870s. Pushing magnification past what the optics can resolve produces a bigger but blurrier image, often called empty magnification.
Compound, Stereo and Digital Microscopes: How the Parts Differ
| Type | Distinguishing parts | Best for |
| Compound | Eyepiece, 3-4 objectives, condenser, diaphragm | Cells, bacteria, thin slides |
| Stereo (dissecting) | Two light paths, zoom or paired objectives, top and bottom lighting | Insects, minerals, circuit boards, coins |
| Digital | Camera sensor and screen replace or supplement the eyepiece | Classrooms, sharing, documentation |
| Electron (SEM, TEM) | Electron gun, electromagnetic lenses, vacuum chamber | Research labs, nanoscale work |
A stereo microscope has no condenser or high-power objectives, so it will not show cell detail. A compound microscope cannot show a whole insect in 3D. Choose by what you plan to look at.
Specialized methods such as brightfield, darkfield and phase contrast change how light interacts with the specimen. They add parts like phase rings, but the basic labeled parts stay the same.
A Short History Behind the Parts
Robert Hooke published Micrographia in 1665 and coined the term “cell” after viewing cork. Antonie van Leeuwenhoek built single-lens instruments and became the first to describe bacteria and protozoa. Zacharias Janssen is often credited with early compound designs, though that attribution is debated.
August Köhler introduced a lighting method in 1893 that gives even, high-contrast illumination and is still taught in labs. Manufacturers such as Zeiss, Leica, Nikon and Olympus (now Evident) built the modern research microscope on those foundations.
Buying Guide: Which Parts Matter Most
If you are buying or replacing a microscope, the optics and build quality matter far more than the headline magnification.
| If you are… | Prioritize | Skip |
| A parent buying for a child | Metal frame, LED light, 4x/10x/40x, stable base | 100x oil lens, camera add-ons |
| A student | Binocular head, mechanical stage, fine focus, iris diaphragm | Trinocular head |
| A teacher or school buyer | Durable build, cordless LED, spare parts and warranty | Mirror illumination, plastic lens mounts |
| A lab or clinical buyer | 100x oil objective, high NA, adjustable condenser, Köhler capability | Toy-grade kits |
| A hobbyist | Good glass optics, mechanical stage, camera port | Research-grade extras |
Metal vs plastic: Metal bodies are heavier and cost more, but they hold alignment and survive classroom use. Plastic is light and cheap but flexes, shakes under high power and often has weaker lenses.
Typical price tiers (USD, verify current listings): beginner and kids models run roughly $30-$100, student and hobby models $100-$400, school and professional models $400-$2,000 and up, and research-grade systems more. Import duties and shipping change local prices, so compare educational suppliers, scientific distributors and brand dealers such as Motic, AmScope, Swift, National Optical, Celestron and OMAX.
Replacing parts: objectives follow standard thread conventions such as RMS, but compatibility is not guaranteed across brands. Check the thread, parfocal distance and NA before ordering.
Care Checklist and Common Mistakes
Care Checklist
- Carry with two hands: arm and base
- Always start at the lowest power
- Clean lenses only with lens paper and lens cleaner
- Lower the stage before changing slides
- Turn the light down before switching off
- Wipe immersion oil from the 100x lens after every use
- Cover the microscope when stored
Common Mistakes
- Using the coarse knob at high power. This is the fastest way to crack a slide or scratch an objective.
- Touching lenses with fingers. Skin oil smears and is difficult to remove.
- Skipping low power. You lose the specimen and waste time.
- Leaving the diaphragm wide open. Contrast disappears.
- Using oil on the wrong objective. Oil on 4x, 10x or 40x lenses can damage them.
- Forcing a stuck knob. Stop and ask a teacher or technician.
How to Label a Microscope Diagram for an Exam
- Draw a light pencil outline first.
- Add the parts from top to bottom: eyepiece, body tube, nosepiece, objectives, stage, diaphragm, light source, arm, base, and focus knobs.
- Use straight, ruled leader lines that touch the part and never cross.
- Write labels horizontally in a neat column.
- Give the diagram a title.
Memory trick: follow the light backward as a phrase, eye, tube, turret, lens, stage, light, base. It matches the top-to-bottom order of the diagram.
FAQs
1.How many parts does a microscope have?
It depends on the source, but most lists use 10 to 16 parts. A common student list has 13: eyepiece, body tube, arm, nosepiece, objectives, stage clips, stage, diaphragm, condenser, light source, coarse focus, fine focus and base.
2.What are the three main parts of a microscope?
They are the optical parts (eyepiece and objectives), the illumination parts (light source, condenser and diaphragm), and the mechanical parts (stage, arm, base, nosepiece and focus knobs).
3.What is the function of the diaphragm?
The diaphragm controls how much light reaches the specimen. It changes brightness and contrast, so closing it slightly often makes transparent specimens easier to see.
4.What is the difference between the coarse and fine focus knobs?
The coarse knob makes large, fast adjustments and is only for low power. The fine knob makes small, precise adjustments and is safe at every magnification.
5.Why do you start with the lowest power objective?
Low power gives the widest field of view and the longest working distance. It makes the specimen easier to find and keeps the slide safe from the lens.
6.What part should you hold when carrying a microscope?
Hold the arm with one hand and support the base with the other.
7.How do you find total magnification?
Multiply the eyepiece magnification by the objective magnification. A 10x eyepiece with a 40x objective gives 400x.
8.What is the most important part of a microscope?
The objective lens. It determines resolution, image quality and the main magnification, which is why lens quality matters more than a bigger number on the box.
9.What is the difference between a compound and a stereo microscope?
A compound microscope shows thin, transparent specimens at high power. A stereo microscope gives a three-dimensional view of solid objects at low power.
Conclusion
A microscope becomes easy to understand once you group its parts by job. Optics magnify, illumination controls light and contrast, and the mechanical frame holds and positions the slide.
Here is what to do next:
- Use the labeled map to name all 13 parts without looking.
- Practice the 10-step routine on a prepared slide, starting at 4x every time.
- Work out total magnification for each objective on your own microscope.
- If you are buying, prioritize optics, a mechanical stage and sturdy construction over magnification claims.
- Follow the care checklist so your lenses stay clear for years.
Unfulfilled Points: Named author credentials, a reviewed-by line, an update date, an original diagram with alt text, and schema markup need publisher input and cannot be written into the article text. Price ranges are general and should be checked against current listings.
These information are gathered from different surveys, medical tests and tech giants like Techradar and more. Our top priority is to provide you valuable information about Parts of a Microscope With Labels .
For More Details About Different Digital Microscopes Click Here