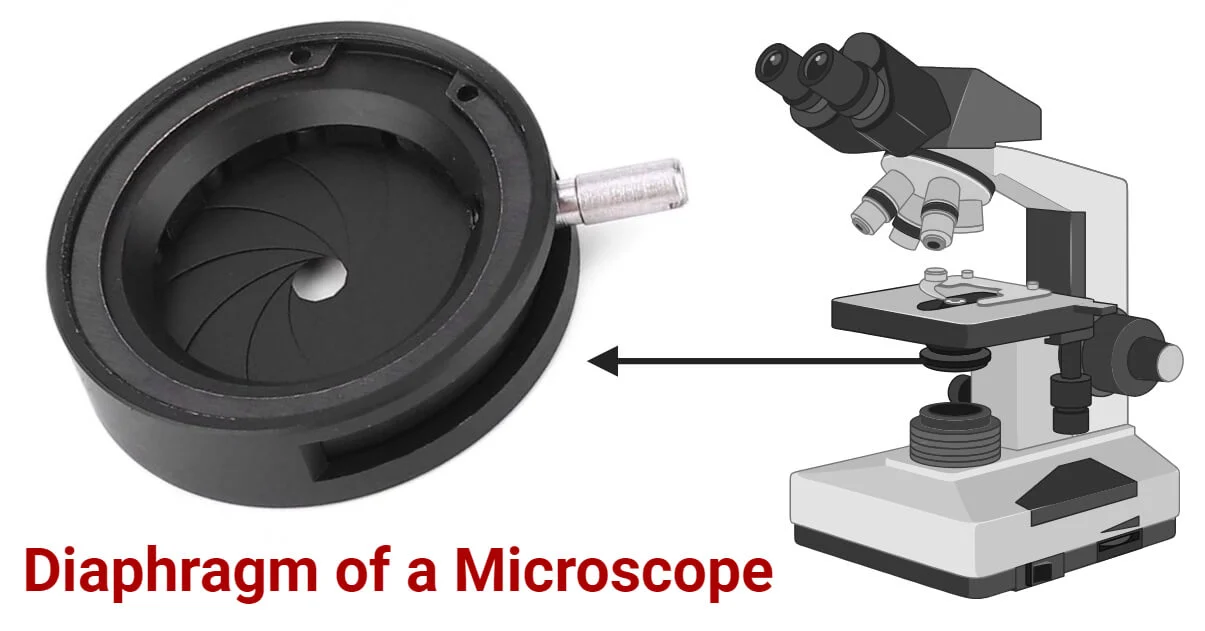
What Does Function of a Microscope Diaphragm Do?
The microscope diaphragm is an adjustable opening under the stage that controls how much light reaches the specimen. By changing the aperture size, it adjusts brightness, contrast and depth of field, helping you get a clear, sharp image.
That is the quick answer. The rest of this guide covers why it matters, where it sits, how it works, which types exist and how to set it for every objective lens.
Whether you are labeling a diagram for class, preparing slides in a clinical lab or choosing a microscope for a workshop, the same principle applies. Good images come from controlled light, not just bright light.
Where Is the Diaphragm on a Microscope?
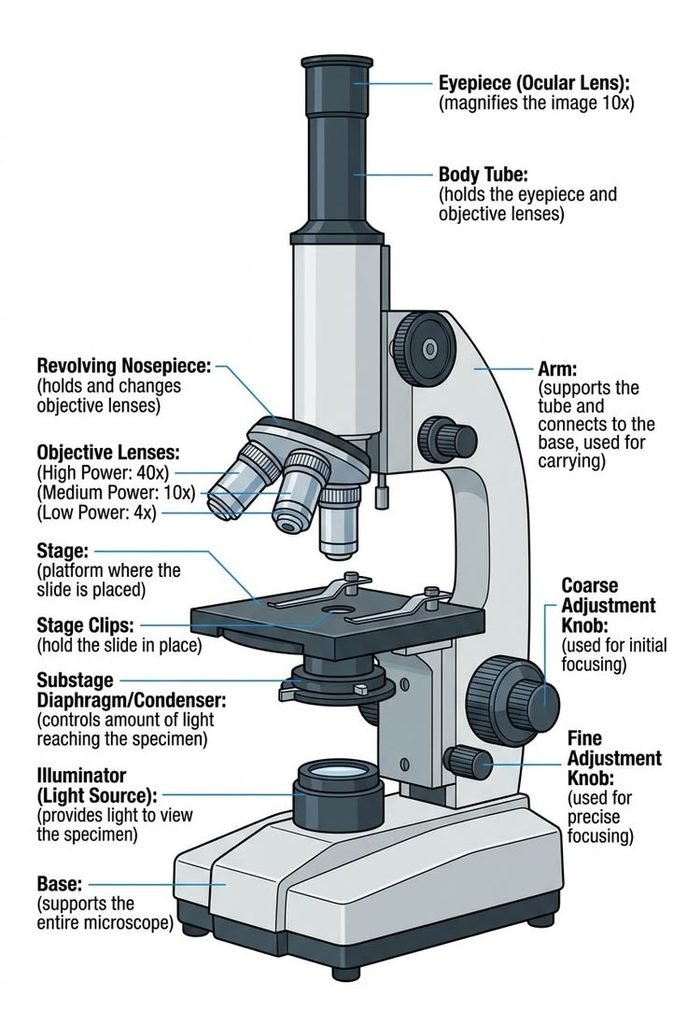
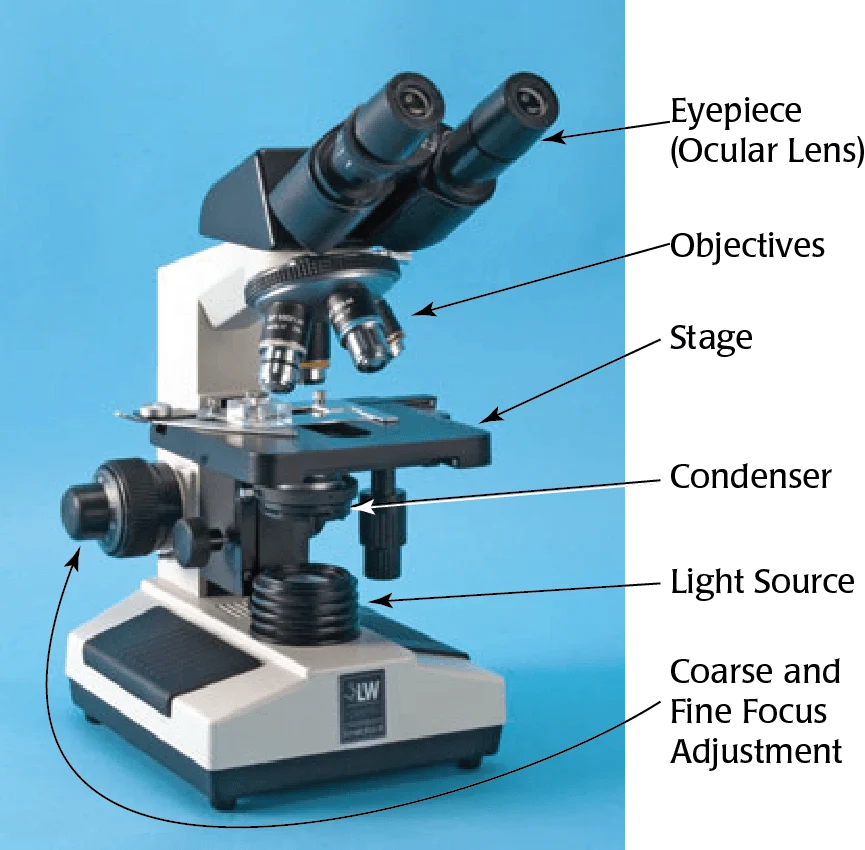
On a standard compound light microscope, the diaphragm sits beneath the stage, attached to or built into the condenser. Students often find it as a small lever or a rotating wheel just under the stage opening.
Light travels through the microscope in a fixed order:
- Illuminator (an LED or halogen lamp, or a mirror on older models)
- Field diaphragm, on microscopes that have one
- Condenser
- Aperture (iris) diaphragm
- Specimen on the stage
- Objective lens, then eyepiece
Basic school microscopes usually have a single diaphragm, either a disc or a small iris. Research-grade models have two, one near the lamp and one in the condenser.
The Five Core Functions of a Microscope Diaphragm
1. It controls how much light reaches the specimen
Opening the diaphragm lets more light through. Closing it reduces the light. This is the function most beginners learn first, and it is only part of the story.
2. It improves contrast
Pale, transparent specimens such as cheek cells, onion skin, yeast or pond organisms often disappear under strong light. Closing the diaphragm slightly makes their edges stand out against the background.
3. It affects resolution
Resolution is the ability to see two close points as separate. If the diaphragm is closed too far, fine detail is lost. If it is too wide, stray light blurs what the objective can resolve.
4. It changes depth of field
A smaller opening gives a greater depth of field, so more of a thick specimen looks sharp at once. The trade-off is lower resolution.
5. It reduces glare
An over-open diaphragm sends unfocused light into the optical path. The result is a hazy, flat image that looks overexposed even when focus is correct.
In short, the diaphragm is a balance control. It trades brightness, contrast, resolution and depth of field against each other.
How the Diaphragm Works: A Plain-Language Look at Numerical Aperture
Every objective lens has a numerical aperture (NA). It describes how wide a cone of light the lens can accept. A higher NA means the lens can gather more light and resolve finer detail.
The condenser and its diaphragm shape the cone of light that enters the specimen. Think of it as matching a funnel to a bottle. If the funnel is too narrow, you waste the bottle’s capacity. If it is too wide, light spills everywhere.
- Cone too small: higher contrast, but lower resolution, and diffraction rings can appear around objects.
- Cone too large: more resolving potential, but glare and washed-out contrast.
- Cone matched: the best compromise between detail and contrast.
A common working rule in microscopy teaching is to set the condenser aperture to roughly 70 to 80 percent of the objective’s numerical aperture. Treat it as a starting point. Specimen thickness and stain density can shift the ideal setting. (Source: standard microscopy references, such as manufacturer technical guides and university lab manuals.)

Types of Microscope Diaphragms
| Type | How it works | Where you find it | Strength | Limitation |
| Iris diaphragm | Overlapping metal leaves form a smoothly variable opening | Student, clinical and research microscopes | Precise, continuous control | Leaves can stick if neglected |
| Disc diaphragm | A rotating disc with holes of fixed sizes | Basic and children’s microscopes | Simple and durable | Only a few set sizes |
| Aperture diaphragm | An iris inside the condenser that sets the light cone | Most microscopes with a condenser | Main control for contrast and resolution | Needs resetting for each objective |
| Field diaphragm | An iris near the lamp that limits the lit area | Microscopes built for Köhler illumination | Cuts stray light, helps alignment | Missing on entry-level models |
| Phase or darkfield stops | Special annular or shaped stops in the condenser | Phase-contrast and darkfield setups | Show unstained, transparent specimens | Specialized and costlier |
The word iris comes from the way the leaves open and close like the iris of an eye. When people say iris diaphragm, they usually mean the aperture diaphragm in the condenser.
Aperture Diaphragm vs Field Diaphragm
These two are the most commonly confused parts, and many guides blur them.
| Feature | Aperture diaphragm | Field diaphragm |
| Controls | The angle of the light cone | The size of the illuminated area |
| Location | In or at the condenser | Near the light source |
| Affects | Contrast, resolution, depth of field | Glare and evenness of the field |
| Typical adjustment | Close to about 70 to 80 percent of objective NA | Open until it just leaves the field of view |
A simple rule helps. The aperture diaphragm changes how the image looks. The field diaphragm changes how much of the slide is lit.
Diaphragm vs Condenser: What Is the Difference?
The condenser is the lens system that focuses light onto the specimen. The diaphragm is the adjustable opening that controls how much light, and at what angle, the condenser delivers.
In most compound microscopes the two work as a pair. The condenser collects and focuses. The diaphragm limits and shapes. Lowering the condenser to dim the image is a common mistake, because it misaligns the optics instead of simply reducing light.
How to Adjust a Microscope Diaphragm Step by Step
Basic method for student and school microscopes
- Place a stained or high-contrast slide on the stage and secure it with the clips.
- Start with the lowest-power objective, usually 4x.
- Turn on the light. Focus with the coarse knob, then the fine knob.
- Open the diaphragm fully, then close it slowly while watching the image.
- Stop when contrast improves but fine detail is still visible.
- Repeat the adjustment each time you change objectives.
Köhler illumination method for advanced users
Köhler illumination is the lighting method described by August Köhler in the 1890s. It uses the field and aperture diaphragms together for even lighting and the best use of the optics.
- Focus on a specimen with the 10x objective.
- Close the field diaphragm until its edges appear in the field of view.
- Move the condenser up or down until those edges are sharp.
- Center the diaphragm image with the condenser centering screws.
- Open the field diaphragm until it just disappears past the edge of the view.
- Remove an eyepiece, or use a phase telescope, and look at the back of the objective. Close the aperture diaphragm to about 70 to 80 percent of the visible circle.
- Replace the eyepiece and observe.
Diaphragm settings are for contrast and resolution. To change brightness, use the lamp intensity control instead.
Recommended Diaphragm Settings by Objective Lens
| Objective | Typical starting point | Why |
| 4x scanning | Mostly closed to partly open | Low NA needs a small cone, and it limits glare |
| 10x low power | Partly open | Balances contrast and detail |
| 40x high power | Mostly open | Higher NA needs a wider cone |
| 100x oil immersion | Open close to the objective’s NA | Maximum resolution is the goal |
These are starting points, not fixed rules. Stain density, specimen thickness and condenser quality all move the best setting. Always judge by the image, not the number.
Why You Should Not Use the Diaphragm as a Brightness Knob
This is one of the most useful tips and one of the least covered. When an image is too bright, many people close the diaphragm until it looks right. It looks dimmer, but resolution has dropped and diffraction artifacts may appear.
Better ways to reduce brightness:
- Lower the lamp intensity with the dial.
- Add a neutral density filter, especially for bright LED sources.
- Leave the diaphragm set for contrast and detail.
Which Diaphragm Setup Do You Need?
Students and hobbyists: A disc or simple iris diaphragm is enough. Learning to adjust it for contrast gives most of the benefit.
Routine lab work such as blood smears or histology: Choose a microscope with an iris aperture diaphragm and an adjustable condenser.
Research and photomicroscopy: Look for a Köhler-capable microscope with both field and aperture diaphragms and a centerable condenser.
Unstained, transparent samples: Consider phase contrast or darkfield accessories, which use specialized stops instead of a plain diaphragm.
Iris vs disc: pros and cons
| Iris diaphragm | Disc diaphragm | |
| Control | Continuous and precise | A few fixed settings |
| Cost | Higher | Lower |
| Upkeep | Occasional cleaning | Almost none |
| Best for | Labs, clinics, serious hobbyists | Beginners and young learners |
Price varies widely by brand, optics and region, so compare current quotes from local suppliers. (Source: supplier quotes, current year.)
Common Mistakes and Warnings
- Closing it too far at high power. This causes ringing artifacts and loss of fine detail.
- Leaving it wide open for pale specimens. Transparent cells vanish into glare.
- Forgetting to readjust after switching objectives. Each lens needs its own setting.
- Lowering the condenser to cut light. This degrades the optical alignment.
- Forcing a stiff iris lever. The thin leaves can bend or jam.
Safety warning: never look at the lamp, or at sunlight reflected through the eyepieces. Eye damage is possible.
Troubleshooting Checklist
- Image looks flat or washed out: close the diaphragm slightly
- Image is dark with weak detail: open the diaphragm and raise the lamp intensity
- Bright rings or halos around objects: the diaphragm may be closed too far
- Uneven lighting across the field: check the field diaphragm and condenser centering
- Lever feels stiff or stuck: stop and have it cleaned or serviced
- Dust shadows in the view: clean the eyepieces and condenser top lens
Care, Maintenance and Servicing
Keep the microscope covered when not in use. Wipe optical surfaces with lens tissue only, and move the diaphragm lever through its full range now and then so the leaves do not seize.
Do not oil or lubricate the iris yourself. For a stuck or damaged diaphragm, use a qualified technician. Searches like microscope repair near me or microscope service center usually lead to authorized brand centers and scientific equipment distributors.
Buying Notes for Different Regions
Diaphragm quality is tied to the microscope and condenser as a whole, so buying decisions should focus on the full optical train.
- North America and Europe: educational suppliers, lab equipment dealers and online stores stock both disc and iris models, and authorized repair is widely available.
- South Asia, the Middle East and Africa: local scientific instrument dealers and school-supply markets commonly carry student and clinical models. Ask about spare condensers before buying.
- East and Southeast Asia: a broad range from entry-level to research grade is available through manufacturers and distributors.
When comparing a microscope dealer or supplier, check whether the model has an iris aperture diaphragm, whether the condenser is adjustable, and whether service parts are available locally.
Alternatives and Related Controls
| Control | What it does | When to use it |
| Lamp intensity dial | Changes brightness without hurting resolution | Whenever the image is too bright or dim |
| Neutral density filter | Reduces light evenly | Photomicroscopy and bright LED sources |
| Condenser height | Focuses the light cone | During Köhler alignment |
| Phase contrast | Reveals transparent specimens without staining | Live cells and unstained samples |
| Darkfield stop | Shows specimens bright on a dark background | Tiny particles and microorganisms |
| Staining | Adds natural contrast to the specimen | Fixed slides and histology |
Frequently Asked Questions
1.What is the function of the diaphragm in a microscope?
It controls the amount and angle of light reaching the specimen. That affects brightness, contrast, resolution and depth of field.
2.Where is the diaphragm located on a microscope?
Under the stage, attached to or built into the condenser. Advanced microscopes also have a field diaphragm near the light source.
3.What is the difference between a diaphragm and a condenser?
The condenser focuses light onto the specimen. The diaphragm is the adjustable opening that sets how much light and what cone angle the condenser delivers.
4.Should the diaphragm be open or closed?
Neither extreme works well. A partly closed setting often gives better contrast, while a more open setting suits high magnification. Adjust while watching the image.
5.Why does my microscope image look washed out?
The diaphragm is probably too wide, or the light is too strong. Close the diaphragm slightly and lower the lamp intensity.
6.Can you control brightness with the diaphragm?
You can, but it is not ideal. Use the lamp dial or a filter for brightness, and keep the diaphragm for contrast and resolution.
7.What does the field diaphragm do?
It limits the illuminated area of the specimen, which reduces stray light and helps with Köhler alignment. It does not set the light cone angle.
8.How do you use a disc diaphragm?
Rotate the disc until the hole that gives the clearest, highest-contrast image sits under the stage opening. Change it whenever you change objectives.
9.Do all microscopes have a diaphragm?
Most compound light microscopes do. Very simple or toy models may not have an adjustable one, and some digital models use fixed illumination.
Practical User Experience
This is based on how the diaphragm is described in the article, not on any personal use. The first thing a new user is likely to notice is how much the image changes with a small movement. Closing it slightly makes pale specimens easier to pick out, while opening it up suits higher power. That visible effect makes the control rewarding to learn.
A basic disc model looks simple to handle but limited, since it offers only a few fixed hole sizes. An iris diaphragm gives smoother, continuous control, which seems more convenient for fine-tuning, though the leaves can stick if neglected. A separate field diaphragm and a centerable condenser add more control, but the Köhler setup brings extra steps a beginner may find fiddly at first.
The main early difficulty is knowing when to stop. Starting at low power, opening the diaphragm fully and then closing it slowly while watching the image gives a clear reference point. Rechecking after each objective change soon becomes routine, and using the lamp dial for brightness keeps the diaphragm free for contrast.
Over a longer session, readjusting at every objective could feel repetitive, and the best setting still depends on the specimen. It rewards judgment more than any single fixed rule.
Overall impression: it seems easy to start with and takes some practice to use well, especially on iris and Köhler-capable setups. The effort looks worthwhile for the clearer image it gives.
Conclusion
The function of a microscope diaphragm is to shape the light that forms your image. Used well, it improves contrast, protects resolution and cuts glare, which is why it deserves attention before any other adjustment.
Start at low power, open the diaphragm, then close it gradually until detail and contrast balance. Readjust for each objective, use the lamp for brightness, and keep the iris clean. If you are buying, choose a model with an iris aperture diaphragm, and for serious work, a condenser with both aperture and field control.
Unfulfilled Points: An original labeled light-path diagram could not be included because it needs a custom image. Author and reviewer credentials could not be added because they require real names and qualifications.
These information are gathered from different surveys, medical tests and tech giants like Techradar and more. Our top priority is to provide you valuable information about Function of a Microscope Diaphragm.
For More Details About Different Digital Microscopes Click Here