What a Compound Light Microscope Is
A compound light microscope uses visible light and two lens systems, the objective and the eyepiece, to magnify thin, translucent specimens. Most models reach about 1000x, enough to see cells, protozoa and bacteria.
The word compound simply means two sets of lenses share the work. A hand lens uses one. Here the objective forms a first magnified image and the eyepiece enlarges it again for your eye.
If you are staring at a labeled diagram and trying to make sense of it, the easiest approach is to follow the light. Start at the lamp in the base and travel up to the eyepiece. Every part sits somewhere on that path, and its job is clearer once you see where it fits.
The Compound Light Microscope, Labeled
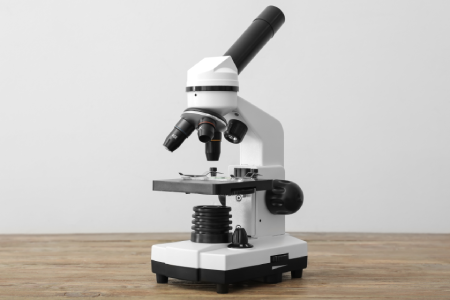
A good diagram has leader lines running from each name to its part. When you sketch your own, draw the instrument from the side and add the labels in this order: base, stage, objectives, eyepiece. Then fill in the rest.
The parts fall into three groups.
Optical parts
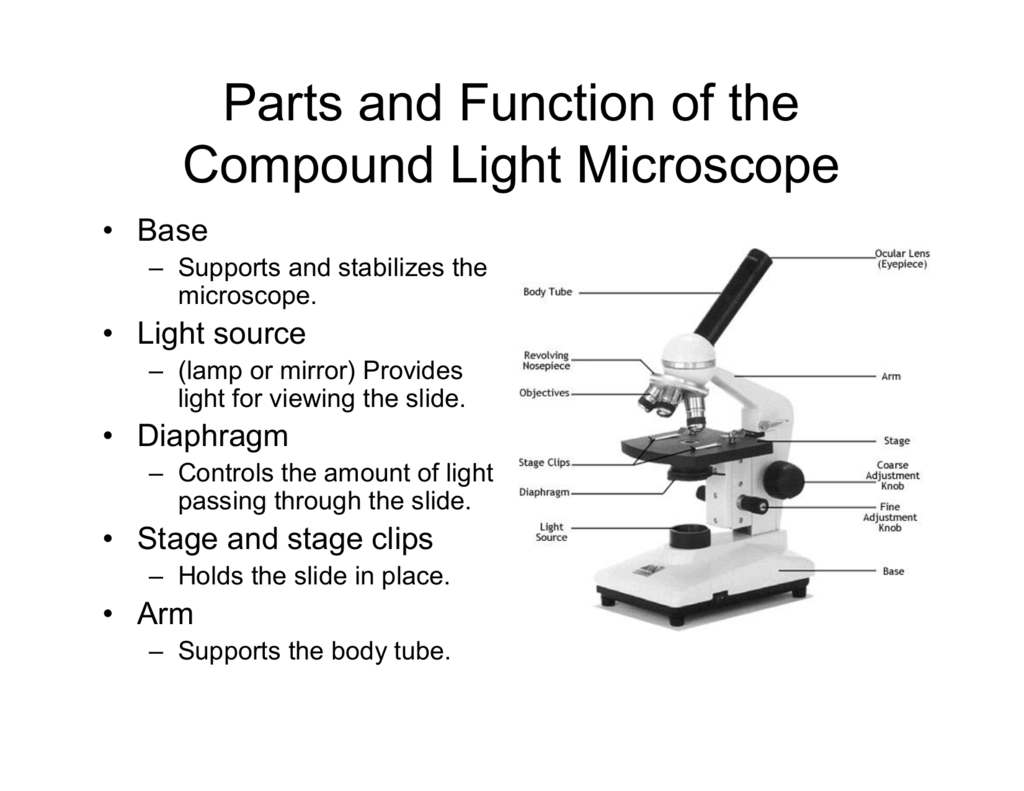
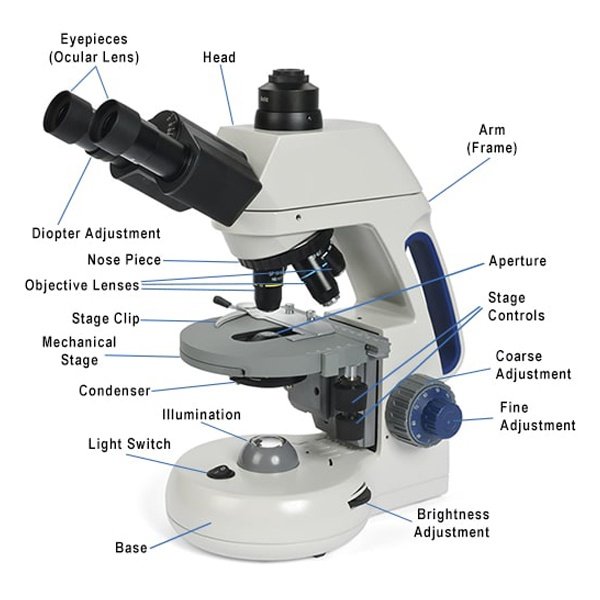
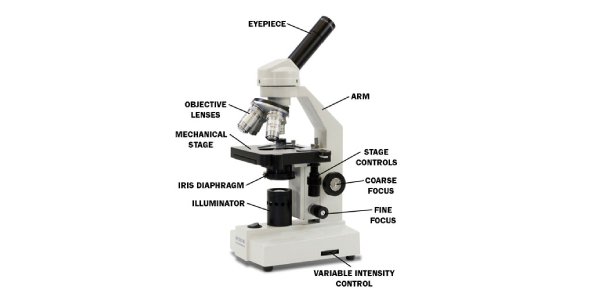
- Eyepiece (ocular lens): the lens you look through, usually 10x.
- Objective lenses: three or four lenses on the nosepiece, typically 4x, 10x, 40x and 100x.
- Condenser: a lens system under the stage that gathers light and focuses it on the specimen.
Mechanical parts
- Head (body tube): holds the eyepiece and keeps the optical path aligned.
- Revolving nosepiece (turret): rotates to bring each objective into position.
- Arm: the curved support connecting head and base.
- Stage: the platform holding the slide.
- Stage clips or mechanical stage: secure the slide, and on a mechanical stage, move it in small, controlled steps.
- Coarse focus knob: large, quick focusing movements.
- Fine focus knob: small adjustments for sharp detail.
- Base: the heavy foot that steadies the instrument, often housing the lamp.
Illumination parts
- Light source (illuminator): LED in most modern units, halogen in some older ones, and a mirror on very basic models.
- Iris diaphragm: controls the amount and angle of light reaching the specimen.
- Brightness control: adjusts lamp intensity.
Advanced models add a field diaphragm to limit the lit area. That one is worth knowing if your exam diagram looks more complicated than the usual classroom instrument.
Parts and Functions at a Glance
| Part | Group | What it does | Why it matters |
| Eyepiece (ocular) | Optical | Magnifies the image from the objective, usually 10x | Contributes to total magnification |
| Objective lenses | Optical | Form the first magnified image at 4x, 10x, 40x, 100x | Control detail and resolution |
| Nosepiece | Mechanical | Rotates objectives into place | Switch powers quickly |
| Head (body tube) | Mechanical | Holds eyepiece and aligns light path | Keeps the image clear |
| Arm | Mechanical | Supports the head, connects to base | Safe carrying point |
| Stage | Mechanical | Holds the slide | Steady viewing |
| Stage clips / mechanical stage | Mechanical | Hold and move the slide | Smooth scanning |
| Condenser | Illumination | Focuses light on the specimen | Brighter, sharper image |
| Iris diaphragm | Illumination | Adjusts light and contrast | Reveals transparent specimens |
| Light source | Illumination | Supplies illumination | No light, no image |
| Coarse focus knob | Mechanical | Large focus movement | Finds the specimen fast |
| Fine focus knob | Mechanical | Small focus movement | Gives crisp detail |
| Base | Mechanical | Stabilizes the instrument | Prevents tipping and vibration |
So how many parts are there?
Students often ask for “the 14 parts of a compound microscope.” The honest answer is that the count depends on the textbook.
Some books list stage clips and the mechanical stage separately. Others combine the head and body tube, or add the brightness control. If your course gives a specific list, use it. The functions above stay the same either way.
Names that change between countries and textbooks
The same part often has two names, which trips up many learners.
- Eyepiece and ocular lens are the same part.
- Illuminator and light source are the same part.
- Iris diaphragm and aperture diaphragm usually mean the same thing.
- Adjustment knobs may be called coarse and fine “adjustment” rather than “focus.”
Curricula such as GCSE, IGCSE, AP Biology, KCSE and middle-school life science courses (for example class 9 or class 11 biology in some systems) use these names differently. Check your syllabus wording before an exam. Spelling also shifts between regions, such as “micrometre” and “micrometer.”
How the Parts Work Together
The light path is short and logical.
- The light source in the base produces light.
- The condenser and iris diaphragm shape the beam.
- Light passes through the thin specimen on the stage.
- The objective lens collects it and forms a magnified image.
- The eyepiece magnifies that image again.
A useful memory trick for exams is to write the five stages down in order, then label each on your diagram. Following the light path is far easier to recall than a random list of names.
Magnification, Resolution and Why Bigger Isn’t Better
Total magnification is the eyepiece power multiplied by the objective power.
| Objective | Common name | Total with a 10x eyepiece |
| 4x | Scanning | 40x |
| 10x | Low power | 100x |
| 40x | High power (high dry) | 400x |
| 100x | Oil immersion | 1000x |
Objectives are often color-banded to make them easy to spot. A common convention is red for 4x, yellow for 10x, blue for 40x and white for 100x, but read the printed value on the lens to be sure.
Magnification alone does not give you detail. Resolution is the ability to separate two points that sit very close together. A light microscope typically resolves about 0.2 micrometres. Push past roughly 1000 times the objective’s numerical aperture and the image only gets bigger and blurrier. This is called empty magnification.
The physics behind this was worked out by Ernst Abbe in the 19th century. His work links resolution to wavelength and numerical aperture (NA), a number printed on each objective that describes how much light it gathers. A higher NA gives finer detail.
Two other terms appear often. Objectives are parfocal when the image stays roughly in focus as you switch between them. Working distance is the space between the objective and the slide, which shrinks as power increases. That shrinking gap is why careless focusing at 40x can crack a slide.
How to Use a Compound Microscope, Step by Step
- Carry it with two hands: one on the arm, one under the base.
- Switch on the light and set it to a comfortable medium.
- Rotate to the lowest power objective (4x or 10x) until it clicks.
- Place the slide on the stage, center the specimen over the opening and secure it with the clips.
- Focus with the coarse knob, watching from the side first so the lens does not touch the slide, then through the eyepiece.
- Sharpen with the fine knob.
- Adjust the diaphragm until the specimen stands out clearly.
- Move up in power one objective at a time.
- Use only the fine knob at 40x and above.
- Finish by returning to the lowest objective, lowering the stage, removing the slide and cleaning up.
How to focus at 400x
Find and center the specimen at 100x first. Rotate to 40x. Because the objectives are parfocal, you should see something right away. Use the fine focus knob only, then adjust the diaphragm for contrast.
If the image disappears, don’t reach for the coarse knob. Go back to low power, recenter and try again.
Using oil immersion at 100x
The 100x objective needs a drop of immersion oil between the lens and the slide. The oil has a refractive index close to glass, so it prevents light from bending away and keeps the image sharp.
Focus on the specimen at 40x, rotate the nosepiece halfway, add one drop of oil, then click the 100x objective into place and fine focus. When finished, wipe the oil off the objective with lens paper. Never use oil with a dry objective.
A note on Köhler illumination
Lab microscopes with a field diaphragm and adjustable condenser can be set up using Köhler illumination, a method developed by August Köhler. It aligns the light path so the field is evenly lit and contrast is at its best. Many school models don’t need it, but it is the standard technique in professional work.
Why the Lowest Power Comes First
The lowest objective has the widest field of view and the longest working distance. That makes it the easiest place to locate a specimen and the safest for the slide and the lens.
Think of it like finding a street on a map. You zoom out first, then zoom in.
Compound vs Stereo Microscope
People often confuse these two instruments. They answer different questions.
| Feature | Compound light microscope | Stereo (dissecting) microscope |
| Magnification | About 40x to 1000x | About 5x to 50x |
| Specimen type | Thin, translucent slides | Solid, opaque or large objects |
| Light | Mostly transmitted from below | Mostly reflected from above, sometimes both |
| View | 2D, flat | 3D, upright |
| Typical use | Cells, tissue, microbes, blood smears | Insects, plants, circuit boards, minerals |
If you want to see onion skin cells, use a compound model. If you want to inspect an insect wing without slicing it, use a stereo model.
Monocular vs binocular
Monocular models have one eyepiece and are lighter and cheaper. They work well for short sessions and for younger students.
Binocular models have two eyepieces and are far more comfortable for longer use. Most classrooms prefer them. Trinocular versions add a camera port for photographs or projection.
Choosing a Compound Microscope
This section matters whether you are a parent buying a first microscope or a department head ordering classroom sets.
Ask these questions in order:
- Who will use it? Younger children do well with a sturdy, simple model. Older students and professionals benefit from a binocular with a good condenser.
- What magnification do you actually need? 40x to 400x covers most school work. Add 1000x with oil immersion only if you plan to study bacteria.
- How good are the lenses? Achromatic objectives suit most learners. Plan objectives give a flatter image and are common in lab use.
- What light does it use? LED is cool, efficient and long-lasting. Look for adjustable brightness and an iris diaphragm.
- Can you get service and spare parts? This matters more than most buyers expect, particularly for classroom sets.
A warning about “2000x” boxes
A small plastic body advertising 1500x or 2000x is usually selling empty magnification. The optics cannot resolve that much detail, so the image is large but poor. A good 400x view beats a poor 2000x view every time.
What it costs
Prices vary by country, brand and import costs, so think in tiers rather than numbers.
- Entry level: lightweight body, LED lighting, achromatic lenses. Fine for hobbyists and young students.
- Mid-range: metal frame, binocular head, mechanical stage and a better condenser. The usual choice for schools.
- Professional: plan objectives, Köhler-capable illumination and often a trinocular head. Used in clinical and research labs.
Online retailers, school suppliers and scientific equipment dealers all sell compound models. If you search for a microscope shop near you, look for dealers who offer a warranty and local repairs. Established manufacturers include Olympus (now Evident), Nikon, Zeiss, Leica, Motic, AmScope and Swift.
Safety and Care
Microscopes are robust but not careless-proof.
- Lamp heat: halogen lamps get hot. Switch off and let them cool before moving the instrument.
- Electrical care: keep cords away from the stage and never use the microscope with wet hands.
- Slides: thick or chipped slides can break under a high-power objective.
- Lenses: use only lens paper and a cleaner designed for optics. Fingers and tissues leave marks or scratches.
- Oil: clean the 100x objective after every session.
- Storage: return to the lowest objective, lower the stage and cover with a dust cover in a dry place.
Heavily used lab instruments benefit from periodic professional servicing.
Common mistakes
- Chasing magnification instead of image quality.
- Using the coarse knob at high power.
- Skipping the diaphragm and wondering why a clear specimen looks empty.
- Starting with the 40x objective instead of the lowest one.
- Using thick specimens or no cover slip.
- Mixing up the parts under pressure. The coarse and fine knobs are the most common culprits. The larger knob is coarse and the smaller one is fine.
Where the Compound Microscope Came From
Robert Hooke published detailed observations of cork cells in Micrographia in 1665, the work that popularized the word “cell.” Antonie van Leeuwenhoek had by then ground single-lens instruments good enough to see bacteria and protozoa.
Later optical theory from Abbe and illumination methods from Köhler turned the instrument into the dependable tool you see in classrooms and clinics today. Terminology and magnification marking are covered by international standards such as ISO 10934 for light microscopy vocabulary and ISO 8039 for magnification, which are worth checking if you need formal definitions.
Practical User Experience
The first thing you notice with a labeled compound light microscope is how much the labels help. With the diagram beside you, the instrument stops looking like a tangle of metal, because each part has a clear job along the path the light follows.
The nosepiece and stage clips make everyday use easier. Rotating to another objective is quick, and the clips keep the slide from drifting while you adjust. A mechanical stage makes scanning smoother, though basic models rely on clips alone.
Focusing is where beginners struggle. It’s easy to reach for the wrong knob, and at 40x the gap between lens and slide is small. Starting at the lowest objective, using the coarse knob only at low power and switching to the fine knob after that makes the habit stick. The iris diaphragm also turns a washed-out view into something readable.
For longer sessions, a binocular head should feel more comfortable than a monocular one, which suits shorter use. The 100x oil immersion objective is the fiddliest part, since it adds oil and cleanup.
The limits are real: only thin, translucent specimens work, and detail stops at roughly 0.2 micrometres, whatever the box claims.
Overall, it’s fairly easy to understand once the parts are named, but it rewards patience. Expect a short learning curve with focusing, and put lens quality ahead of a bigger magnification number.
Frequently Asked Questions
1.What are the main parts of a compound light microscope?
The main parts are the eyepiece, objective lenses, nosepiece, arm, stage, stage clips, condenser, iris diaphragm, light source, coarse and fine focus knobs, and base.
2.What does the diaphragm do on a microscope?
The iris diaphragm controls how much light reaches the specimen and the angle at which it arrives. Closing it slightly increases contrast, which helps you see transparent cells.
3.How do you calculate total magnification?
Multiply the eyepiece power by the objective power. A 10x eyepiece with a 40x objective gives 400x.
4.What is the difference between the coarse and fine focus knobs?
The coarse knob makes large movements and is used only at low power to find the specimen. The fine knob makes tiny adjustments and gives sharp detail. Use only the fine knob at 40x and above.
5.Why should you start with the lowest power objective?
It gives the widest view and the greatest working distance, so you can find the specimen easily and avoid hitting the slide.
6.What is the maximum magnification of a compound light microscope?
Most reach about 1000x to 1500x. Resolution of about 0.2 micrometres limits how much useful detail you can see.
7.What is the difference between a compound and a stereo microscope?
A compound microscope shows thin, translucent slides at high magnification. A stereo microscope shows larger, solid objects in three dimensions at lower magnification.
8.Can you see bacteria with a compound light microscope?
Yes, usually at 400x to 1000x, and stained slides with oil immersion give the best results. Viruses are too small to see with a light microscope.
9.What is the condenser for?
The condenser gathers light from the lamp and focuses it onto the specimen. Along with the diaphragm, it controls brightness and contrast.
Conclusion
A compound light microscope labeled correctly stops looking like a tangle of parts and starts looking like a system. Light travels up from the base, gets shaped by the condenser and diaphragm, passes through the specimen, and is magnified twice before it reaches your eye.
If you are studying, practice drawing the diagram from memory and write each function beside its label. If you are buying, put lens quality, comfort and service ahead of the biggest magnification number on the box.
Then put a real slide on the stage. Onion skin or a drop of pond water is enough to make every part on the diagram click.
Unfulfilled Points: The original labeled diagram image, the printable worksheet with answer key, and an author bio with a review date could not be included, as they need design assets and real author details. Current ISO edition numbers should be confirmed before citing them formally
These information are gathered from different surveys, medical tests and tech giants like Techradar and more. Our top priority is to provide you valuable information about Compound Light Microscope Labeled.
For More Details About Different Digital Microscopes Click Here