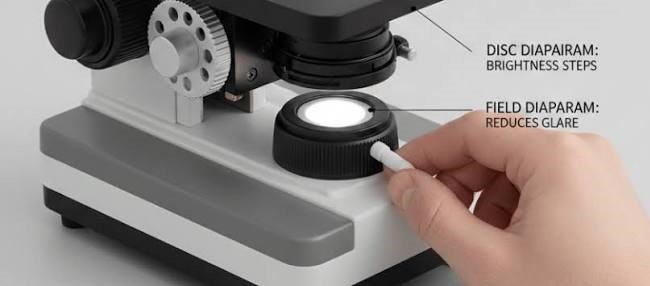
Diaphragm Microscope Function: What It Does and How to Set It
The diaphragm controls how much light reaches the specimen, and at what angle. Opening it brightens the image and supports fine detail. Closing it raises contrast and depth of field. Used well, it turns a flat, washed-out view into a crisp one.
If your image looks too bright, too dull or ringed with halos, this small part under the stage is often the reason. This guide explains what it does, how to adjust it, and how to judge it when you choose a microscope.
What Is a Microscope Diaphragm?
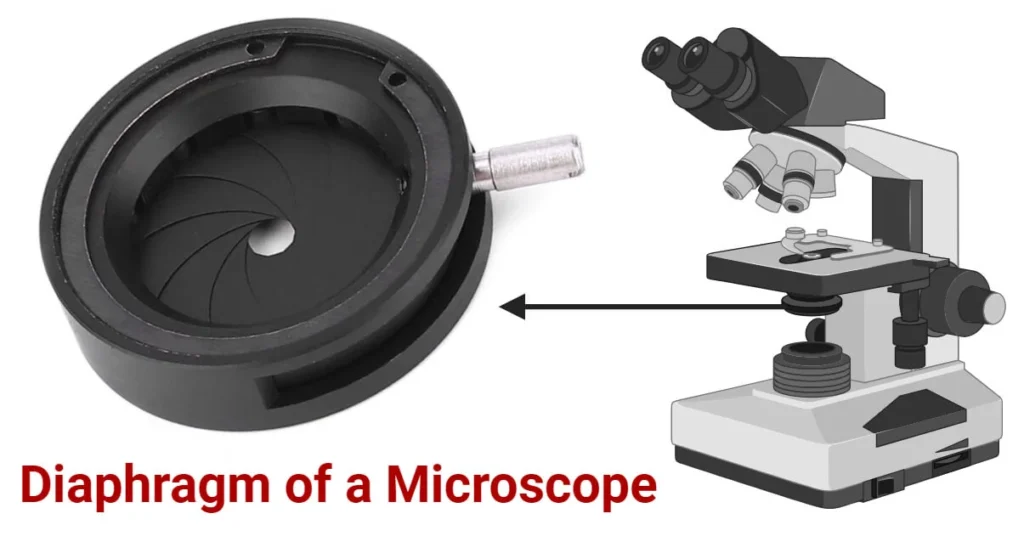
A microscope diaphragm is an adjustable opening in the light path, usually just below the stage. Most people call it the iris diaphragm because its overlapping metal blades open and close like the iris of an eye.
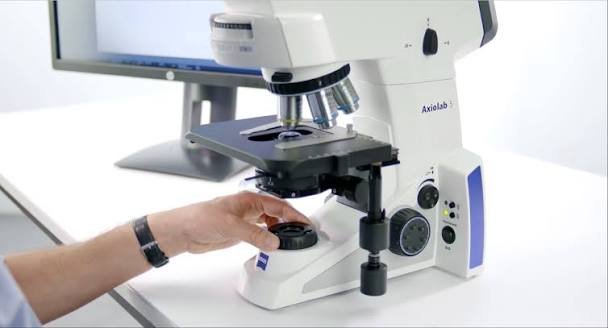
It sits between the light source and the specimen, close to the condenser. On simpler microscopes it is a lever or a rotating disc. On better instruments it is part of the condenser itself.
On a labeled diagram, look directly under the stage. That is where exams usually expect you to point.
What the Diaphragm Actually Does
The diaphragm limits the diameter and angle of the light cone that reaches the specimen. That one job produces four visible effects.
- Brightness: a wider opening lets in more light, a narrower one lets in less.
- Contrast: a smaller opening makes edges and internal structures stand out, especially in transparent or lightly stained samples.
- Resolution: a wider cone supports finer detail. Close it too far and detail suffers.
- Depth of field: a smaller opening keeps more of the specimen in focus at once.
It does not change magnification. Magnification comes from the objective lens and the eyepiece.
Contrast versus resolution
This is the trade-off at the heart of every adjustment. More open means better resolution but lower contrast. More closed means higher contrast but softer fine detail.
The best setting sits between the extremes, and it changes with the objective lens and the specimen.
Diaphragm or lamp: which controls brightness?
Use the lamp intensity control (or a neutral density filter) for brightness. Use the diaphragm for contrast and resolution.
Treating the diaphragm as a dimmer is the most common beginner mistake. It changes the light cone, so you pay for that dimming with image quality.
Why the Setting Matters: The Optics in Plain Language
Every objective lens has a numerical aperture (NA). This number describes how much light the lens can gather and how fine a detail it can resolve.
The condenser and its diaphragm decide how much of that capacity you actually use. If the light cone is too narrow, you waste the lens’s resolving power. If it is too wide, stray light creates glare and flattens the image.
A widely taught guideline in manufacturer microscopy guides, including those from Nikon, Olympus/Evident and Zeiss, is to fill roughly two-thirds to four-fifths of the objective’s back aperture. You check this by removing an eyepiece (or using a phase telescope) and looking down the tube.
Where It Sits and How It Relates to the Condenser
The light travels upward through the microscope in this order:
- Light source (LED, halogen lamp or mirror)
- Field diaphragm (on advanced models)
- Condenser with its aperture diaphragm
- Specimen on the stage
- Objective lens
- Eyepiece
The diaphragm and condenser work as a pair. The condenser focuses light onto the specimen. The diaphragm shapes how wide that light cone is. One cannot replace the other.
Types of Diaphragms
| Type | How it works | Where you find it |
| Iris diaphragm | Overlapping blades give smooth, continuous adjustment | Most compound microscopes |
| Disc diaphragm | A rotating disc with a few fixed hole sizes | Beginner and children’s microscopes |
| Aperture diaphragm | An iris inside the condenser that sets the light cone angle | Advanced compound microscopes |
| Field diaphragm | An iris near the lamp that sets the size of the lit area | Microscopes set up for Köhler illumination |
Aperture diaphragm versus field diaphragm
These two are often confused, and many pages use the terms loosely.
The aperture diaphragm controls the angle of light. It affects contrast and resolution. The field diaphragm controls the size of the illuminated patch. It reduces stray light and glare.
A simple way to remember it: the aperture diaphragm shapes how light hits the sample, and the field diaphragm controls where it lands.
Disc versus iris
A disc is simple and easy for young users, but it offers only a few steps. An iris gives smooth control and is the better choice for regular study, lab work or medical use.
How to Adjust the Diaphragm: Basic Method
This works for student and general-purpose microscopes.
- Secure a stained slide on the stage.
- Start with the lowest-power objective, usually 4x.
- Set the lamp to a comfortable medium level.
- Focus with the coarse knob, then the fine knob.
- Open the diaphragm fully and note the image.
- Close it slowly until the background looks clean and the edges look crisp.
- Change objectives, then repeat the adjustment.
The last step matters. Each objective has a different ideal setting, so a setting that worked at 10x will rarely suit 40x.
How to Adjust It: Köhler Illumination
Köhler illumination, introduced by August Köhler in 1893, gives even, controlled lighting. It needs a microscope with a field diaphragm and an adjustable condenser.
- Focus on a specimen at 10x.
- Close the field diaphragm until its edge appears in the view.
- Move the condenser up or down until that edge is sharp.
- Center the edge with the condenser centering screws.
- Open the field diaphragm until it just leaves the field of view.
- Remove an eyepiece and look down the tube.
- Adjust the aperture diaphragm until it covers about two-thirds to four-fifths of the back lens.
- Replace the eyepiece and fine-tune by eye.
Do not use condenser height to control brightness. Keep it where the field diaphragm edge is sharp.
Settings by Magnification
Treat these as starting points rather than fixed rules.
| Objective | Typical approach |
| 4x | Mostly closed. The low-NA lens collects little, and an open diaphragm causes glare. |
| 10x | Moderately closed. Balance contrast against brightness. |
| 40x | More open. The higher-NA lens needs a wider light cone. |
| 100x oil | Nearly fully open, with immersion oil used as the instructions require. |
Settings by specimen
- Unstained cheek cells or onion skin: close the diaphragm a bit more. Transparent edges need the extra contrast.
- Stained blood smears or tissue sections: keep it more open. The stain already supplies contrast, so preserve resolution.
- Pond water organisms: close slightly for more depth of field, so moving cells stay in focus.
- Plant or fungal sections: adjust in small steps. Fine cell walls need both contrast and resolution.
Troubleshooting: Fixing a Poor Image
| What you see | Likely cause | What to do |
| Washed-out, flat image | Diaphragm too open | Close it gradually |
| Dark, grainy image | Diaphragm too closed or lamp too low | Open it and raise lamp intensity |
| Rings or halos around objects | Diaphragm too closed, causing diffraction | Open it slightly |
| Glare at low power | Diaphragm open or condenser too high | Close it and check condenser position |
| Uneven lighting | Misaligned condenser or field diaphragm | Repeat the Köhler setup |
| Stiff or sticky lever | Dust or dried lubricant | Clean externally; ask a technician if it persists |
Common Mistakes to Avoid
- Using the diaphragm as a dimmer instead of the lamp control
- Leaving it fully open at low power
- Closing it too far at high power
- Forgetting to re-adjust after changing objectives
- Lowering the condenser to cut brightness
- Forcing a stiff lever
Handle the blades and condenser lens with care. Fingerprints, oils and scratches reduce image quality, and the damage is hard to reverse. On lamp-heated microscopes, let the lamp cool before touching parts near it, which matters in classrooms.
Choosing a Microscope: What to Check
If you are comparing models for home, school or a lab, the diaphragm tells you a lot about the build.
- Disc or iris? An iris gives finer control and suits anything beyond casual use.
- Is there a condenser with an aperture diaphragm? Without it, the diaphragm has limited effect at high power.
- Does it support Köhler illumination? Look for a field diaphragm and a focusable, centerable condenser.
- How does the lever feel? It should move smoothly and hold its position.
- Can you upgrade? A standard Abbe condenser fitting leaves room to improve later.
| Setup | Advantages | Limits |
| Disc diaphragm | Simple and low cost | Few settings |
| Iris diaphragm | Smooth, precise control | Slightly higher cost |
| Iris with Abbe condenser | Better contrast and resolution | A bit more to learn |
| Field and aperture diaphragms | Best consistency and image quality | Highest cost, needs practice |
Prices vary widely by brand, country and import costs, so compare current listings from your suppliers rather than relying on a single figure.
Alternatives and Upgrades
If the diaphragm alone does not give the image you want, consider these options:
- Neutral density filters reduce brightness without changing the light cone.
- An Abbe or achromatic condenser improves contrast and resolution on student microscopes.
- LED illumination with an intensity dial separates brightness from contrast control.
- Phase contrast or darkfield works better for transparent, unstained specimens.
Care and Maintenance
Keep the dust cover on between sessions. Wipe outer surfaces with a soft, dry cloth, and clean the condenser lens only with lens tissue and a suitable lens cleaner.
Do not oil the diaphragm yourself. If the blades stick, a service technician can fix it without damaging the mechanism. In warm, humid climates, store the microscope in a dry place, since fungus can grow on optical surfaces. For exams, check which term your syllabus uses (iris diaphragm or aperture diaphragm) so your answer matches the marking scheme, whether you study under CBSE, GCSE, AP or IB.
Practical User Experience
This section does not claim personal testing. It describes what people commonly run into at the bench, based on the optics covered above.
Beginners usually notice the diaphragm last. Early sessions often happen with it fully open, which gives a bright but flat image, and the instinct is to blame the lens or the slide.
Once the diaphragm is closed in small steps, the change shows within seconds. Cell edges sharpen, the background settles and glare drops, especially at 4x and 10x.
A few habits make daily use easier:
- Set brightness with the lamp first, then touch the diaphragm.
- Move the lever slowly and stop when edges look crisp, not when the field looks dim.
- Recheck after every objective change, since the 10x setting rarely suits 40x.
- On disc models, try each hole size in turn, because there are only a few steps.
Stiff or loose levers are the most common hardware complaint. A lever that drifts makes repeat settings hard, which is one reason to check the action of an iris diaphragm before buying.
Overall impression: the diaphragm is simple to learn and rewards a minute of practice. It cannot fix a poor lens or a dirty slide, but on a decent microscope it is the quickest route to a clearer image.
Frequently Asked Questions
1.What is the function of the diaphragm on a microscope?
It controls the amount and angle of light reaching the specimen. That changes brightness, contrast, resolution and depth of field.
2.Where is the diaphragm located?
It sits under the stage, between the stage and the light source. On advanced models, the aperture diaphragm is inside the condenser and the field diaphragm is near the lamp.
3.Is the diaphragm the same as the condenser?
No. The condenser focuses light onto the specimen. The diaphragm sets how wide that light cone is. They work together.
4.Should the diaphragm be open or closed?
Neither extreme. Aim for a clean background and sharp edges, usually more closed at low power and more open at high power.
5.What happens if the diaphragm is too open?
The image looks washed out because glare and stray light reduce contrast.
6.What happens if it is too closed?
The image gets darker and loses fine detail, and you may see rings or halos around objects.
7.Can the diaphragm adjust brightness?
It changes brightness, but it is the wrong tool for that. Use the lamp control or a filter, and keep the diaphragm for contrast and resolution.
8.Does the diaphragm change magnification?
No. Magnification depends on the objective and eyepiece. The diaphragm affects image quality, not size.
9.Do all microscopes have a diaphragm?
Most compound microscopes do. Very basic models may have a simple disc, and many stereo microscopes have no adjustable diaphragm.
Conclusion
The diaphragm is a small part with a large effect. It shapes the light cone, and that shapes how much contrast, detail and depth you see.
To get the most from it, follow these steps:
- Find the diaphragm under your stage and identify its type.
- Set brightness with the lamp, not the diaphragm.
- Close it gradually from fully open until the edges look crisp.
- Re-adjust whenever you change objectives.
- Learn Köhler illumination if you use the microscope often.
- When buying, favor an iris diaphragm with a good condenser.
Unfulfilled Points: A named expert author or reviewer and a first-hand practical-experience section were not included, because no real author details or hands-on experience were provided and none can be invented. “Microscope repair near me” is left as an internal-link theme, since the scope is Global.
These information are gathered from different surveys, medical tests and tech giants like Techradar and more. Our top priority is to provide you valuable information about Diaphragm Microscope Function .
For More Details About Different Digital Microscopes Click Here