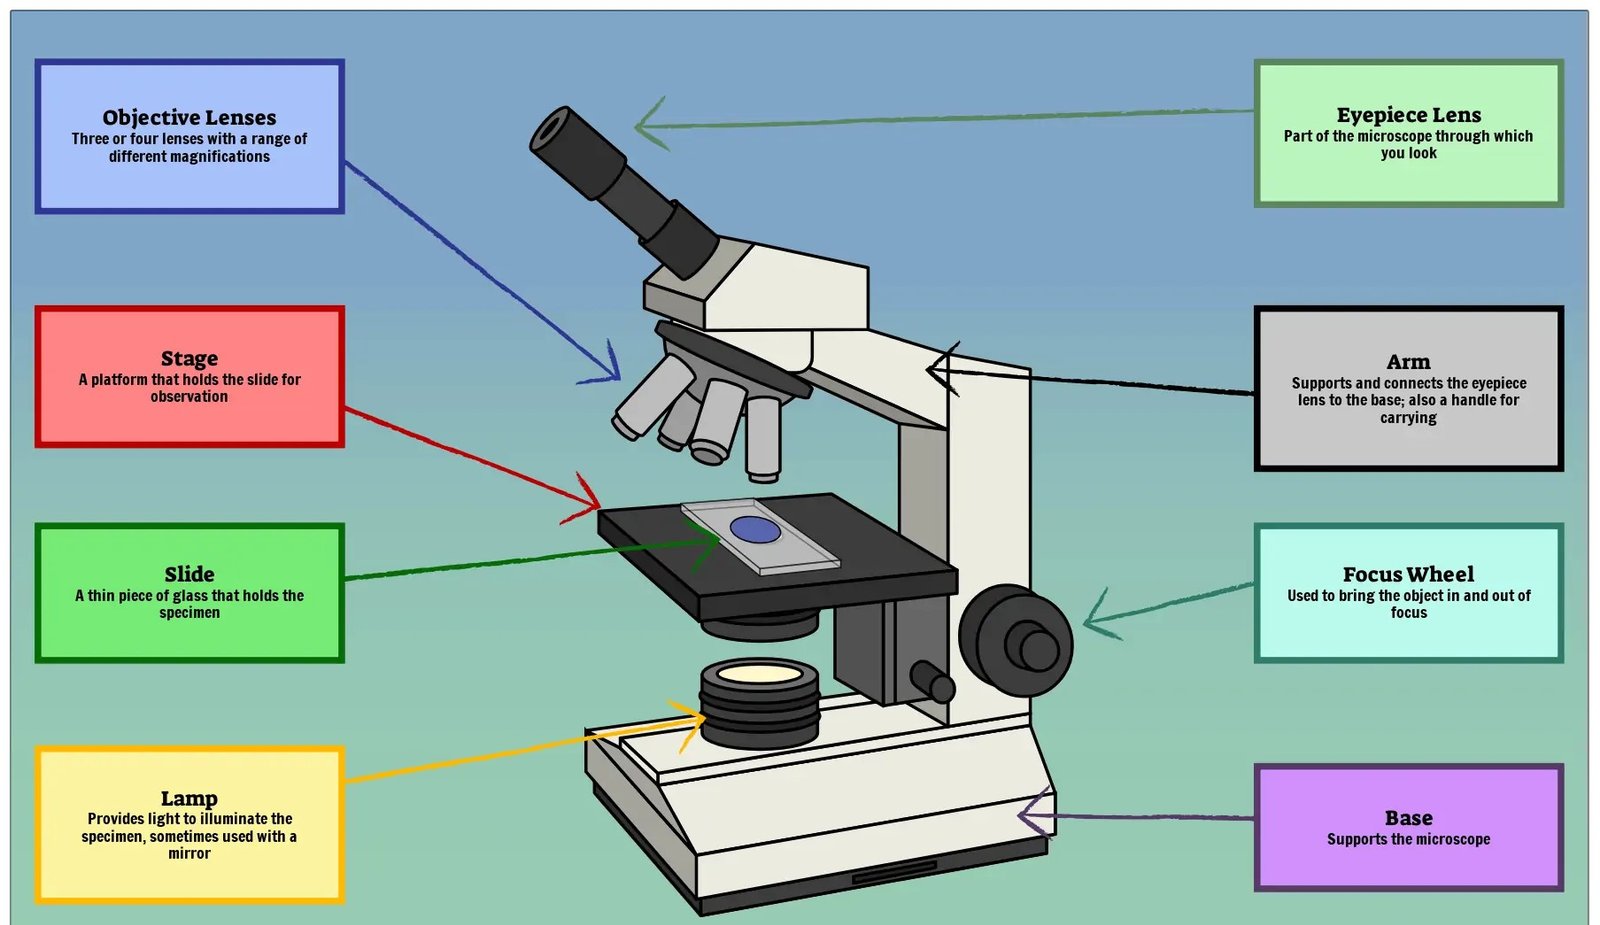
Meta Description: Parts of a microscope labeled with functions, magnification math, a focus-knob guide, and a self-test. Clear for students, teachers, and buyers.
Parts of a Microscope Labeled: Names, Functions and a Simple Way to Remember Them
A compound microscope has three groups of parts: optical parts that magnify (eyepiece, objectives), mechanical parts that support and move the slide (arm, base, stage, nosepiece, focus knobs), and illumination parts that light the specimen (illuminator, condenser, iris diaphragm).
That one sentence is the key to the whole diagram. Once you sort every part by its job, the names stop feeling random.
This guide walks through each part in the order light travels through the instrument. It also covers magnification, the correct focusing routine, common mistakes, and what to look for if you are choosing a microscope for a home, a classroom, or a lab.
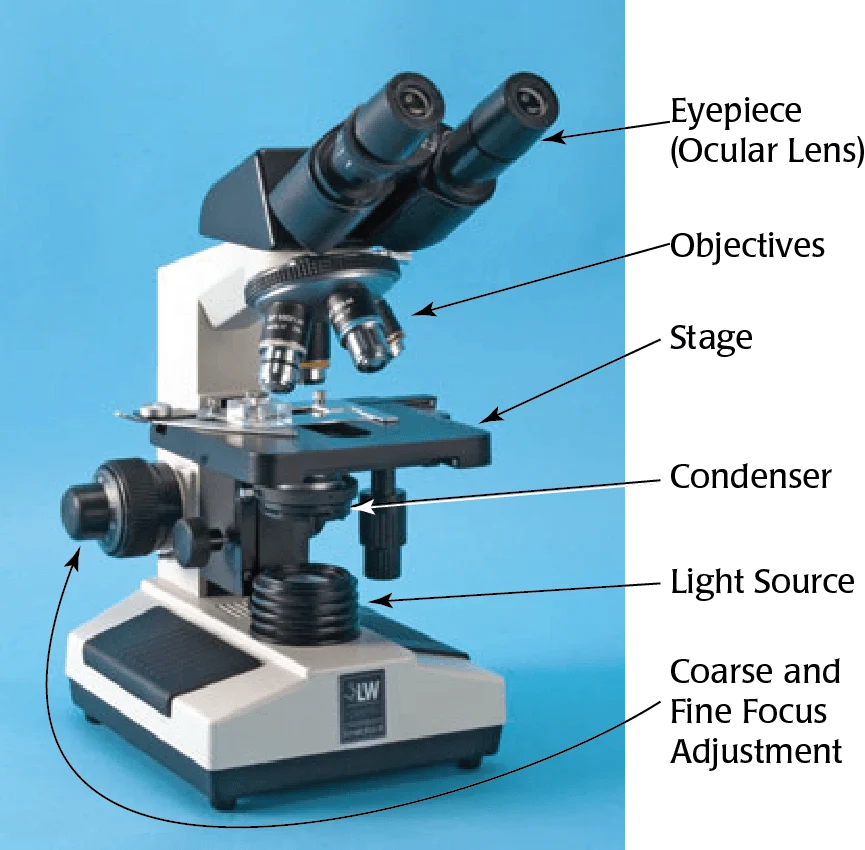
Parts of a Microscope at a Glance
Here is the standard compound light microscope, listed from top to bottom as you would label it on a diagram.
| # | Part | Group | What it does |
| 1 | Eyepiece (ocular lens) | Optical | The lens you look through; usually 10× |
| 2 | Head (body tube) | Mechanical | Connects the eyepiece to the objectives |
| 3 | Arm | Mechanical | Supports the head; your carrying handle |
| 4 | Revolving nosepiece (turret) | Mechanical | Rotates to switch objective lenses |
| 5 | Objective lenses | Optical | Provide the main magnification |
| 6 | Stage | Mechanical | Flat platform that holds the slide |
| 7 | Stage clips or mechanical stage | Mechanical | Hold the slide; a mechanical stage moves it precisely |
| 8 | Aperture | Illumination | Opening in the stage that lets light through |
| 9 | Condenser | Illumination | Gathers and focuses light on the specimen |
| 10 | Iris diaphragm | Illumination | Controls how much light passes and improves contrast |
| 11 | Illuminator (light source) | Illumination | LED or halogen lamp, or a mirror on older models |
| 12 | Coarse focus knob | Mechanical | Large, fast focus adjustments |
| 13 | Fine focus knob | Mechanical | Small, precise focus adjustments |
| 14 | Base | Mechanical | Heavy foundation; often houses the lamp |
Some diagrams merge or split a few of these, so you may see 12 labels in one textbook and 16 in another. The functions stay the same.
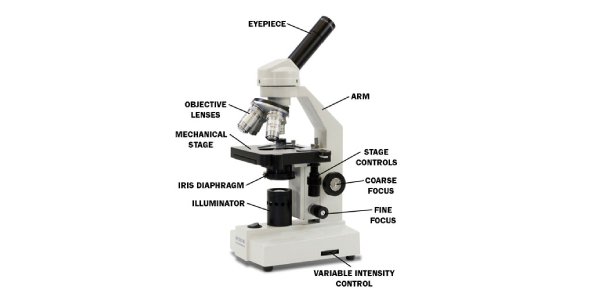
The Optical Parts: Where Magnification Happens
Eyepiece (Ocular Lens)
The eyepiece sits at the top of the head and is the lens closest to your eye. Most school microscopes use a 10× eyepiece, though 15× versions exist.
A monocular microscope has one eyepiece. A binocular model has two, which is easier on the eyes during long sessions. Binocular heads usually add two adjustments: one to match the spacing between your eyes, and a diopter ring to compensate if your eyes differ in strength.
Objective Lenses
Objectives are the lenses on the nosepiece, just above the slide. A typical set has three or four:
- Scanning (4×): finds and centers the specimen.
- Low power (10×): general viewing and easy focusing.
- High power (40×): cell-level detail.
- Oil immersion (100×): bacteria and fine structures; used with immersion oil.
Many manufacturers use colored rings to mark each power, but the colors are not universal. Always read the printed number on the barrel instead of relying on color.
That printed barrel also usually shows a second number called the numerical aperture (NA). A higher NA means the lens gathers more light and can separate finer detail.
Magnification vs. Resolution
These two ideas are often confused, and they matter for exams and for buying decisions.
- Magnification makes the image larger.
- Resolution is the ability to tell two close points apart as separate.
Light microscopes are limited by the wavelength of light, at roughly 0.2 micrometres. Past that point, a bigger image only looks blurrier. This is why a well-made 400× view can look sharper than a cheap 1000× one.
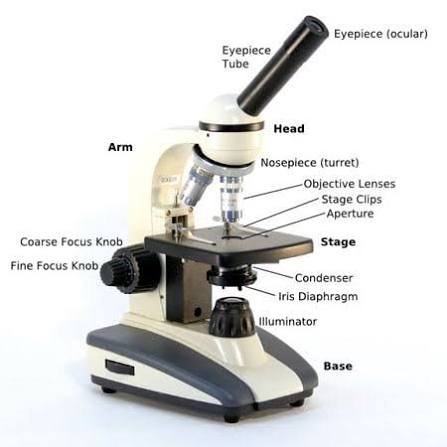
The Mechanical Parts: Support, Position and Focus
Head, Arm and Base
The head (or body tube) carries the image from the objective up to your eye. The arm connects the head to the base, and the base keeps everything stable.
Always carry a microscope with one hand on the arm and the other under the base. Never lift it by the stage or the head.
Revolving Nosepiece
Turn the nosepiece until you feel a click. That click means the objective is lined up with the light path. Turning it by the objectives themselves can knock them out of alignment, so grip the nosepiece body.
Stage, Stage Clips and Mechanical Stage
The stage holds a standard glass slide, about 3 × 1 inches (75 × 25 mm). Stage clips pin it in place.
A mechanical stage adds two small knobs that slide the specimen left-right and forward-back. At 400× or higher, even a tiny nudge by hand can lose the specimen, so this feature is a real help for beginners.
Coarse and Fine Focus Knobs
This is the pair students mix up most often.
| Knob | Size | Use it with | Watch out for |
| Coarse | Larger | 4× (and 10× to get roughly in focus) | Can drive the lens into the slide |
| Fine | Smaller | Every power; the only knob at 40× and 100× | Very little risk |
Coarse to find, fine to perfect. That rule prevents most broken slides.
The Illumination Parts: Getting Light Right
Illuminator or Mirror
Modern microscopes use an LED or halogen lamp in the base. LEDs run cool and last a long time. Halogen lamps are bright but get hot.
Older or budget models use a mirror to bounce room light or a lamp upward. If your diagram shows a mirror, it does the same job as the illuminator.
Condenser
The condenser sits under the stage. It concentrates light into a cone that fills the objective lens. On most classroom microscopes, keeping it near its highest position is a good starting point.
Better microscopes use an Abbe condenser, named after Ernst Abbe, who worked with Carl Zeiss on improving microscope optics. It is one reason quality models resolve more detail at high power.
Iris Diaphragm
The iris diaphragm is a ring of thin leaves that opens and closes like the pupil of an eye. It controls how much light reaches the specimen and how much contrast you see.
- Too much light washes out the image.
- Too little makes it dark.
- Transparent specimens, like cheek cells, often look better with less light.
Professionals set condenser and diaphragm together using Köhler illumination, a method developed by August Köhler in the 1890s that gives even, high-contrast lighting.
How the Parts Work Together
Follow the light and the diagram makes sense:
- The illuminator produces light.
- The condenser and iris diaphragm shape and limit it.
- Light passes through the stage aperture and the specimen.
- The objective lens creates a magnified image.
- The head carries that image upward.
- The eyepiece magnifies it a second time for your eye.
If one step fails, the whole image suffers. A dirty objective causes blur. A nearly closed diaphragm makes everything dark.
How to Calculate Total Magnification
Multiply the eyepiece power by the objective power.
| Eyepiece | Objective | Total magnification |
| 10× | 4× | 40× |
| 10× | 10× | 100× |
| 10× | 40× | 400× |
| 10× | 100× | 1000× |
Onion skin cells are easy to see at 100× to 400×. Bacteria usually need 1000× with oil immersion.
As magnification rises, two things shrink: the field of view (how much of the slide you see) and the working distance (the gap between lens and slide). That is why you always start on the lowest power.
Most quality microscopes are parfocal, meaning the image stays roughly in focus when you switch objectives. You then only need a small turn of the fine knob.
Using the Parts in the Right Order
- Carry the microscope by the arm and base.
- Rotate the nosepiece to the lowest-power objective.
- Place the slide on the stage and secure it with the clips.
- Center the specimen over the aperture.
- Turn on the light and open the iris diaphragm partway.
- Focus at 4× with the coarse knob, then sharpen with the fine knob.
- Switch to 10× and refine with the fine knob.
- Move to 40× and use only the fine knob.
- For 100×, add one drop of immersion oil, then focus with the fine knob only.
- When finished, return to the lowest power, remove the slide, switch off the light, and cover the microscope.
Types of Microscopes and How Their Parts Differ
| Type | How it differs | Typical use |
| Compound light | Several objectives, light passes through the specimen | Cells, microorganisms, prepared slides |
| Simple | One lens, no condenser | Basic magnification |
| Stereo (dissecting) | Two optical paths, 3D view, lower magnification | Insects, rocks, coins, circuit boards |
| Digital | Camera and screen replace or add to the eyepiece | Sharing and recording images |
| Inverted | Objectives sit below the stage | Cell cultures in dishes |
| Fluorescence | Special filters and light source | Research and clinical labs |
| Electron (SEM, TEM) | Uses electron beams, not light | Extremely fine structure |
Most school worksheets that ask you to label a microscope use a compound light model. Historical figures like Robert Hooke and Anton van Leeuwenhoek worked with much simpler instruments, and their observations laid the groundwork for cell biology.
A Simple Way to Remember and Label the Parts
Work top to bottom, and ask what each part does:
Eyepiece → Head → Arm → Nosepiece → Objectives → Stage clips → Stage → Diaphragm → Condenser → Light source → Base, with the coarse and fine knobs on the side of the arm.
Then test yourself with a blank diagram.
Quick self-test
- Which part holds the slide in place?
- Which part changes the magnification?
- Which knob is safe at 40×?
- Which part controls light and contrast?
- What is the total magnification of a 10× eyepiece with a 40× objective?
Answer key: 1) stage clips (or mechanical stage); 2) nosepiece with objectives; 3) fine focus knob; 4) iris diaphragm; 5) 400×.
Common Mistakes and Safety Notes
- Focusing with the coarse knob at high power. This can crack the slide or scratch the objective.
- Starting at high power. Begin at the lowest objective every time.
- Cleaning lenses with tissue or fingers. Use lens paper only.
- Ignoring the diaphragm. It is your main contrast control.
- Leaving oil on the 100× objective. Dried oil can damage the lens, so wipe it off after use.
- Carrying by the stage or head. Use the arm and base.
- Treating higher magnification as better. Resolution sets the real limit.
A few safety points for classrooms and labs: handle glass slides and coverslips carefully, keep cords clear of walkways, switch the lamp off when finished, and follow your school’s lab safety policy for immersion oil.
Check the power supply too. Some illuminators are built for 110 V, others for 230 V, and battery-powered LED models avoid the issue entirely.
Choosing a Microscope: What to Check
The parts you have just learned are also your buying checklist.
For students, parents and hobbyists
- Objectives: Glass optics beat plastic. Look for at least 4×, 10× and 40×.
- Lighting: LED is the practical default.
- Focus: Smooth, non-slipping coarse and fine knobs.
- Stage: A mechanical stage makes high-power viewing far easier.
- Condenser and diaphragm: An adjustable diaphragm gives noticeably better images.
- Frame: Metal is usually more durable than plastic.
For schools, labs and institutional buyers
- Durability: Look for a sturdy frame and stage that survive daily student use.
- Standard fittings: Objectives that follow a common thread standard, such as the RMS thread, are easier to replace or upgrade.
- Terminology: Manufacturers that follow ISO light-microscopy vocabulary make training materials easier to align.
- Service and warranty: Confirm parts availability, repair options, and warranty in your region.
- Power: Match the voltage to your country, or choose cordless.
- Volume: Ask about bulk pricing and matching accessories across a class set.
Established names include Zeiss, Leica, Nikon, Evident (the former Olympus life-science business), Motic and AmScope, covering everything from lab-grade instruments to budget student models.
| Option | Pros | Cons |
| Student compound microscope | Affordable, durable, classroom-ready | Limited advanced features |
| Digital or USB microscope | Easy image sharing and capture | Optics are often weaker |
| Stereo microscope | 3D view of solid objects | Low magnification |
| Used lab microscope | Excellent optics for the price | Needs inspection for wear and missing parts |
Pricing falls into rough tiers: entry-level student, mid-range hobby, and professional lab. Check current prices with retailers and suppliers in your region before deciding.
Pocket microscopes and phone clip-on lenses are fine for casual looking, but they cannot match the control and clarity of a true compound microscope.
Practical User Experience
This section reflects what a new user would realistically notice, based on the article’s information rather than any personal testing.
The labeled diagram looks like a lot at first, with 14 parts, but sorting them into optical, mechanical, and illumination groups makes it manageable. Following the path of the light, from illuminator to eyepiece, also gives a natural order for learning the names.
In practice, a mechanical stage is a real convenience. At 400×, nudging a slide by hand can lose the specimen, so the two small stage knobs save frustration. A binocular head also looks more comfortable for longer sessions than a single eyepiece.
The coarse and fine focus knobs are where beginners are most likely to struggle. They sit close together and do similar jobs, so it is easy to reach for the wrong one. Using the coarse knob only at low power and relying on the fine knob afterward helps, and parfocal objectives reduce refocusing when switching powers. The iris diaphragm also takes some practice, because too much light washes out transparent specimens. Adjusting it gradually while watching the image works better than guessing.
There are some limitations. The field of view and working distance shrink at higher powers, which makes finding the specimen harder. The 100× oil objective adds extra steps and cleanup. A higher magnification also does not guarantee a sharper image.
Overall, the labeled parts are easy to understand and become straightforward to handle once the routine is familiar. Patience is still needed at high power.
Frequently Asked Questions
1.What are the main parts of a microscope?
The main parts are the eyepiece, head, arm, base, nosepiece, objective lenses, stage, stage clips, condenser, iris diaphragm, light source, and the coarse and fine focus knobs. Together they magnify, light, support, and focus the specimen.
2.Which part of the microscope holds the slide?
The stage holds the slide. Stage clips secure it, or a mechanical stage grips it and lets you move it with two small knobs. This is the platform between the objectives and the condenser.
3.What is the difference between the coarse and fine focus knobs?
The coarse knob makes big, fast adjustments and is used only at low power. The fine knob makes small, precise adjustments at every power and is the only knob you should touch at 40× and 100×.
4.What does the diaphragm do on a microscope?
The iris diaphragm controls how much light passes through the specimen. Opening it brightens the image, while closing it increases contrast. Transparent specimens often look clearer with the diaphragm partly closed.
5.How do you calculate total magnification?
Multiply the eyepiece magnification by the objective magnification. A 10× eyepiece with a 40× objective gives 400×. With the 100× oil immersion objective, the same eyepiece gives 1000×.
6.Why do you start with the lowest power objective?
The lowest power gives the widest field of view and the largest working distance. That makes the specimen easier to find and lowers the risk of pushing the lens into the slide.
7.What is the difference between a compound and a stereo microscope?
A compound microscope passes light through thin specimens at high magnification. A stereo microscope gives a lower-power, three-dimensional view of solid objects, such as insects, rocks, or coins.
8.When do you need immersion oil?
You need immersion oil with the 100× objective. A drop between the lens and the slide improves resolution at that power. Clean the oil off the lens with lens paper immediately after use.
9.What is the difference between magnification and resolution?
Magnification makes the image bigger. Resolution is how clearly two nearby points appear separate. A microscope can magnify a lot and still look blurry if its resolution is poor.
Conclusion
Every part of a microscope belongs to one of three jobs: optical parts magnify, mechanical parts hold and focus, and illumination parts control the light. Learn them by job, and the labeled diagram becomes easy to reproduce from memory.
Your next steps are simple. Label a blank diagram from memory, then check it against the table above. Practice the ten-step routine on a prepared slide. Work out total magnification for each objective. If you are buying, use the checklist to compare optics, lighting, focus, and stage before you compare price.
Unfulfilled Points: An original labeled diagram or photography, a downloadable blank printable, and named author or reviewer credentials could not be included because they require real files and identities. Specific ISO standard numbers and curriculum codes were left out because they need verification before publishing.
These information are gathered from different surveys, medical tests and tech giants like Techradar and more. Our top priority is to provide you valuable information about label of a Parts of a Microscope Labeled.
For More Details About Different Digital Microscopes Click Here