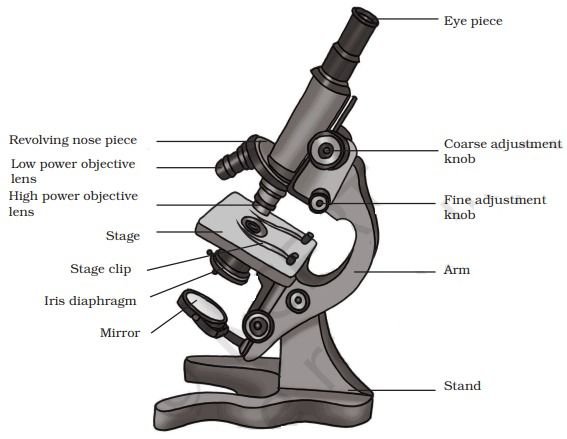
Label of a Compound Microscope: Every Part and What It Does
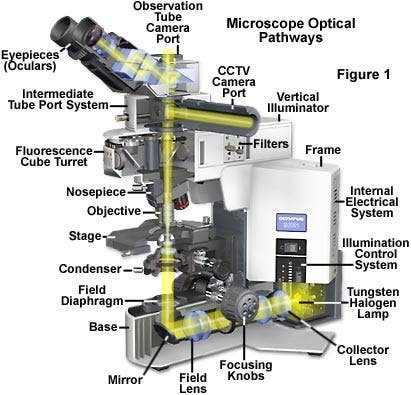
A labeled compound microscope shows the eyepiece, body tube, nosepiece, objective lenses, arm, stage, stage clips, condenser, iris diaphragm, light source, coarse and fine focus knobs, and base. Together, these parts magnify, illuminate, and support the specimen.
If you are staring at a blank diagram and need the names, start with the table below. If you want to understand how the parts work together, keep reading. That understanding is what makes the names stick, and it helps you handle the instrument without damaging it.
What Is a Compound Microscope?
A compound microscope is a light (optical) microscope that uses two lens systems in a row: the objective lens near the specimen and the eyepiece near your eye. The word “compound” simply means more than one lens is involved.
It is built for thin, transparent samples such as onion skin, cheek cells, blood smears, pond water, and prepared tissue slices. It is the standard instrument in school biology labs, undergraduate practicals, and clinical and research settings.
Quick Labeled Diagram Key
Use this key from top to bottom on almost any standard diagram.
| # | Part | Where it sits | What it does |
| 1 | Eyepiece (ocular lens) | Top of the body tube | Gives the final magnification, usually 10x |
| 2 | Body tube (head) | Between eyepiece and nosepiece | Keeps the lenses aligned |
| 3 | Revolving nosepiece (turret) | Below the body tube | Rotates to switch objectives |
| 4 | Objective lenses | Mounted on the nosepiece | Form the first magnified image |
| 5 | Arm | Vertical frame | Connects head to base; carrying handle |
| 6 | Stage | Platform below objectives | Supports the slide |
| 7 | Stage clips or mechanical stage | On the stage | Hold and move the slide |
| 8 | Aperture | Hole in the stage | Lets light reach the slide |
| 9 | Condenser | Under the stage | Focuses light on the specimen |
| 10 | Iris diaphragm | Under the condenser | Controls light and contrast |
| 11 | Light source (illuminator) | In or above the base | Provides illumination |
| 12 | Coarse focus knob | On the arm | Large focus adjustments |
| 13 | Fine focus knob | On the arm | Precise focus adjustments |
| 14 | Base | Bottom | Stabilizes the whole microscope |
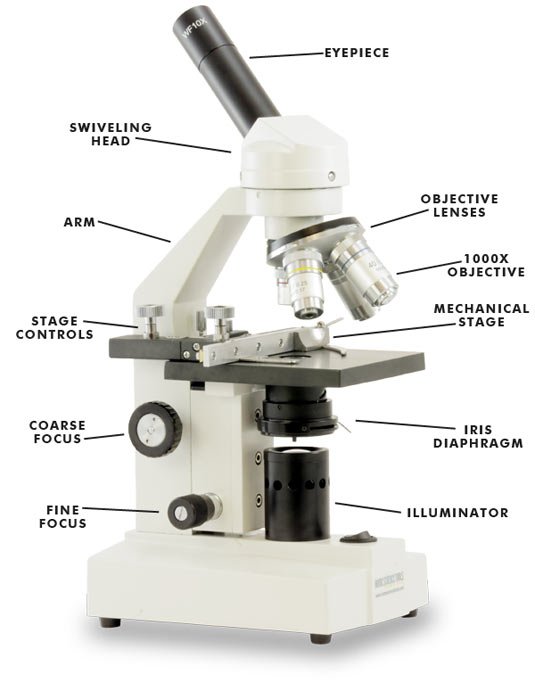
The Three Systems Behind the Parts
Grouping the parts makes them far easier to remember. Every part belongs to one of three systems.
- Optical system: eyepiece, objective lenses, body tube
- Illumination system: light source, condenser, iris diaphragm, aperture
- Mechanical system: base, arm, stage, stage clips, nosepiece, focus knobs
A simple way to hold it in your head: optics magnify, illumination lights, mechanics hold and move.
The Parts Explained
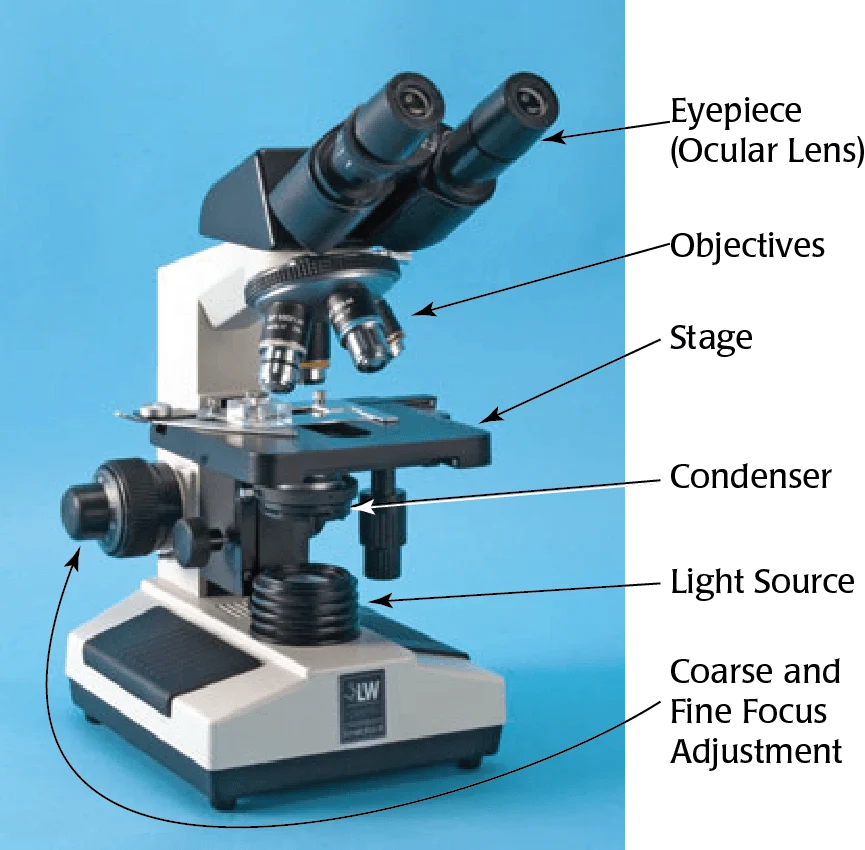
Optical Parts
Eyepiece (Ocular Lens)
The eyepiece is the lens you look through. Most student microscopes use a 10x eyepiece, though 15x and 20x versions exist. Binocular models have two, and some include a diopter adjustment that lets you compensate for differences between your eyes.
A classic exam mistake is confusing the eyepiece with the objective. The eyepiece is always at the top.
Objective Lenses
Objectives are the workhorses. They collect light from the specimen and form the first magnified image. Most compound microscopes carry three to five of them.
| Objective | Common name | Typical use |
| 4x | Scanning | Finding and centering the specimen |
| 10x | Low power | General viewing |
| 40x | High power | Cell detail |
| 100x | Oil immersion | Bacteria and fine structures |
Many manufacturers use colored bands on the barrels, often red for 4x, yellow for 10x, blue for 40x, and white for 100x. The convention is common but not universal, so read the engraving on your model.
Body Tube
The body tube (or head) holds the eyepiece at the correct distance from the objective. In binocular and trinocular models, prisms inside split the image between the two eyepieces or send it to a camera port.
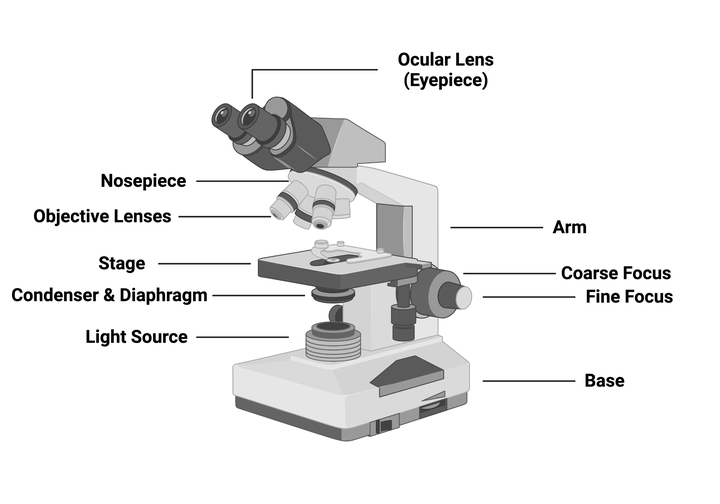
Illumination Parts
Light Source (Illuminator)
Modern microscopes mostly use LED illumination because it runs cool and lasts a long time. Older or budget models may use halogen or tungsten bulbs, and some very basic student models use a mirror to reflect room light.
Condenser
The condenser sits below the stage and gathers light into a focused cone on the specimen. The common design is the Abbe condenser, named after Ernst Abbe. A well-adjusted condenser noticeably improves sharpness.
Iris Diaphragm
The iris diaphragm (also called the aperture diaphragm) opens and closes to control how much light reaches the specimen. Closing it slightly raises contrast, which helps with pale, unstained cells. Opening it brightens the image but can wash out detail.
Aperture
The aperture is simply the opening in the stage that lets light pass upward to the slide. It is easy to forget on a diagram, so add it.
Mechanical Parts
Revolving Nosepiece (Turret)
This rotating disc holds the objectives. Turn it by its ridged edge, never by pushing on an objective barrel, which can knock the optics out of alignment.
Arm
The arm joins the head to the base. It is the part you grip when carrying the microscope.
Stage and Stage Clips
The stage supports the slide. On simple models, two stage clips hold it in place. On better models, a mechanical stage grips the slide and moves it left, right, forward, and back using two knobs. That control matters a great deal at 400x and above, where the slightest hand movement throws the specimen out of view.
Coarse and Fine Focus Knobs
The coarse knob makes large movements and belongs only with the 4x and 10x objectives. The fine knob makes tiny adjustments and is the only one you should touch at 40x and 100x.
Base
The base carries the weight of the instrument and usually houses the light source and power switch.
Same Part, Different Names
Textbooks and manufacturers do not always agree on terminology. If a diagram uses an unfamiliar word, check this table.
| You may see | It means |
| Ocular lens | Eyepiece |
| Turret | Revolving nosepiece |
| Aperture diaphragm | Iris diaphragm |
| Illuminator | Light source |
| Head | Body tube |
| Focus knobs | Coarse and fine adjustment |
Spelling also varies by region. “Colour-coded” and “color-coded” are both correct, and exam boards in the US, UK, India, Pakistan, Australia, and Canada all label the same core parts even when the diagrams look slightly different.
How Light Travels Through the Microscope
Following the light is the best way to understand the whole design.
- The light source produces illumination.
- The iris diaphragm sets how much passes through.
- The condenser focuses that light onto the specimen.
- The specimen absorbs and bends some of the light.
- The objective lens collects it and forms the first magnified image.
- The body tube carries the image upward.
- The eyepiece magnifies it again for your eye.
If any link is weak, the image suffers. A dirty objective, a closed diaphragm, or a poorly centered condenser can make a good microscope look bad. Because of the lens arrangement, the final image is inverted and reversed, so moving the slide left makes the image move right.
Total Magnification and Its Limits
The formula is simple: total magnification = eyepiece magnification × objective magnification.
| Eyepiece | Objective | Total |
| 10x | 4x | 40x |
| 10x | 10x | 100x |
| 10x | 40x | 400x |
| 10x | 100x | 1000x |
Bigger is not always better. Resolution, the ability to tell two nearby points apart, depends on the numerical aperture (NA) of the objective and the wavelength of light. Past the useful limit, you only get a larger blur. That is why a well-made 40x objective can outperform a poor 100x one.
Three related terms worth knowing:
- Field of view: the visible circle you see. It shrinks as magnification rises.
- Working distance: the gap between the objective and the slide. It gets very small at high power.
- Parfocal: objectives that stay roughly in focus when you rotate the nosepiece, so you need only a touch of fine focus.
How to Label a Compound Microscope Diagram
Work in a fixed order so nothing gets skipped.
- Label the eyepiece at the top.
- Move down to the body tube, nosepiece, and objectives.
- Add the arm on the vertical side.
- Label the stage, stage clips, and aperture.
- Go below the stage: condenser, iris diaphragm, light source.
- Add the coarse and fine focus knobs.
- Finish with the base.
- Draw straight label lines that touch the part itself and never cross each other.
A mnemonic for the top-to-bottom order: “Every Big Nose Often Attracts Some Curious Insects Looking For Bugs.” That stands for Eyepiece, Body tube, Nosepiece, Objectives, Arm, Stage, Condenser, Iris diaphragm, Light source, Focus knobs, Base.
Mistakes That Cost Marks
| Common error | Fix |
| Spelling “diaphram” or “condensor” | Diaphragm and condenser |
| Swapping eyepiece and objective | Eyepiece is at the top; objectives are on the nosepiece |
| Pointing a line at empty space | Make the line touch the part |
| Labeling only “knob” | Say coarse focus or fine focus |
| Leaving out the aperture or condenser | Both are frequently required |
How to Focus Without Damaging Anything
Careful focusing protects slides and lenses. Follow this order every time.
- Place the slide on the stage and secure it with the clips.
- Rotate the nosepiece to the 4x objective.
- Look from the side and lower the stage, or raise the objective, until it is close but not touching.
- Look through the eyepiece and use the coarse knob to find the specimen.
- Center the specimen and sharpen it with the fine knob.
- Switch to 10x, then 40x, refocusing with the fine knob only.
- Adjust the diaphragm until the contrast looks best.
Handling rules worth memorizing:
- Carry the microscope with one hand on the arm and one under the base.
- Clean lenses only with lens paper and an approved lens cleaner.
- Never use coarse focus at 40x or 100x.
- When you finish, return to the lowest objective, lower the stage, and switch off the light.
- Cover the microscope and store it somewhere dry to prevent fungus on the optics.
Oil immersion: The 100x objective is used with a drop of immersion oil between the lens and the slide. The oil has a refractive index close to glass, so less light is lost and the image is sharper. Wipe the oil off afterward.
Types of Compound Microscopes
| Type | Distinguishing feature | Best for |
| Monocular | One eyepiece | Basic classroom use |
| Binocular | Two eyepieces | Long viewing sessions |
| Trinocular | Extra camera port | Teaching and documentation |
| Digital | Built-in camera and screen | Sharing images in class |
| Inverted | Objectives below the stage | Cell culture dishes |
| Phase contrast | Special condenser and objectives | Live, unstained cells |
| Fluorescence | Special light source and filters | Research and diagnostics |
The labeling in this guide matches the standard brightfield model taught in most school and college courses.
Compound vs Stereo vs Simple Microscope
| Microscope | Magnification | Specimens | Image |
| Compound | High (roughly 40x to 1000x) | Thin, transparent slides | Flat, inverted |
| Stereo (dissecting) | Low | Whole, opaque objects such as insects or rocks | 3D, upright |
| Simple | Very low (a single lens) | Anything small | Upright |
If you need to see cell structure, choose a compound microscope. If you need to examine a whole object in three dimensions, choose a stereo microscope.
Choosing a Compound Microscope
The parts on the diagram double as a buying checklist. That works for parents and students as well as for schools and labs.
For individual students and families
- Prefer glass optics over plastic.
- Choose LED lighting for cool, long-lasting illumination.
- A metal frame lasts far longer than a plastic one.
- A magnification range of 40x to 400x covers most school work.
- Look for both coarse and fine focus, and an adjustable diaphragm.
For schools, teaching labs, and clinics
- Look for achromatic or plan-achromatic objectives and a mechanical stage.
- Consider binocular or trinocular heads for long sessions or camera use.
- Ask about warranty terms, spare-part availability, and after-sales support.
- Check that objective and eyepiece markings follow recognized conventions. ISO standards cover microscope marking, so confirm the current edition with your supplier.
- Confirm the power supply. Mains-powered models must match local voltage (roughly 110–120V in some regions and 220–240V in others). Battery or USB-powered LED models sidestep the issue.
What drives price: optics grade, LED versus halogen, mechanical stage, binocular or trinocular head, camera and imaging options, and the maker’s reputation. Established manufacturers include Olympus (now Evident), Nikon, Zeiss, Leica, and Motic, and many educational suppliers also sell well-regarded entry-level models. Compare current listings and warranty terms before deciding.
A Short Note on History
The compound microscope is traditionally credited to Zacharias Janssen in the late 1500s. Robert Hooke used one to describe cells in his book Micrographia, while Antonie van Leeuwenhoek famously used single-lens microscopes to observe microorganisms. Ernst Abbe later transformed optical design, which is why the Abbe condenser still carries his name.
Practical User Experience
For a first-time user, the labeled diagram makes the instrument far easier to read. Grouping the parts into optics, illumination, and mechanics gives a clear map, and the top-to-bottom labeling order means nothing gets skipped.
In use, the mechanical parts seem to matter most for convenience. The arm gives an obvious place to grip when moving the microscope, and the revolving nosepiece makes switching objectives quick. A mechanical stage looks especially helpful at 400x and above, where slight hand movement throws the specimen out of view. Simple stage clips would likely feel fiddlier at that power. The colored bands on the objectives help identify each one, but they aren’t universal, so checking the engraving is still necessary.
A beginner may find a few things awkward at first. Using coarse focus only at 4x and 10x takes discipline, and the inverted, reversed image makes the slide seem to move the wrong way. Starting at 4x, centering the specimen, and refining with fine focus looks like the practical way through. The iris diaphragm also takes some adjusting, since closing it adds contrast on pale cells while opening it can wash out detail.
The limitations are realistic. It suits only thin, transparent samples, the field of view shrinks at high power, the working distance becomes very small, and the 100x objective needs oil.
Overall, it seems approachable once the parts are understood, though it rewards careful handling over quick use. This impression comes from the article’s information alone, not from hands-on testing.
Frequently Asked Questions
1. What are the main parts of a compound microscope?
The main parts are the eyepiece, body tube, nosepiece, objective lenses, arm, stage, stage clips, condenser, iris diaphragm, light source, coarse and fine focus knobs, and base.
2. What is the function of the eyepiece?
The eyepiece magnifies the image formed by the objective lens. It is usually 10x and is the lens you look through.
3. What is the difference between coarse and fine focus?
Coarse focus moves the stage or head a long distance and is used at low power. Fine focus makes small adjustments and is used at every power, especially 40x and 100x.
4. What does the iris diaphragm do?
It controls how much light reaches the specimen. Adjusting it changes both brightness and contrast.
5. What does the condenser do?
The condenser focuses light from the source onto the specimen, which improves brightness and sharpness.
6. Which part of the microscope holds the slide?
The stage holds the slide, secured by stage clips or a mechanical stage.
7. How do you calculate total magnification?
Multiply the eyepiece magnification by the objective magnification. A 10x eyepiece with a 40x objective gives 400x.
8. Why is oil used with the 100x objective?
Immersion oil has a refractive index close to glass, so less light is lost and resolution improves at very high magnification.
9. Why is the image upside down?
The lens system inverts and reverses the image, so the slide appears to move in the opposite direction from your hand.
10. What is the difference between a compound and a stereo microscope?
A compound microscope shows thin, transparent specimens at high magnification. A stereo microscope shows larger, opaque objects in 3D at lower magnification.
11. Is the nosepiece the same as the turret?
Yes. The revolving nosepiece is also called the turret.
Conclusion
Labeling a compound microscope becomes simple once you see it as three systems: optics that magnify, illumination that lights the specimen, and mechanics that hold and focus. Learn the top-to-bottom order, use the mnemonic, and double-check the spelling of diaphragm, condenser, and objective.
Next, sketch the diagram from memory and label it, then test yourself on a real microscope by finding a slide at 4x and stepping up in power. If you are choosing an instrument, use the parts checklist above to compare models. Knowing what each part does is the fastest way to spot good optics, and it keeps both the slides and the microscope safe.
These information are gathered from different surveys, medical tests and tech giants like Techradar and more. Our top priority is to provide you valuable information about label of a compound microscope .
For More Details About Different Digital Microscopes Click Here