Labeled Microscope: Every Part, Its Function, and How to Use It
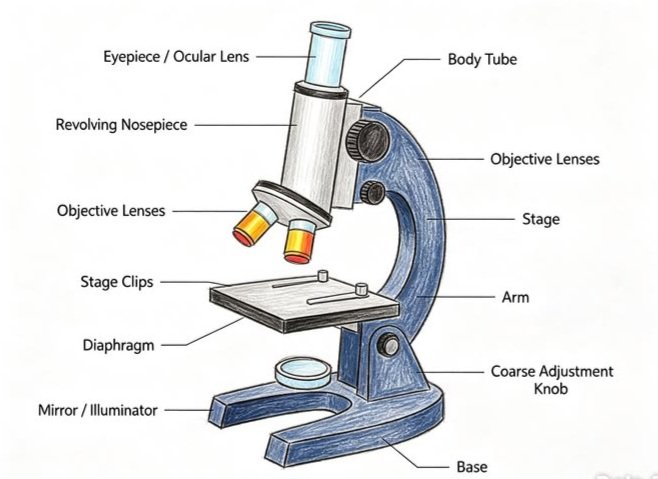
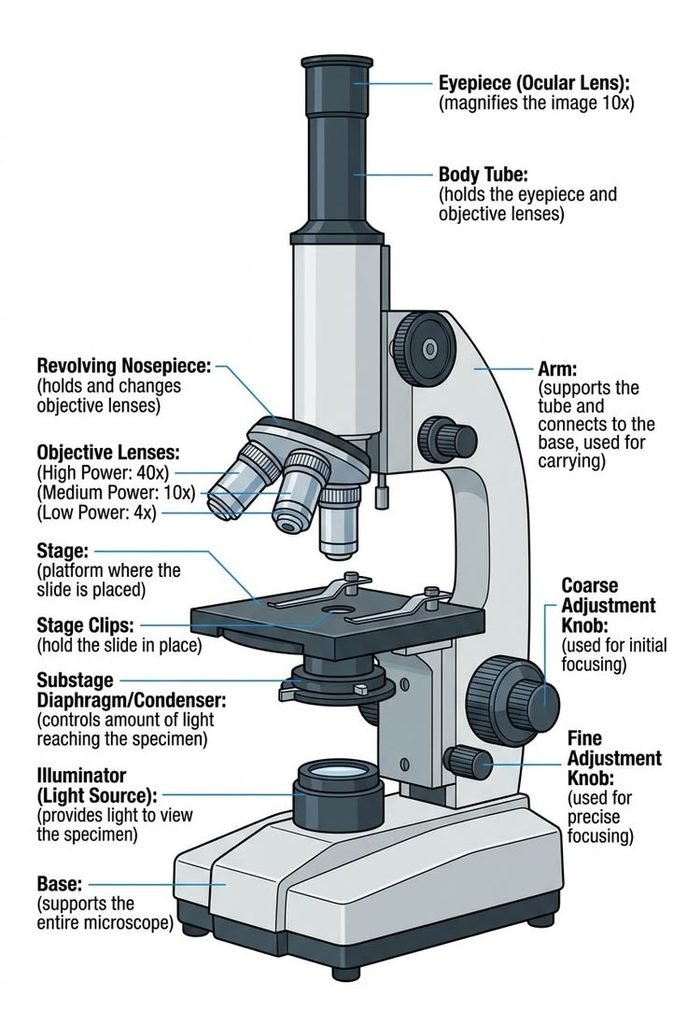
A labeled microscope is a diagram that names each part of the instrument: eyepiece, body tube, nosepiece, objective lenses, stage, stage clips, diaphragm, condenser, light source, coarse and fine focus knobs, arm, and base. Together these parts magnify tiny specimens by sending light through lenses.
Knowing where each part sits is only half the job. The other half is knowing what it does and what goes wrong when you misuse it.
This guide covers both, so you can label a diagram with confidence, use a microscope without damaging it, and pick the right type if you are buying one.
What a Labeled Microscope Actually Shows
A microscope is an optical instrument that enlarges objects too small to see with the naked eye, such as cells, bacteria, pond organisms, and plant fibers. A labeled diagram strips the instrument down to its named components so you can connect each name to a position and a job.
Most school diagrams show a compound light microscope. That is the type found in biology classrooms and entry-level labs, and it is the one this guide uses unless stated otherwise.
People look for labeled diagrams for different reasons:
- Students preparing for a lab practical or a label-the-diagram exam question
- Teachers and homeschool parents building a lesson or printing a worksheet
- Buyers who want to know what the parts are before comparing models
- New lab users who need to handle the equipment correctly from day one
The Parts at a Glance
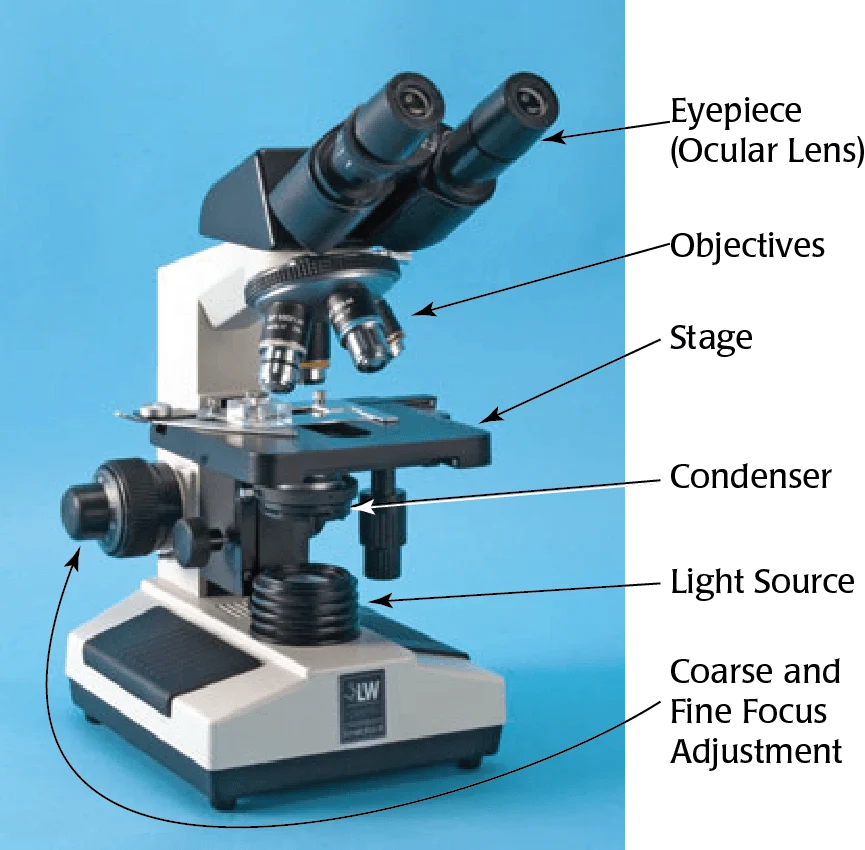
Picture the microscope from top to bottom. Light enters at the base, rises through the specimen, and reaches your eye through the eyepiece.
| Position | Part | What it does |
| Top | Eyepiece (ocular lens) | The lens you look through, usually 10x |
| Top | Head and body tube | Hold the optics in alignment |
| Upper middle | Revolving nosepiece (turret) | Rotates to switch objective lenses |
| Upper middle | Objective lenses | Do the main magnifying: 4x, 10x, 40x, 100x |
| Middle | Stage | Platform that supports the slide |
| Middle | Stage clips or mechanical stage | Hold and move the slide |
| Lower middle | Condenser | Focuses light onto the specimen |
| Lower middle | Diaphragm (iris) | Controls light intensity and contrast |
| Bottom | Light source (LED or mirror) | Illuminates the specimen |
| Side | Coarse focus knob | Large focus movements |
| Side | Fine focus knob | Final sharpening |
| Side | Arm | Connects head to base; your carrying handle |
| Bottom | Base | Stable foundation, often houses the lamp |
Why Different Sources List 7, 12, or 18 Parts
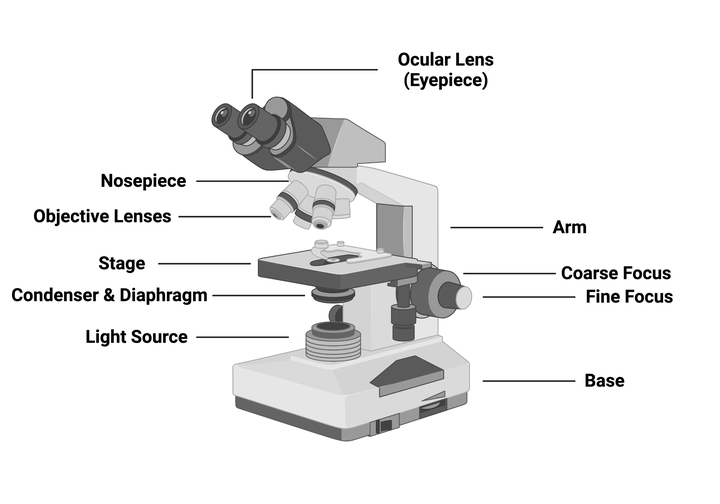
If you have compared diagrams, you have probably noticed that the count changes from site to site. One lists seven parts, another twelve, another eighteen.
Nothing is wrong with any of them. The difference is how finely the parts are split.
A short list might say “stage” and stop. A longer list separates the stage, stage clips, and mechanical stage controls. A basic list might skip the condenser and iris diaphragm entirely because many school microscopes have only a simple disc or lever.
For exams, follow the list your teacher or exam board uses. Terms also vary by region: “ocular lens” and “eyepiece” mean the same thing, as do “turret” and “revolving nosepiece.”
Structural Parts: The Frame That Holds Everything
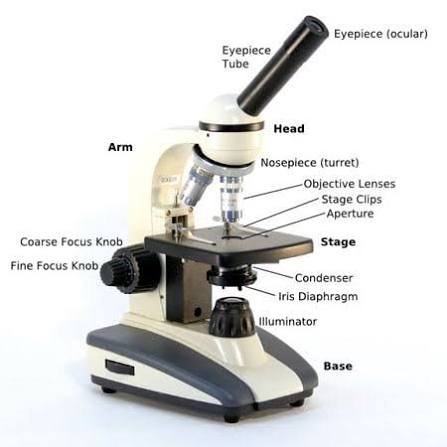
Structural, or mechanical, parts support the optics and position the specimen.
Base and Arm
The base keeps the microscope stable and usually contains the lamp. The arm connects the base to the head. Together they form the carrying points.
Head and Body Tube
The head holds the eyepiece and the optical path. The body tube maintains the correct distance between lenses. If this alignment is off, the image will be blurry no matter how well you focus.
Revolving Nosepiece
This rotating mount holds the objectives. Turn it until the lens clicks into place. A lens that is not fully seated gives a dark or off-center view, which beginners often mistake for a broken microscope.
Stage, Stage Clips, and Mechanical Stage
The stage is the flat platform under the objective. Clips keep the slide from sliding off. A mechanical stage adds two small knobs that move the slide smoothly in two directions, which matters a lot at high magnification, where a tiny nudge can move the specimen out of view.
Coarse and Fine Focus Knobs
The coarse knob makes large adjustments. The fine knob makes small ones. Confusing them is one of the most common labeling errors, so remember: coarse is for finding, fine is for sharpening.
Optical Parts: Where the Magnification Happens
Eyepiece (Ocular Lens)
Most student microscopes use a 10x eyepiece. A monocular scope has one; a binocular scope has two, which reduces eye strain during longer sessions.
Objective Lenses
The objectives sit on the nosepiece and are usually engraved with their power:
- 4x (scanning): finds the specimen on the slide
- 10x (low power): good for general viewing
- 40x (high power): shows cell detail
- 100x (oil immersion): reveals fine structure, but needs immersion oil
Objectives are usually parfocal, meaning the image stays roughly in focus when you rotate to a higher power. You will still need a small fine-focus adjustment.
Condenser and Diaphragm
These two are the most frequently confused parts.
The condenser sits under the stage and gathers light into a focused beam. The diaphragm, or iris, adjusts how much of that light reaches the specimen.
Think of the condenser as the lens that aims the light and the diaphragm as the dial that sets its strength. Too much light washes out clear specimens such as cheek cells. Too little hides their detail.
Illumination: The Light Source
Modern microscopes use LED lamps, which run cool and last a long time. Older or basic models may use a halogen lamp or a mirror that reflects room light upward.
Safety warning: never use a mirror to reflect direct sunlight into a microscope. It can cause serious, permanent eye damage.
How the Parts Work Together
Following the light makes the whole system easier to remember:
- The lamp produces light at the base.
- The condenser concentrates it, and the diaphragm regulates it.
- The light passes through the thin specimen on the slide.
- The objective lens captures it and forms a magnified image.
- The eyepiece magnifies that image again for your eye.
Total magnification is the eyepiece power multiplied by the objective power. A 10x eyepiece with a 40x objective gives 400x.
If any link in this chain is poorly adjusted, the picture suffers. Most “my microscope is broken” problems turn out to be lighting or focus problems.
Magnification, Resolution, and Field of View
Three terms appear often in exam questions and product descriptions.
- Magnification is how much larger the image looks.
- Resolution is how well the microscope separates two close points. Higher magnification does not guarantee better resolution.
- Field of view is the visible circle of the specimen. It gets smaller as magnification increases.
An objective’s numerical aperture (NA), usually engraved on the lens, indicates its light-gathering ability and resolving power. When two objectives have the same magnification, the higher NA generally resolves finer detail.
Working distance is the space between the objective and the slide when focused. It shrinks as power increases, which is why high-power focusing demands care.
How to Use a Microscope Step by Step
Follow this order every time and you will protect both the slides and the lenses.
- Carry it correctly. One hand on the arm, one under the base.
- Plug in and switch on the light.
- Rotate to the lowest-power objective (4x or 10x) until it clicks.
- Place the slide on the stage and secure it with the clips.
- Center the specimen over the light opening.
- Watch from the side and use the coarse knob to bring the objective close to the slide without touching it.
- Look through the eyepiece and turn the coarse focus slowly until the image appears.
- Sharpen with the fine focus knob.
- Adjust the diaphragm for the best contrast.
- Move up to higher power only after focusing at low power. At 40x and above, use fine focus only.
- Finish properly. Return to the lowest power, lower the stage, remove the slide, and cover the microscope.
Starting at low power gives you a wide field of view and plenty of working distance. It is the simplest habit that prevents cracked slides.
Common Mistakes and What They Cost You
| Mistake | What happens |
| Using coarse focus at high power | The lens can crack the slide and scratch itself |
| Skipping low power | You lose the specimen and waste time |
| Wiping lenses with fingers or tissue | Smears and permanent scratches |
| Too much light | Transparent specimens vanish |
| Carrying by the stage or knobs | Misaligned parts or a dropped microscope |
| Leaving oil on the 100x objective | Residue that damages the lens and blurs images |
| Treating magnification as quality | A blurry image just becomes a bigger blurry image |
Use lens paper and approved lens cleaner only, and clean oil off the 100x objective right after use.
Types of Microscopes and How Their Labels Differ
Most diagrams show the compound light microscope, but other types have different parts. Check which one your assignment means.
| Type | Best for | What changes on the diagram |
| Compound light | Thin specimens on slides: cells, tissue, microorganisms | Multiple objectives, condenser, stage |
| Stereo (dissecting) | Solid 3D objects: insects, minerals, circuit boards | Two optical paths, long working distance, top and bottom lights |
| Digital | Viewing on a screen, sharing, recording | Camera sensor, USB or HDMI output |
| Inverted | Cells growing in dishes | Objectives sit below the stage |
| Fluorescence | Specially labeled biological structures | Filter cubes and a specialized light source |
| Electron (SEM/TEM) | Nanoscale detail in research labs | Electron source, vacuum column, detectors |
A simple microscope is essentially a single magnifying lens, which is why its diagram is so short compared with a compound microscope.
Which Microscope Do You Need?
Work through these questions in order.
- What will you look at? Thin, flat specimens point to a compound microscope. Solid objects point to a stereo microscope.
- Who will use it? Young learners need something sturdy and simple. Older students and professionals benefit from quality glass optics and a mechanical stage.
- How much magnification? For most school work, 40x to 400x covers it. Going to 1000x needs oil immersion and good optics.
- Do you want to share or save images? A digital or camera-ready model helps.
- How often will it be used? Daily classroom use justifies a metal frame and replaceable parts.
Quick paths
- Student or homeschool: a basic compound microscope with LED light
- Teacher or school lab: sturdy compound scopes, ideally cordless LED for easy classroom use
- Hobbyist: a compound scope for pond water, a stereo scope for coins and insects
- Professional or lab buyer: plan objectives, a mechanical stage, and a dealer with warranty and service
Pros and Cons by Type
| Type | Pros | Cons |
| Compound | High magnification, standard for biology | Needs thin, prepared specimens |
| Stereo | 3D view, no slide preparation | Lower magnification |
| Digital | Easy sharing and recording | Image quality depends on the sensor and optics |
| Electron | Extreme detail | Costly and specialized |
What Microscopes Cost
Prices vary by brand, glass quality, and features. Treat these as ranges and check current listings.
| Tier | Typical user | Price range |
| Entry level | Kids and casual learning | Low (Source: current retailer listings) |
| Mid range | Students, teachers, hobbyists | Moderate (Source: current retailer listings) |
| Professional | Labs and clinics | High (Source: manufacturer price lists) |
If you are buying locally, searches like “microscope supplier near me” or “school lab equipment dealer in your city” turn up education suppliers and lab-equipment dealers. Before you buy, check:
- Voltage and plug type, which differ between regions
- Warranty and return policy
- Repair access, plus availability of spare bulbs, slides, and oil
- Authorized-dealer status, if you are buying a branded model
How to Memorize the Parts
A fixed route beats random flashcards. Go top to bottom, then side to side:
- Eyepiece
- Body tube
- Nosepiece
- Objectives
- Stage and clips
- Condenser and diaphragm
- Light source
- Arm, focus knobs, base
Then practice: sketch a blank microscope outline, label it from memory, check, and repeat until you get every part right. Pairing each name with its function (“diaphragm: controls light”) makes recall stick faster than names alone.
Care and Storage Checklist
- Cover the microscope after use
- Return to the lowest power and lower the stage
- Clean lenses with lens paper only
- Wipe oil from the 100x objective right away
- Switch off and unplug the light
- Store in a dry, dust-free place
- Always carry it with two hands
A Short History
The microscope’s story starts with early lens makers. Robert Hooke published detailed drawings of what he saw, including the cork cells that gave us the word “cell.” Antonie van Leeuwenhoek used single-lens instruments to observe microorganisms. Their observations helped lay the groundwork for cell theory, and the parts you are labeling today descend from those early designs.
Practical User Experience
Going by how the article describes the instrument, the first thing a new user is likely to notice is that the parts follow the path of the light. Once you trace it from lamp to eyepiece, the layout makes sense and the labels stop feeling like a memory test.
The mechanical stage looks like the most helpful feature for longer sessions. At high magnification a tiny nudge can push the specimen out of view, so smooth slide movement saves a lot of fiddling. A binocular head should also be easier on the eyes than a single eyepiece, and an LED lamp runs cool.
The early friction is probably the controls. Coarse and fine focus are easy to mix up, and the condenser and diaphragm look alike on a diagram. Starting at low power and remembering that coarse is for finding and fine is for sharpening should help. Parfocal objectives also keep the image roughly in focus when you change power, so only a small adjustment is needed.
The limitations are realistic. A compound microscope needs thin, prepared specimens, so it won’t suit solid objects. The field of view shrinks as magnification rises, and the 100x objective needs oil and cleanup afterward. Part counts also differ between diagrams, which can confuse someone checking against an exam list.
Overall, it seems easy to understand and handle once the light path and the two focus knobs click, with a modest learning curve and some practical limits. This impression comes only from the article’s information, not from hands-on use.
FAQs
1.What are the main parts of a microscope?
The main parts are the eyepiece, body tube, nosepiece, objective lenses, stage, stage clips, condenser, diaphragm, light source, coarse and fine focus knobs, arm, and base.
2.What does the diaphragm do?
The diaphragm controls how much light reaches the specimen. Opening it brightens the view; closing it increases contrast. Transparent specimens usually look best with the diaphragm partly closed.
3.What is the difference between coarse and fine focus?
Coarse focus moves the stage or body a large distance to find the image. Fine focus makes tiny adjustments to sharpen it. At high power, use fine focus only.
4.How do you calculate total magnification?
Multiply the eyepiece power by the objective power. A 10x eyepiece with a 40x objective gives 400x.
5.Why do you start with the lowest-power objective?
Low power gives a wider field of view and more working distance, so the specimen is easier to find and the slide is less likely to be hit by the lens.
6.How do you carry a microscope?
Hold the arm with one hand and support the base with the other. Keep it upright and close to your body, and never carry it by the stage or knobs.
7.What is the difference between a compound and a stereo microscope?
A compound microscope views thin, transparent specimens at high magnification. A stereo microscope gives a three-dimensional view of larger, solid objects at lower magnification.
8.What is the difference between a simple and a compound microscope?
A simple microscope uses one lens, like a magnifying glass. A compound microscope uses two lens systems, an objective and an eyepiece, for much greater magnification.
9.Monocular or binocular: which is better?
Binocular microscopes are more comfortable for longer sessions because you use both eyes. Monocular models cost less and are fine for short classroom use.
10.How do you label a microscope diagram in an exam?
Start at the top with the eyepiece and move down through the body tube, nosepiece, objectives, stage, diaphragm, and light source, then add the arm, knobs, and base. Use straight label lines that do not cross.
Conclusion
A labeled microscope is the quickest route to understanding how magnification, lighting, and focus fit together. Once you know what each part does, using the instrument becomes easy and safe.
Your next steps:
- Practice labeling a blank diagram using the top-to-bottom route.
- Run through the step-by-step workflow on a prepared slide, starting at low power.
- Follow the care checklist to protect the lenses and stage.
- If you are buying, use the type questions above and compare suppliers on warranty, voltage, and spare-parts access.
Do those four things and the diagram will stop being something to memorize and start being something you can use.
Unfulfilled Points: ISO standards and named optics brands were left out because their exact references could not be verified. An original diagram, printable blank worksheet, and quiz are visual assets that can’t be produced in text, so they need to be added when publishing.
These information are gathered from different surveys, medical tests and tech giants like Techradar and more. Our top priority is to provide you valuable information about Labeled Microscope .
For More Details About Different Digital Microscopes Click Here