What Are the Parts of a Microscope?
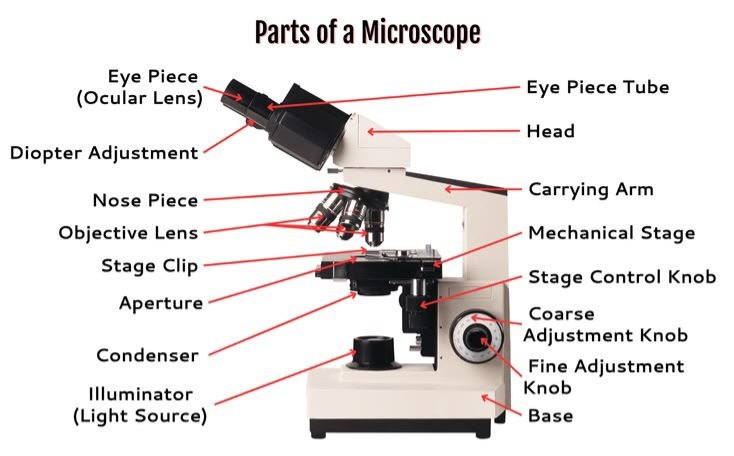
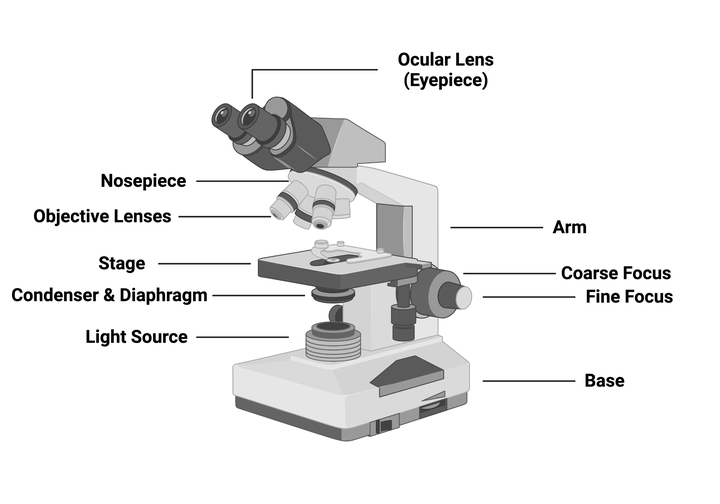
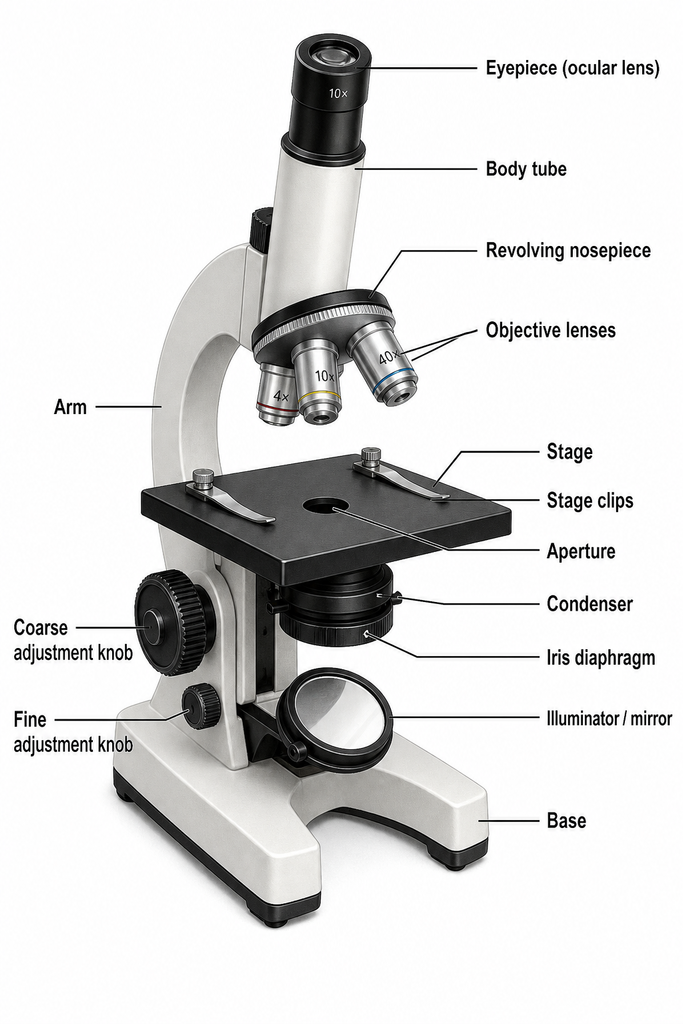
A compound light microscope has three groups of parts. The optical parts (eyepiece and objective lenses) magnify the image. The mechanical parts (arm, base, stage, nosepiece and focus knobs) hold and position the slide. The illumination parts (light source, condenser and diaphragm) light the specimen and control contrast.
Once you see the scope as three systems, the names stop feeling like a random list. Each part has one job, and most image problems trace back to one of them.
This guide covers what each part does, why it matters, how it commonly goes wrong, and how the parts work together. It is written for students, teachers, parents, lab staff and anyone thinking about buying a microscope.
Parts of a Microscope Labeled: Quick Reference
Use this table as a study sheet or as a checklist when you label a diagram.
| Part | System | What it does |
| Eyepiece (ocular lens) | Optical | Magnifies the image again; usually 10x |
| Objective lenses | Optical | Do the main magnifying; commonly 4x, 10x, 40x, 100x |
| Revolving nosepiece (turret) | Mechanical | Rotates to switch objectives |
| Head and body tube | Mechanical | Holds the eyepiece and keeps the optics aligned |
| Arm | Mechanical | Connects head to base; the carrying handle |
| Base | Mechanical | Provides stability; often houses the light |
| Stage | Mechanical | Platform that holds the slide |
| Stage clips or mechanical stage | Mechanical | Secure and move the slide |
| Coarse adjustment knob | Mechanical | Fast, large focus changes |
| Fine adjustment knob | Mechanical | Small, precise focus changes |
| Illuminator | Illumination | Supplies light |
| Condenser | Illumination | Focuses light onto the specimen |
| Iris diaphragm | Illumination | Controls light amount and contrast |
Some schools teach a “7 parts” version of this list. It usually covers the eyepiece, objective, stage, arm, base, focus knobs and light source. The table above is the fuller version you will meet in labs and on exams.
The Optical Parts
Eyepiece (Ocular Lens)
The eyepiece is the lens you look through, at the top of the head. Most are 10x, though 15x and 20x versions exist. Binocular models have two, and one usually has a diopter ring that corrects for the difference between your two eyes.
Objective Lenses
Objectives sit close to the specimen and form the first magnified image. A typical set includes:
- 4x (scanning): finds your specimen and gives an overview
- 10x (low power): general viewing
- 40x (high power): cell-level detail
- 100x (oil immersion): the finest detail, used only with immersion oil
Each objective is engraved with its magnification and its numerical aperture (NA). NA measures how much light the lens gathers, and a higher NA gives better resolution.
Good objectives are parfocal. After you focus at low power, the image stays close to focus when you switch to a stronger lens, so only a small fine-focus tweak is needed. The working distance, the gap between the lens and the slide, gets shorter as magnification rises. That is why high-power lenses are the easiest to damage.
Ocular vs. Objective: The Simple Difference
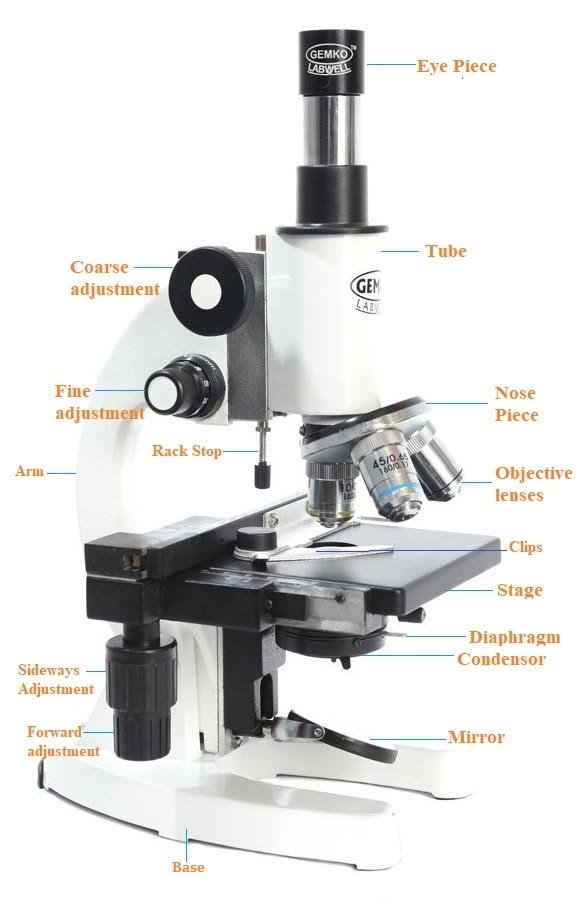
The objective is near the slide and does the primary magnifying. The ocular is near your eye and enlarges that image further. Students often swap the two under exam pressure. A memory aid: the objective is next to the object.
The Mechanical Parts
Head, Body Tube, Arm and Base
The head holds the eyepiece and keeps the light path aligned. The arm joins the head to the base, and the base keeps everything steady. To carry a microscope safely, hold the arm with one hand and support the base with the other.
Revolving Nosepiece
The nosepiece is the rotating turret that holds the objectives. Turn it by the ring, not by pulling on an objective, which can knock the lenses out of alignment.
Stage, Stage Clips and Mechanical Stage
The stage holds the slide. Basic models use spring clips, and you move the slide by hand. A mechanical stage has two small knobs that slide the specimen smoothly across the view. At 400x, a tiny movement moves the image a lot, so a mechanical stage is a real advantage for serious work.
Coarse and Fine Focus Knobs
The coarse knob makes big, fast adjustments and belongs to low power only. The fine knob makes small changes for a crisp image at 40x and 100x.
The rule to remember: use the coarse knob only with the 4x or 10x objective. At high power, using it can drive the lens into the slide.
The Illumination Parts
Light Source
Most modern microscopes use LED illumination, which runs cool and lasts a long time. Older or specialized models may use halogen bulbs. Very basic scopes use a mirror to bounce room light upward.
Condenser
The condenser sits under the stage and focuses light into a cone on the specimen. Its height affects sharpness and contrast, and it matters most at higher magnification.
Iris Diaphragm
The iris diaphragm opens and closes to control how much light reaches the specimen. Closing it increases contrast, which helps with transparent specimens such as cheek cells. Opening it brightens the view.
A common beginner habit is to blast the light to maximum. That washes out detail. Adjust the diaphragm first.
How the Parts Work Together: Focusing Step by Step
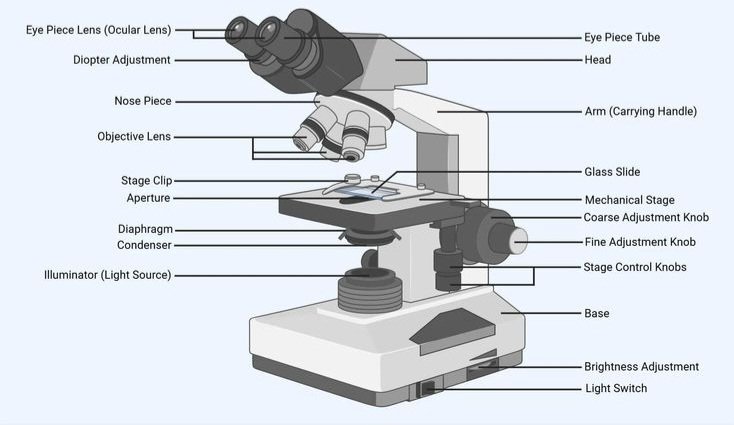
Following the same sequence every time protects both lenses and slides.
- Place the microscope on a stable surface and switch on the light.
- Rotate the nosepiece to the lowest-power objective (usually 4x).
- Secure the slide on the stage with the clips.
- Watching from the side, use the coarse knob to bring the stage and objective close together.
- Look through the eyepiece and turn the coarse knob slowly until the specimen appears.
- Sharpen with the fine knob.
- Adjust the iris diaphragm for the best contrast.
- Center the area you want, switch to 10x and refocus with the fine knob only.
- Repeat for 40x. Use oil only with the 100x objective, and only if it is labeled for oil.
Magnification Math
Total magnification is the eyepiece power multiplied by the objective power.
| Eyepiece | Objective | Total magnification |
| 10x | 4x | 40x |
| 10x | 10x | 100x |
| 10x | 40x | 400x |
| 10x | 100x | 1000x |
More magnification does not always mean more detail. Resolution, the ability to separate two close points, depends on the objective’s numerical aperture. Push magnification beyond what the optics can resolve and you just get a bigger blur, often called empty magnification. Rough rule: useful magnification tops out at roughly 1000 times the objective’s NA.
Field of view shrinks as magnification rises. At 40x you see a wide area, and at 400x you see only a sliver. That is why you always find your target at low power first.
Troubleshooting: Which Part Fixes Which Problem?
| Symptom | Likely cause | What to check |
| Image too dark | Diaphragm nearly closed, low light, wrong objective position | Open the diaphragm, raise brightness, click the nosepiece fully into place |
| Washed-out, low contrast | Too much light | Close the diaphragm slightly |
| Blurry at high power | Dirty lens or slide, wrong fine focus | Clean with lens paper, refocus with fine knob |
| Can’t find the specimen | Started at high power | Return to 4x |
| Half the view is dark | Objective not clicked into place, or the condenser is off-center | Rotate the nosepiece until it clicks |
| Image blurs when switching lenses | Objectives not parfocal or slide not flat | Recheck the slide, refocus with the fine knob |
| Dark spot that rotates with the eyepiece | Dust on the eyepiece | Clean it gently with lens paper |
Compound vs. Stereo vs. Digital Microscopes
Not every microscope has the same parts.
| Type | Best for | How its parts differ |
| Compound | Cells, bacteria, thin stained slides | Turret with several objectives; high magnification; light passes through the specimen |
| Stereo (dissecting) | Insects, circuits, coins, rocks, dissection | Two optical paths for a 3D view; lower magnification; often top and bottom lighting |
| Digital | Sharing, recording, teaching groups | Camera sensor and screen replace or supplement the eyepiece |
| Electron | Nanoscale research | Electron gun, electromagnetic lenses and vacuum chamber instead of glass lenses and light |
Light microscopy also includes techniques such as brightfield, darkfield, phase contrast and fluorescence, each of which adds specialized components to the basic layout.
Choosing a Microscope: What to Look For
If you are buying for a classroom, a home or a lab, use the parts to guide your decision.
Match the type to the task. Thin slides call for a compound scope. Solid objects call for a stereo scope.
Check the lenses. Glass optics with clearly marked NA beat plastic lenses. Achromatic or plan objectives give sharper, flatter, more color-accurate images than basic ones.
Look at the stage. A mechanical stage is worth the upgrade for anyone doing more than casual viewing.
Consider the light. LED with adjustable brightness is a safe default. A condenser with an iris diaphragm gives you real control over contrast.
Weigh the head. Binocular heads reduce eye strain during long sessions, while monocular scopes cost less.
Think about imaging. If you need to share or document what you see, look for a camera port or built-in digital camera.
Pros and cons of common upgrades
| Feature | Pros | Cons |
| Mechanical stage | Smooth, precise movement | Costs more |
| LED illumination | Cool, efficient, long-lived | Cheap LEDs may not dim well |
| Plan objectives | Flat, sharp field | Higher price |
| Binocular head | Comfortable for long use | Extra cost and weight |
| Built-in camera | Easy sharing and capture | Sensor quality varies |
Price tiers. Microscopes fall into rough tiers: student and hobby models, prosumer models, and laboratory-grade instruments. Prices vary by region, brand and specification, so check current listings before you decide.
Where to buy. Educational suppliers serve schools and homeschool families. Laboratory distributors serve clinics, universities and industry. Authorized brand dealers handle warranty and service. Online marketplaces offer variety, but check seller reliability. Well-known manufacturers include Zeiss, Nikon, Leica and Olympus (now operating as Evident). Whichever route you choose, look for spare parts, repair support, calibration options and a clear return policy.
Regional notes. Voltage and plug type differ between countries, so confirm compatibility. Terminology also varies. Some regions say “eyepiece” and others say “ocular,” and curricula may label parts slightly differently. If you search for a microscope near you, ask whether the seller offers local service and replacement objectives.
Common Mistakes and Warnings
- Using the coarse knob at 40x or 100x, which can crack a slide or damage the lens
- Skipping the low-power start
- Using immersion oil on an objective not built for it
- Touching lenses with fingers, tissues or clothing (use lens paper)
- Carrying the scope by the stage or head
- Opening the diaphragm fully for every slide
- Leaving a slide on the stage during storage
- Forcing a stuck knob instead of checking for a blockage
- Ignoring electrical safety, for example a frayed cord or a plug that does not match local voltage
In lab settings, follow your institution’s safety and sterilization practices, especially when handling biological specimens and immersion oil.
Care and Cleaning Checklist
- Turn the light down before switching off
- Rotate to the lowest-power objective
- Lower the stage fully
- Clean lenses with lens paper and a lens-safe cleaner
- Wipe oil off the 100x objective after each session
- Cover the scope with a dust cover
- Store it away from moisture and direct sunlight
A Quick History Note
Microscopy grew from the work of several pioneers. Robert Hooke described cells in cork, and Antonie van Leeuwenhoek used single-lens instruments to observe microorganisms. Zacharias Janssen is often credited with early compound microscopes, though that attribution is debated among historians.
Memory Aids for Students
- Follow the light path: light source, condenser, specimen, objective, eyepiece, eye.
- Group by job: see (optical), hold (mechanical), light (illumination).
- Coarse is for large steps, fine is for finishing.
- Objective is next to the object.
- Label your own diagram from memory, then check it against the table above. Active recall works far better than rereading.
FAQs
1.What are the 3 main parts of a microscope?
The optical parts (eyepiece and objectives), the mechanical parts (arm, base, stage, nosepiece, focus knobs) and the illumination parts (light source, condenser, diaphragm).
2.What is the function of the objective lens?
It sits closest to the specimen and creates the first magnified image. Different objectives give different magnifications and levels of detail.
3.What is the difference between coarse and fine focus?
Coarse focus makes large, quick adjustments and is used at low power. Fine focus makes small adjustments for sharpness and is the only knob to use at high power.
4.What does the diaphragm do on a microscope?
It controls how much light reaches the specimen. Closing it raises contrast, and opening it brightens the view.
5.How do you calculate total magnification?
Multiply the eyepiece power by the objective power. A 10x eyepiece with a 40x objective gives 400x.
6.Why should you start with the lowest-power objective?
It gives the widest field of view, makes the specimen easier to find and keeps the lens far from the slide.
7.What is the function of the condenser?
It gathers light and focuses it on the specimen, improving brightness, sharpness and contrast.
8.What is the highest magnification of a light microscope?
Most compound models reach 1000x with a 10x eyepiece and a 100x oil immersion objective. Beyond that, light microscopes hit the limits of resolution.
9.Which microscope part controls the amount of light?
The iris diaphragm, together with the brightness control on the illuminator.
10.What are the parts of a stereo microscope?
Two eyepieces, a paired optical system, a focus knob, a stage and top and bottom lighting. It usually has a magnification range rather than a rotating set of objectives.
Practical User Experience
Going through the parts of a microscope, the first thing I’d notice is that the three-system split (optical, mechanical, illumination) makes the instrument less intimidating. Once each part has one job, the long list of names feels manageable.
The features that look most helpful in practice are the parfocal objectives and a mechanical stage. Switching lenses needs only a small fine-focus tweak, and a mechanical stage makes it much easier to move a slide smoothly at 400x, where a tiny nudge shifts the image a lot. An LED light with an iris diaphragm also gives real control over contrast, so there’s no need to run the light at full brightness.
A beginner will probably struggle at first with finding the specimen and with the focus knobs. Starting at the lowest-power objective and using the coarse knob only at low power seems to be the easiest way to build confidence. Mixing up the eyepiece and objective is also easy, though remembering that the objective sits next to the object helps.
There are some limitations. The field of view shrinks quickly at higher magnification, so finding the target takes patience. The 100x objective needs oil and careful cleaning, and the high-power lenses sit close to the slide, so mistakes can damage them. Binocular heads and mechanical stages are more comfortable for longer sessions but cost more.
Overall, the parts are straightforward to learn and handle once the basic routine becomes habit. The main effort is learning to be gentle and methodical.
Conclusion
Every part of a microscope has one clear job, and the image you see is only as good as the weakest link in the chain. Learn the three systems first, then the individual names fall into place.
Your next steps:
- Label a real microscope or a diagram using the quick-reference table.
- Practice the nine-step focusing routine until it is automatic.
- Learn the magnification formula and read the NA on each objective.
- If you are buying, match the type, lenses, stage and lighting to what you plan to view.
- Follow the care checklist after every session.
With these basics, you can identify the parts, use the scope safely and get sharper, clearer images.
Unfulfilled Points: A downloadable label-yourself diagram or quiz, an original labeled diagram, schema markup and a named author or reviewer could not be produced in text. Specific ISO standard numbers and current brand details were left out because they need verification, and exact pricing was left out because no verified figures were available.
These information are gathered from different surveys, medical tests and tech giants like Techradar and more. Our top priority is to provide you valuable information about Parts of a Microscope.
For More Details About Different Digital Microscopes Click Here