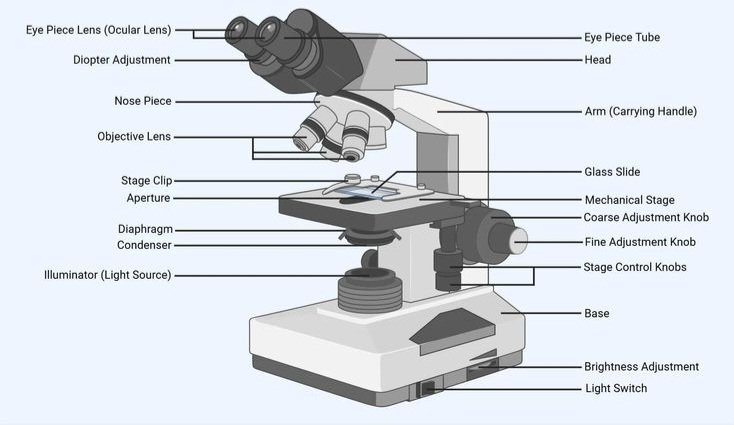
Meta Description: Microscope parts labeled and explained: eyepiece, objectives, stage, condenser, diaphragm and focus knobs, with functions and a 12 vs. 14 parts guide.
Microscope parts labeled: The Complete Guide
A compound microscope has three groups of parts. Optical parts (eyepiece, objective lenses, condenser) magnify and form the image. Mechanical parts (arm, base, stage, nosepiece, focus knobs) hold and move things. Illumination parts (light source, diaphragm) control brightness and contrast.
If you’re staring at a blank diagram and a deadline, that summary is your starting point. The rest of this guide explains every label, why it’s there, and how the parts work together.
The standard reference here is the compound light microscope, the kind found in most classrooms and labs. Later sections cover how the parts change on stereo, digital, inverted and electron microscopes.
How to read a labeled microscope diagram
Every labeled diagram, whether it says “labeled” or “labelled,” follows the same logic. Start at the top and work down.
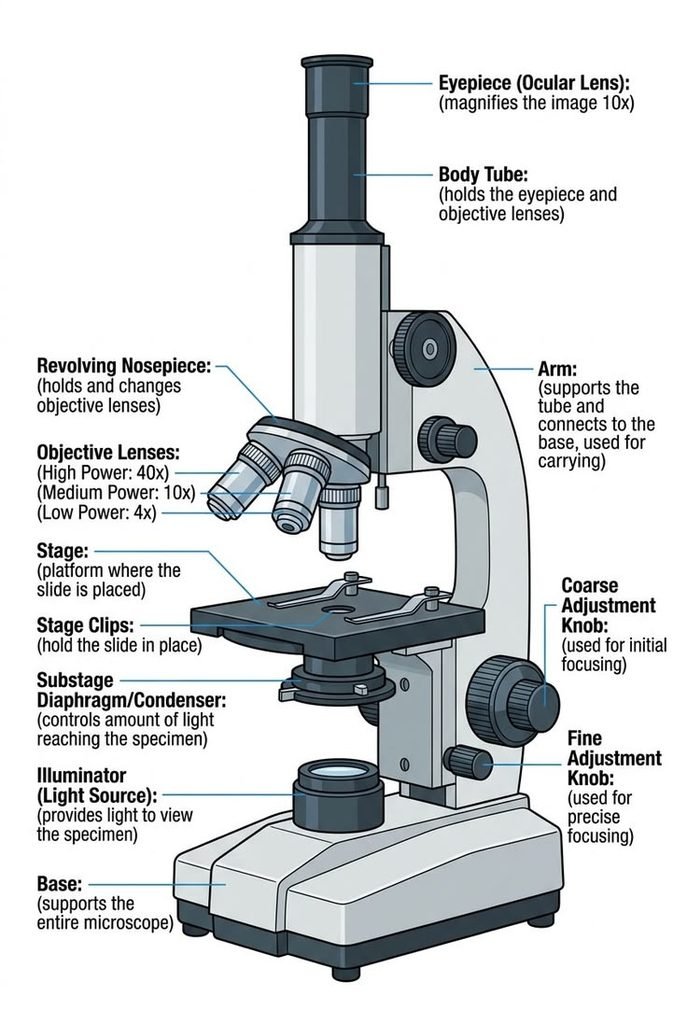
The eyepiece sits at the top of the head. Below it are the body tube and the revolving nosepiece carrying the objective lenses. Further down are the stage, condenser, diaphragm and light source, all mounted on a solid base. The arm is the curved piece connecting the head to the base, and the focus knobs sit on its side.
Once you see the instrument as a vertical light path, the names stop feeling random.
Quick-reference table: parts, aliases and functions
| Part | Also called | Group | What it does |
| Eyepiece | Ocular lens | Optical | Magnifies the image for your eye (usually 10x) |
| Body tube | Head, barrel | Mechanical | Holds the eyepiece and connects it to the objectives |
| Revolving nosepiece | Turret | Mechanical | Rotates to switch between objectives |
| Objective lenses | Objectives | Optical | Do the main magnifying (4x, 10x, 40x, 100x) |
| Arm | Limb | Mechanical | Supports the head; the carrying handle |
| Stage | Specimen platform | Mechanical | Holds the slide |
| Stage clips / mechanical stage | Slide holder | Mechanical | Secure the slide; the mechanical stage moves it precisely |
| Condenser | Abbe condenser | Optical | Gathers and focuses light onto the specimen |
| Iris diaphragm | Aperture diaphragm | Illumination | Controls the amount and angle of light, and contrast |
| Field diaphragm | — | Illumination | Limits the light beam near the light source |
| Light source | Illuminator | Illumination | LED or halogen lamp in the base |
| Coarse focus knob | Coarse adjustment | Mechanical | Fast, large focus movements |
| Fine focus knob | Fine adjustment | Mechanical | Small, precise focusing |
| Diopter adjustment | Eyepiece focus ring | Optical | Compensates for differences between your eyes |
| Base | Foot | Mechanical | Stable foundation; houses the illumination |
The 12 vs. 14 Parts Question
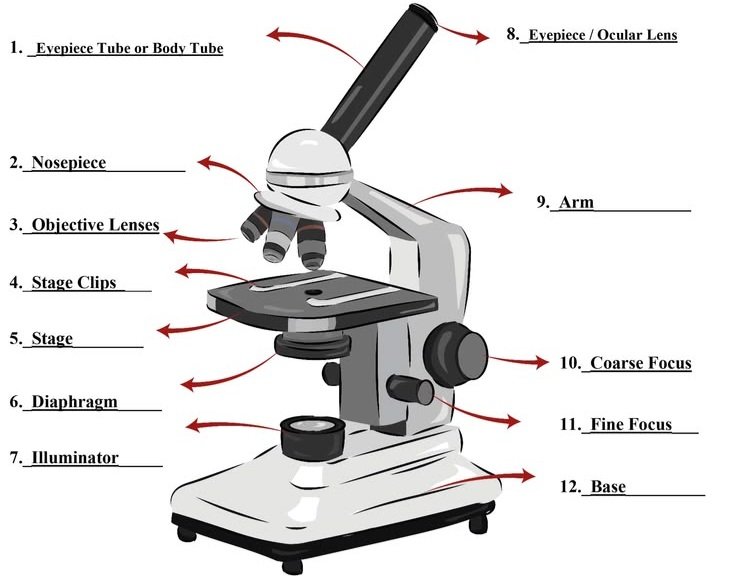
Teachers often ask for “the 12 parts of a microscope,” and others ask for 14. Both are right, because lists differ in how they count.
One common 12-part list is: eyepiece, body tube, nosepiece, objective lenses, arm, stage, stage clips, diaphragm, light source, coarse focus, fine focus and base. Here the objectives count as a single group.
The 14-part version usually appears when the objective lenses (scanning, low power and high power) are listed separately instead of as one group. Some lists also swap in the condenser or drop the body tube.
The safest approach: Match your teacher’s or textbook’s list. If it isn’t specified, label the full set in the table above and use the aliases in brackets.
The Three Part Groups
Sorting parts into groups makes memorizing much easier.
Optical parts: they bend light and magnify
- Eyepiece (ocular)
- Objective lenses
- Condenser
- Diopter adjustment (on binocular heads)
Mechanical (structural) parts: they support and position
- Head and body tube
- Arm
- Base
- Revolving nosepiece
- Stage, stage clips and mechanical stage
- Coarse and fine focus knobs
Illumination parts: they control the light
- Light source
- Iris (aperture) diaphragm
- Field diaphragm
- Filters
Memory shortcut: optics magnify, mechanics hold, illumination reveals.
Optical Parts in Detail
Eyepiece (ocular lens)
The eyepiece is the lens you look through. Most are 10x, though other powers exist. Some include a pointer or a measuring reticle.
Binocular microscopes have two eyepieces. Trinocular heads add a third port for a camera.
Diopter adjustment and interpupillary distance
Your eyes are rarely identical. The diopter ring on one eyepiece lets you correct for that difference so both eyes are sharp at once.
Interpupillary distance is the gap between your pupils. On a binocular head you slide the eyepiece tubes closer or farther apart until the two views merge into one circle.
Why it matters: Skipping both adjustments is the number one cause of eye strain during long sessions.
Objective lenses
The objectives sit on the nosepiece and do most of the magnifying. Most compound microscopes carry three or four.
| Objective | Common name | Typical use |
| 4x | Scanning | Locating the specimen |
| 10x | Low power | General viewing |
| 40x | High power | Cell-level detail |
| 100x | Oil immersion | Bacteria and very fine structure |
Many manufacturers use colored bands on the barrel to identify power quickly. Red is commonly 4x, yellow 10x, blue 40x and white 100x.
How to decode the markings on an objective
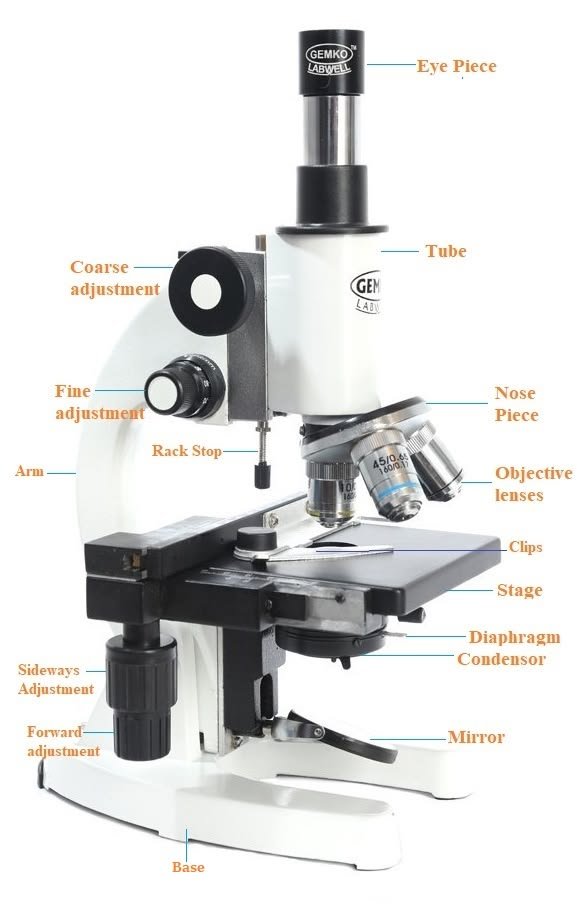
The side of every objective is engraved. A typical example reads 40x/0.65 160/0.17.
- 40x is the magnification.
- 0.65 is the numerical aperture (NA), which sets how much detail the lens can resolve.
- 160 is the tube length in millimetres. Infinity-corrected objectives show an infinity symbol instead.
- 0.17 is the coverslip thickness in millimetres the lens is designed for.
- Oil means the lens needs immersion oil.
Magnification makes things bigger. Resolution makes them clearer. A high-NA objective separates two close points. A low-NA objective at high magnification just gives a larger blur.
Condenser (Abbe condenser)
The condenser sits under the stage. Named for physicist Ernst Abbe, it gathers light from the source and focuses it into a cone on the specimen.
Beginners often ignore it, but a poorly positioned condenser is a common cause of dull, flat images. If your image looks washed out, check the condenser before blaming the lenses.
Total magnification
Multiply the eyepiece power by the objective power.
- 10x eyepiece × 4x objective = 40x
- 10x eyepiece × 10x objective = 100x
- 10x eyepiece × 40x objective = 400x
- 10x eyepiece × 100x objective = 1,000x
A light microscope cannot resolve detail much finer than about 0.2 micrometres, however high the nominal magnification. Beyond that, you’re enlarging blur.
Mechanical and Support Parts in Detail
Base, arm and head
The base is the heavy foundation. The arm rises from it and carries the head. Together they form the frame.
Carrying rule: Always use two hands, one gripping the arm and one supporting the base. Keep the instrument upright and close to your body.
Revolving nosepiece
The nosepiece rotates to bring each objective into the light path. Turn it until you feel a click. Grip the nosepiece itself, not the objectives, to avoid knocking lenses out of alignment.
Stage, clips and mechanical stage
The stage holds the slide. Simple models use spring clips. Better ones have a mechanical stage with two knobs that move the slide left-right and forward-back with precision.
At 400x, even a tiny movement shifts the specimen out of view. A mechanical stage makes high-power work practical.
Coarse and fine focus
The coarse knob moves the stage or head in large steps. Use it only with the 4x objective.
The fine knob moves in tiny increments and is the only knob you should touch at 40x and above.
Illumination Parts in Detail
Light source
Modern microscopes mostly use LED illumination. LEDs run cool, last long and give consistent color. Older instruments use tungsten-halogen bulbs, which produce more heat.
Some historic and low-cost microscopes use a mirror to reflect ambient light into the tube. Never aim a mirror at direct sunlight. It can cause permanent eye damage.
Iris diaphragm and field diaphragm
These two are often confused.
- Iris (aperture) diaphragm: sits at the condenser. It controls the angle and amount of light, which changes contrast and depth of field.
- Field diaphragm: sits near the light source. It limits the width of the beam so light doesn’t scatter outside the area you’re viewing.
Closing the iris diaphragm boosts contrast, which helps with transparent, unstained specimens. Opening it fully washes them out.
Köhler illumination
Köhler illumination is a method, developed by August Köhler, for aligning the field diaphragm and condenser so the specimen is evenly lit. Research-grade microscopes are built around it, and it is well worth learning for serious work.
How the Parts Work Together: The Light Path
- The light source emits light.
- The field diaphragm and condenser shape and focus it.
- Light passes through the specimen on the stage.
- The objective lens collects it and forms a magnified image.
- The eyepiece magnifies that image again for your eye.
Most quality microscopes are parfocal, meaning the image stays roughly in focus when you change objectives. Many are also parcentric, which keeps the specimen near the center of view.
As you increase power, three things change: the field of view narrows, the working distance (the gap between objective and slide) shrinks, and the depth of field becomes thinner. That is why careful focusing matters more at high power.
Microscope Parts by Type
Not every microscope has the same parts.
| Microscope type | Key differences |
| Compound light | Eyepiece, multiple objectives, condenser, diaphragm; transmitted light through thin specimens |
| Stereo (dissecting) | Two separate optical paths for a 3D view; lower magnification; often top and bottom lighting |
| Digital | A camera sensor replaces or supplements the eyepiece; images appear on a screen |
| Inverted | Objectives sit below the stage, ideal for viewing cell cultures in dishes |
| Electron (SEM/TEM) | Electron source, electromagnetic lenses, vacuum chamber and detector; no glass lenses or visible light |
Exam note: Check whether your course expects a light or an electron microscope diagram. They are labeled completely differently.
Using the Parts Correctly: Step by Step
- Carry the microscope with both hands, one on the arm and one on the base.
- Plug in and switch on the light source.
- Rotate the nosepiece to the lowest-power (4x) objective.
- Place the slide on the stage and secure it.
- Watching from the side, lower the objective close to the slide with the coarse knob.
- Look through the eyepiece and turn the coarse knob slowly until the image appears.
- Sharpen with the fine focus knob.
- Adjust the iris diaphragm for the best contrast.
- Center the specimen, switch to 10x and refocus with the fine knob.
- Repeat at 40x, using only the fine knob.
- When finished, return to the lowest power, remove the slide, switch off, and cover the microscope.
Why start on low power? It has the widest field of view and the longest working distance, so the specimen is easier to find and the slide is safer.
Troubleshooting: Diagnose Problems by Part
| Problem | Likely cause | Fix |
| Blurry image at every power | Dirty eyepiece or objective | Clean with lens paper only |
| Image sharp in one eye only | Diopter not set | Focus with one eye, then adjust the diopter ring |
| Flat, low-contrast image | Diaphragm too open or condenser misaligned | Close the iris slightly; reposition the condenser |
| Dark image | Low light or closed diaphragm | Raise brightness; open the diaphragm |
| Lost specimen when switching power | Not centered or not refocused | Return to low power and recenter |
| Poor quality at 100x | No oil or wrong oil | Add immersion oil to the slide |
| Uneven lighting | Field diaphragm or condenser off | Adjust the field diaphragm |
Common Mistakes and Warnings
- Using the coarse knob at high power, which can crack the slide and damage the objective.
- Touching lenses with fingers. Use lens paper only.
- Using oil on a dry objective, or skipping oil at 100x.
- Confusing magnification with resolution.
- Storing the microscope with a high-power objective down.
- Pointing a mirror at the sun.
Measuring with a Microscope
A stage micrometer is a slide with a precise ruler etched on it. A reticle is a scale fitted inside the eyepiece. Together they let you calibrate the eyepiece scale at each objective and measure specimens in micrometres.
This is standard practice in labs and a useful extension for advanced students.
Choosing a Microscope by Its Parts
If you’re buying for a classroom, lab or household, focus on parts rather than headline magnification.
| If you need to view | Prioritize |
| Cells, bacteria, stained slides | Compound scope with quality glass objectives, a condenser and a mechanical stage |
| Insects, rocks, coins, circuit boards | Stereo microscope with a wide working distance |
| Group teaching or image capture | Digital or trinocular model |
| Living cultures in dishes | Inverted microscope |
Features worth paying for
- Glass (not plastic) objectives
- Metal frame
- LED illumination
- Adjustable condenser and iris diaphragm
- Mechanical stage
- Diopter adjustment on binocular heads
Pros of compound microscopes: high magnification, excellent detail, affordable entry models.
Cons: flat 2D image, thin specimens only, short working distance.
Pricing and buying locally
Prices span a wide range. Student-grade, laboratory-grade and research-grade instruments differ greatly in cost, driven by optics quality, build and service. Get written quotes from suppliers in your region before deciding.
If you search for a “microscope shop near me,” expect educational supply stores, laboratory equipment dealers, university procurement suppliers and online marketplaces. Check these before buying:
- Voltage and plug compatibility (a mismatch can damage the illuminator)
- Availability of replacement bulbs, objectives and slides locally
- Warranty and service coverage, including on-site service in your area
- Import duties if the seller ships from overseas
Institutional buyers should also ask about authorized-distributor status and calibration support.
Care, Cleaning and Storage
- Wipe lenses only with lens paper and a suitable lens cleaner.
- Clean immersion oil off the 100x objective right after use.
- Return to the lowest power and lower the stage before storing.
- Turn off and unplug when finished.
- Cover the microscope to keep out dust.
A Short History
Robert Hooke published detailed microscope observations in the 1600s, and Antonie van Leeuwenhoek used single-lens instruments to see bacteria and other microorganisms. Ernst Abbe advanced lens theory and condenser design in the 1800s, and Köhler’s illumination method followed. Modern makers such as Zeiss, Leica, Nikon and Evident (formerly Olympus) build directly on that tradition.
Exam Notes by Region
Requirements vary by curriculum.
- GCSE / IGCSE: expect labeled light microscope diagrams, magnification calculations and comparisons with electron microscopes.
- CBSE / ICSE: often ask for a labeled diagram plus a function of each part.
- AP Biology / IB Biology: emphasize magnification, resolution and the light path.
UK and Commonwealth sources typically say “eyepiece” and “labelled,” while US sources often say “ocular” and “labeled.” Learn both.
Self-Quiz: Test Yourself
- Which part holds the objective lenses?
- Which knob should you never use at 40x?
- What is the total magnification with a 10x eyepiece and a 40x objective?
- Which part focuses light onto the specimen?
- What does the diopter ring adjust?
Answers: 1. Revolving nosepiece. 2. The coarse focus knob. 3. 400x. 4. The condenser. 5. The focus difference between your two eyes.
Frequently Asked Questions
1.What are the main parts of a microscope?
The main parts are the eyepiece, objective lenses, nosepiece, stage, condenser, diaphragm, light source, arm, base and the coarse and fine focus knobs.
2.What is the function of the eyepiece?
It magnifies the image formed by the objective so you can view it. Most eyepieces are 10x.
3.What is the difference between coarse and fine focus?
Coarse focus makes large, fast adjustments and is for low power only. Fine focus makes small, precise adjustments and is used at every power.
4.What does the diaphragm do on a microscope?
It controls how much light reaches the specimen and how much contrast you see. Closing it slightly helps with transparent samples.
5.How do you calculate total magnification?
Multiply the eyepiece power by the objective power. A 10x eyepiece with a 40x objective gives 400x.
6.Which parts of a microscope magnify?
The eyepiece and the objective lenses. Their powers multiply to give total magnification.
7.What is the difference between optical and mechanical microscope parts?
Optical parts, such as lenses and the condenser, bend light to form the image. Mechanical parts, such as the arm, stage and focus knobs, hold and position the slide and lenses.
8.How do you carry a microscope safely?
Use both hands: one on the arm and one under the base. Keep it upright and close to your body.
9.What is the difference between a compound and a stereo microscope?
A compound microscope gives high magnification of thin, transparent specimens. A stereo microscope gives a lower-magnification 3D view of solid objects.
Practical User Experience
The first thing a new user notices is how much setup matters before anything is in focus. Adjusting the diopter ring and the eyepiece spacing takes a minute, but afterwards both eyes see one sharp circle, and longer sessions feel less tiring.
Focusing is simple once you get used to the two knobs. The coarse knob is quick for finding the specimen at 4x, and the fine knob handles everything after that. At 40x the fine knob feels sensitive at first, so slow, small turns work best.
A mechanical stage makes the biggest difference in everyday use. Nudging a slide by hand at 400x sends the specimen out of view, while the stage knobs keep it steady and make high power practical.
The condenser and iris diaphragm take some patience. Transparent specimens can look flat until the diaphragm is closed slightly, and it’s easy to underestimate how much that changes contrast. Once it’s set, the image looks clearer without touching the lenses. LED illumination stays cool and consistent, which helps during longer sessions.
There are some limitations. The image is flat and 2D, only thin specimens work, and the working distance gets short at high power. The 100x objective needs oil, which adds a step and some cleanup. Re-centering and refocusing after each objective change also takes a few rounds to feel natural.
Overall, the microscope feels easy to handle once the basics click. The glass objectives, a proper condenser and a mechanical stage seem to matter more to daily comfort than the magnification number.
Conclusion
Every microscope part does one of three jobs: magnify, support or illuminate. Learn the groups first, then the individual names and aliases, and any labeled diagram becomes easy to read.
To lock it in, redraw the diagram from memory, work through the self-quiz, and practice the step-by-step routine on a real slide. If you’re buying, choose by parts: glass objectives, LED illumination, a proper condenser and a mechanical stage matter more than a big magnification number.
Unfulfilled Points: Original high-resolution labeled/unlabeled diagrams, a downloadable printable, video, schema markup, and an author/reviewer byline could not be produced in a text-only article. Specific pricing figures and standards citations (such as ISO numbers) were left out because they need verified sources.
These information are gathered from different surveys, medical tests and tech giants like Techradar and more. Our top priority is to provide you valuable information about Microscope Parts Labeled.
For More Details About Different Digital Microscopes Click Here